My Bricklink Designer Program Round 4 Picks

I’ve been writing about the Bricklink Designer Program that kicked off in 2023 for a while. I’ve voted on the last three rounds and a few of my picks are being turned into sets in the program. At the time of this post, Round 1 pre-orders just kicked off. Hopefully you survived the 30 minute website outage to grab the set(s) that you were interested in. Round 4 voting just kicked off and ends on 16 February. Like many of the past rounds, there are a lot of modular type buildings, castles, pirates, and some space items. This round also includes a number of Winter Village themed sets which corresponds to palette being released 1 December for a mid-January submission timeframe.

I made a few picks and listed them below. I also made sure to give all five “Love It” votes.


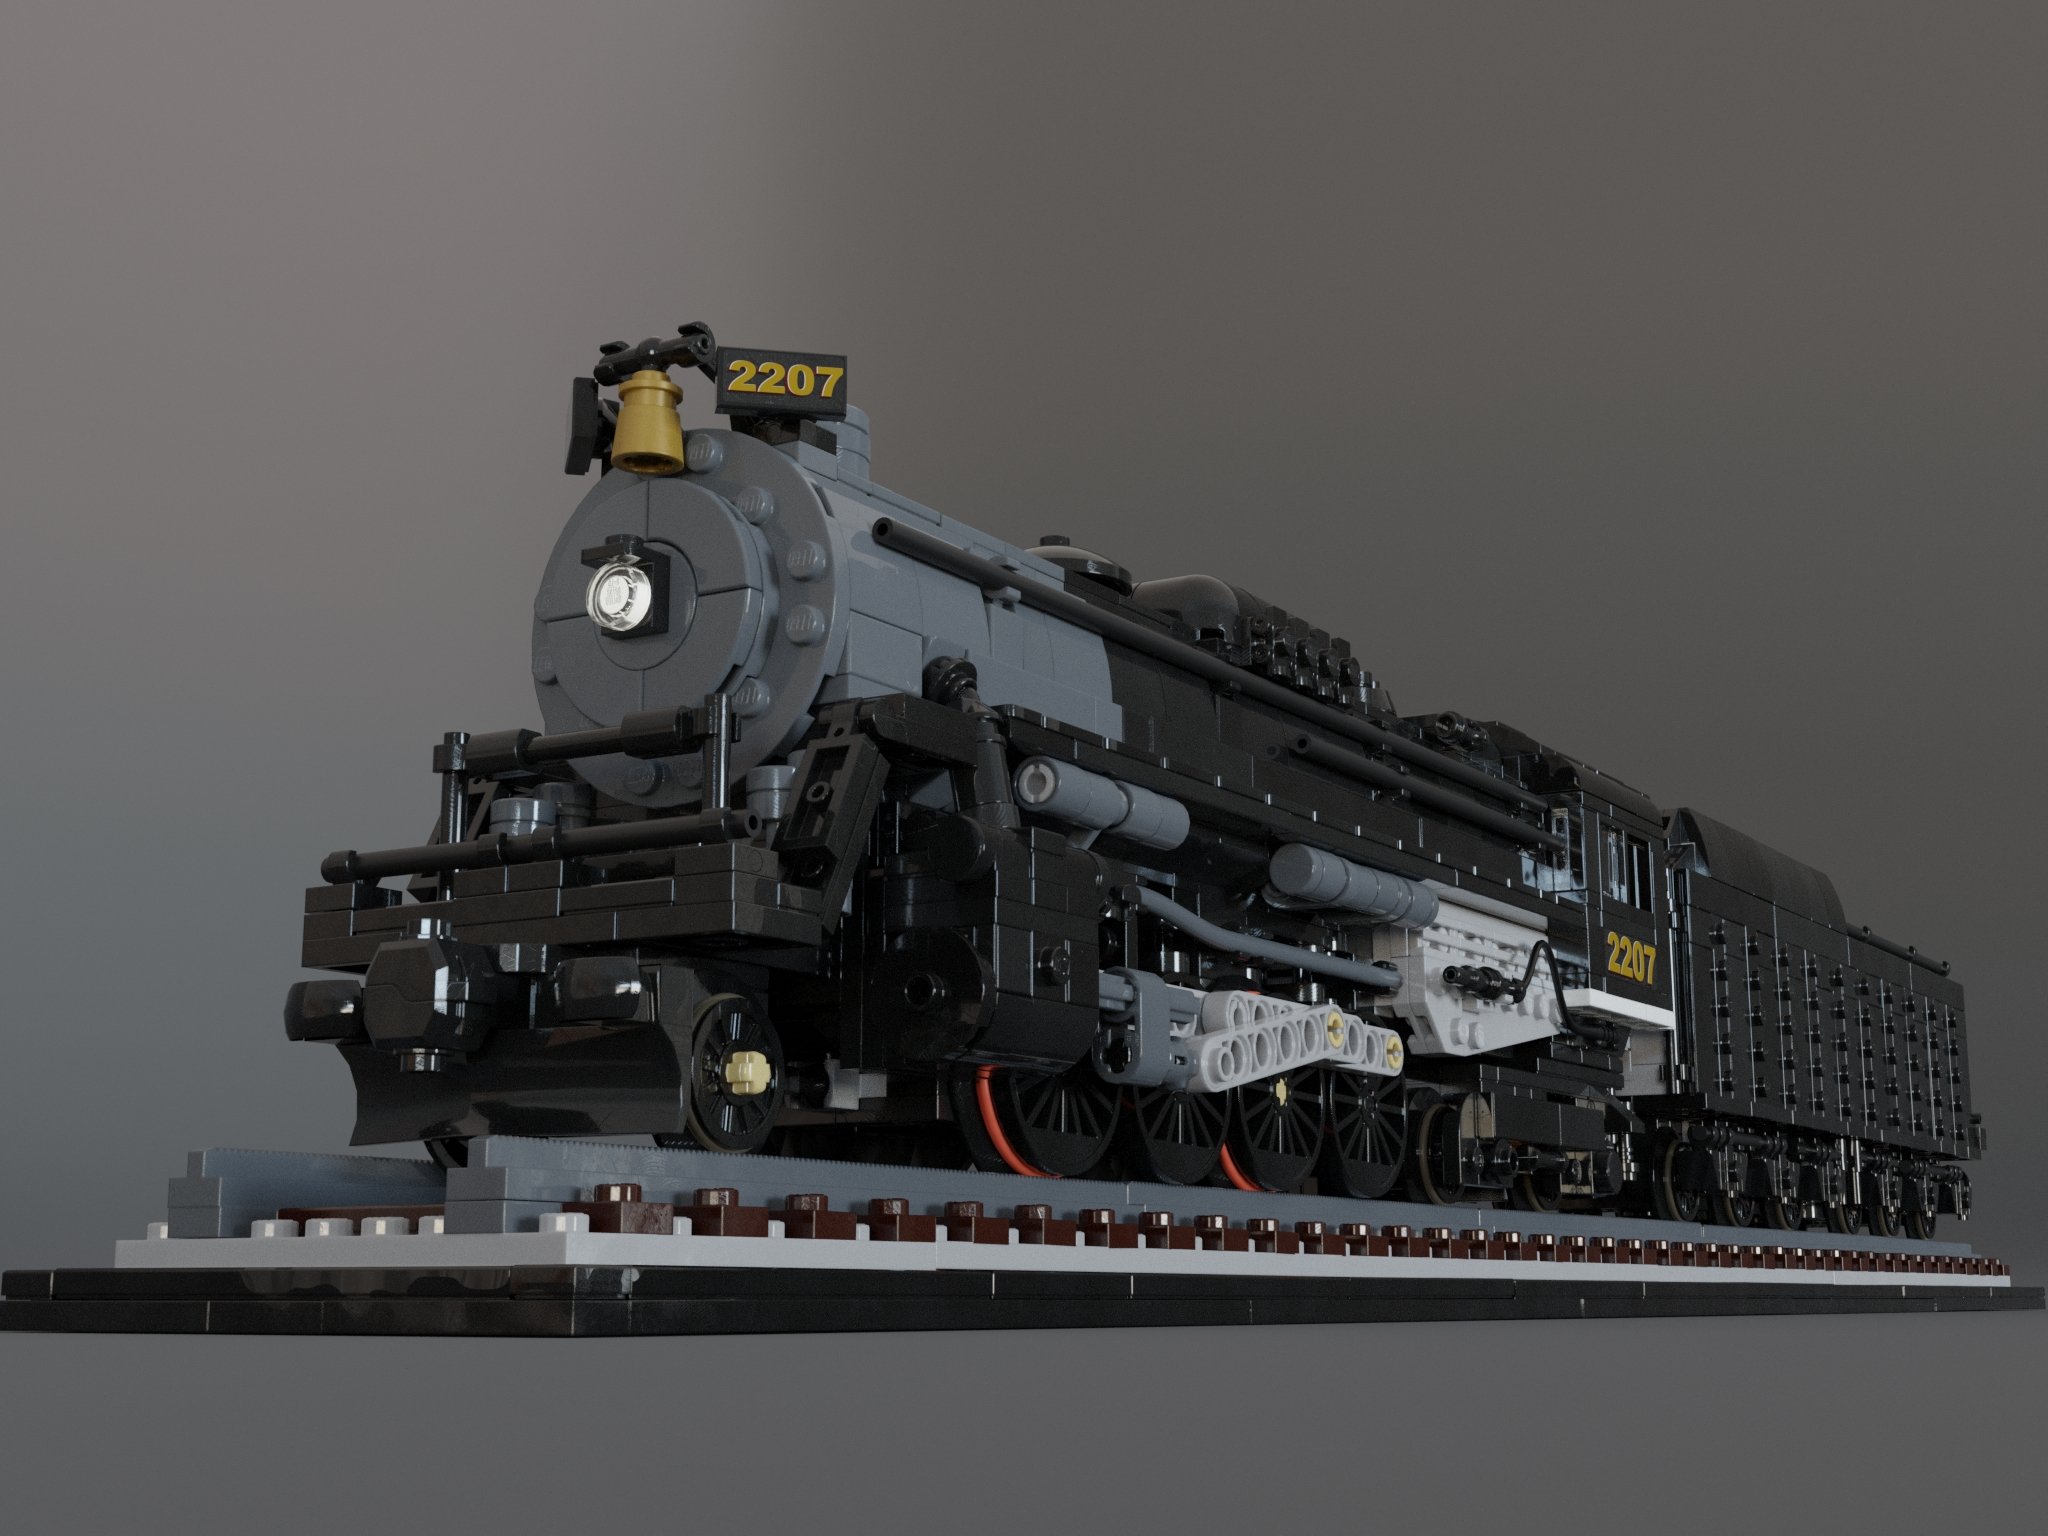
The first one is American Steam Locomotive by designer stijnd which is made up of 2,143 pieces. The fan community has been pushing for some awesome looking steam engines and I think this one would be a great addition to the lineup. I know trains aren’t the most popular theme, but this one has some great detail and would fit in this program instead of the main lineup through LEGO Icons or Ideas.


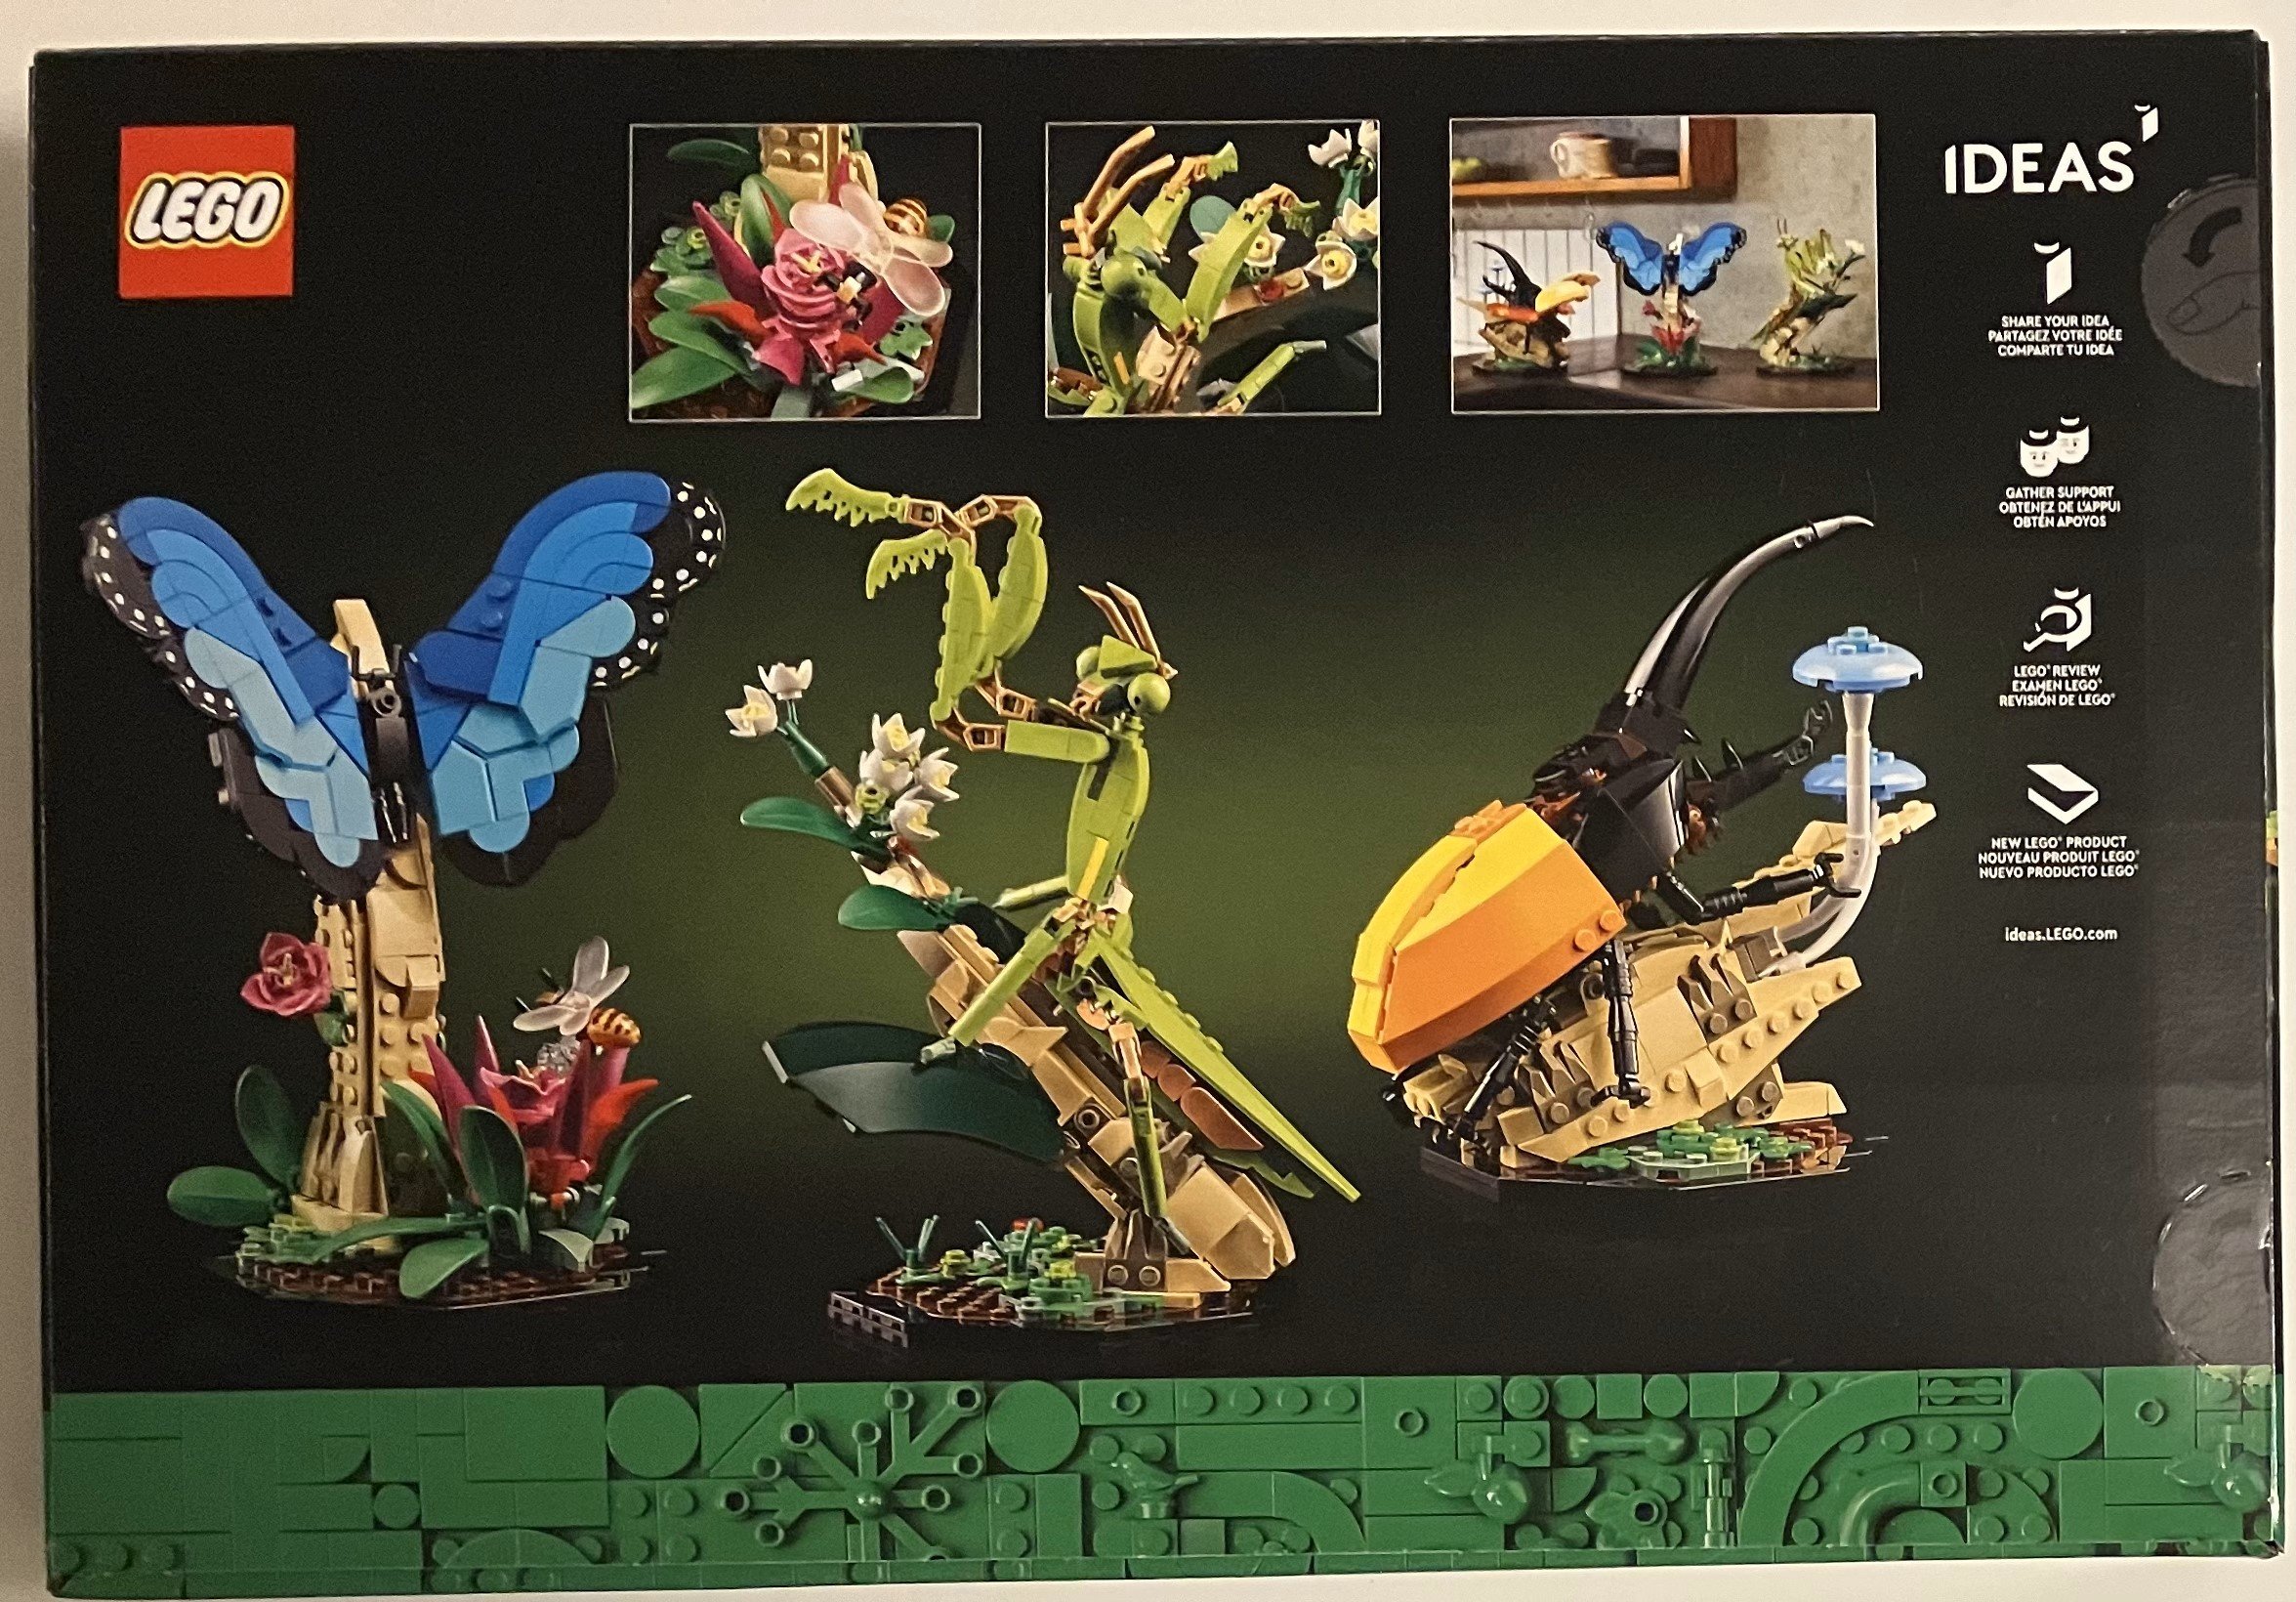
The next pick is called Blooming Bouquets. It’s by designer JackBrickLover and contains 757 pieces. While it’s on the smaller side for a modular building, I think every city could use some smaller buildings and our wallets could use some smaller sets on the cheaper side. This one still has a lot of great details and is very bright and has a good mix of colors. I like the flower on the top of the building with the butterfly.


Fire Truck is by designer KingCreations and packs a lot of detail into a build with only 412 pieces. The City theme gives us a ton of fire vehicles with new ones released each year, but we have yet to get one with this much detail and functionality. This would go great in any City layout and even includes two minifigures. As an added bonus, 412 pieces shouldn’t break the bank. Maybe $45? Please vote for this one like I did!


I had to throw in a building/modular. Here’s the Old City Canal by lukreate. It contains 3,742 pieces and is the front facade of a section of a city around a canal. While it’s not a true modular, it still has a lot of fun details and can be rearranged to give it some different views. Downsides are the high piece count (high price) and a bunch of stickers, but I think it looks pretty cool!


My last pick is The Northern Ambassador Limited by NewEletia45. This one contains 2,272 pieces. The engine looks pretty similar to the the Emerald Night or at least the wheel assembly looks similar. I like the addition of two passenger cars as well. I doubt we’d get the fans to vote for two, but I’ll hedge my bets and pick two while really hoping for one (and I’ll probably get none, but that’s okay).

Please vote for your favorites! Happy building!

We Need More Teens Like This One in Texas

Are you sick of seeing all the negative stories in your news feed? Me too. How come we aren’t seeing more like this one? After being a victim of porch thieves and losing a LEGO set that she ordered, Leah decided instead of getting mad about it, that she could help others get LEGO sets to build with. The linked clip from the San Antonio, Texas area highlights her story and the folks that stepped in to help her achieve her goal. Awesome stuff! I hope she continues.

If you’d like to support Leah’s effort, you can donate online through this link to the San Antonio Independent School District. As the article states, please put “Leah’s Lego Kits” in the comments.

If you know of a cool giving opportunity involving the LEGO brick, please pass it along so I can share it on the blog. You can email me at store@bricksforbricks.com or put it in the comments.

Also you can give to The Chalk Guy LEGO Service Project by ordering from the Bricks for Bricks Bricklink Store or our eBay store.

Happy building!

Set Review - #10321-1: Corvette - LEGO Icon

The LEGO Icons line has been kicking out some classic cars pretty regularly at a similar scale and 2023 was no exception with #10321-1: Corvette. This is the classic 1961 version according to the instructions. This set was released on 1 August 2023 and retails for $149.99 in the US. With 1,210 pieces, it works out to $0.124 per piece which is pretty steep. There are a lot of larger pieces and some non-standard ones so I’m sure that added to the cost. I grabbed this one before Christmas from LEGO when they were offering 3X Insider Points so it was a slightly better deal. Still, look for opportunities to grab this one at a discount or with something better than just the standard high price.

The box showed up in a cardboard box designed for the set which was slightly damaged during shipping. The front shows the set with the Corvette logo, Chevrolet logo, Icons logo, and 18+ greebling. The back gives some additional shots of the vehicle and a schematic with dimensions.

The box contains nine individually numbered parts bags, a bag with the wheels, and then I got two of the new paper bags with the two windshields in them. The instructions come in a paperboard envelope for protection.

The instruction book has a few details about the vehicle and the set in the front before launching into the build. Sadly, this set comes with stickers. Thankfully, they’re all pretty small and add some decent detail to the set overall.

Bags one and two start with the chassis of the vehicle. There are a lot of Technic beams and pins that get connected together before you start to attach pieces that will contain the outer mold line of the vehicle.

Bag three gets some of the trunk built along with a bit of the front.

Bag four adds more of the trunk space along with some of the curves. When I started this build, we had a few days of nice weather before the cold spell that hit the US and I brought a table to build outside while my kiddos played with friends. A neighbor who walked by saw the box and said “That’s LEGO? Wow!” I agree. It’s not the blocky, rectangular sets we’re used to. There are a lot of curves to make this a smooth vehicle. The question I have is whether it’s too far. While I think the vehicle looks sleek, have we gotten too far away from the LEGO concept where we are not making whatever parts we need to get the shapes we desire? I’m not sure there is a wrong answer here. It’s really up to the fan base.

Back to bag four… you add stickers to the license plates. You get three so pick what you like. Also, the bumper includes some gray banana pieces which is a fun detail.

Bag five adds some details to the front of the car to include the mechanism for the steering column. It’s pretty similar to past vehicles, but that’s okay. I don’t buy Icons sets for functionality. It’s more of an added bonus. If you want functionality, go for Technic sets.

Bag six builds the sides of the front of the car to include the wheel wells. You also add in the bumper which includes more gray banana pieces.

The seventh bag adds in headlights using a piece that I haven’t seen used before. Maybe it’s new? You also add the curvature to the top of the car over the wheels in the front. You add in some tiles which are printed to get the racing stripe look. This bag also adds in both doors. They are built in a similar way only mirrored. You use some interesting techniques to build them, but there are more pieces which seem a bit specialized so you be the judge here.

The eighth bag adds the front hood and trunk in the back. The hood in the front opens from the back up versus the front. The fit didn’t seem quite right to me and I’m not sure if I did it wrong or that’s just how it’s intended. Also, the hood piece doesn’t stay onto the assembly that connects to the front of the car real well as you open/close it. The hood has some larger curved tile like pieces… again, helps the model look great, but seem to be rather specialized. I forgot to get a picture here, but you’ll see the engine parts next. You build an engine with this bag. The trunk is added as well. There is a small Technic piece that is loose that seemed out of place that you added in earlier. This piece is used to help you open the truck as it is hard to do otherwise. A smart move and it doesn’t really stand out so I appreciate the effort. There is a sticker on the trunk and I think I centered it okay.

I also failed to take pictures of the seats, but they get added here too.

Here’s the final build with a few picture of the final vehicle. Bag nine adds in the windshields, roof, an antenna, and the steering wheel. Overall, it’s a sleek looking build. I’ve already complained enough about the specialized parts. I enjoyed the build, but wasn’t so sure about all the parts. Also this car is a bit overpriced considering the piece count. The 3X Insider Points along with GWPs helped encourage me to grab this one, but I wouldn’t buy it without multiple promotions.

What are your thoughts on this one? Could have been better? Just right? Awesome?

Happy building!

Set Review - #10325-1: Alpine Lodge - Winter Village - Icons

The Winter Village theme continues with 2023’s Alpine Lodge. This set gets away from Santa and elves and is just a fun winter scene with some Christmas decorations included. The set was released for sale on 1 October 2023 and retails for $99.99. With 1,517 pieces, it works out to $0.066 per piece. LEGO has managed to keep the price of this set at the same range for quite a while now and the price per piece one this one makes it seems like a good deal even with a light brick included.

The front of the box shows the full set built from the front side. The back shows the other side of the set, some play functions of the set, and gives dimensions of the set once it’s built.

The set contains 10 numbered parts bags, two instruction booklets, and a small sticker sheet.

The instructions are designed so that you can build together. One person can work on the lodge itself and another can work on the ice skating area, snow mobile, tree, and out house. I built this set with my 6-year old. I found pieces for him and did some building, but he put most of it together without too many issues.

Only four stickers so not too bad. It could be worse. The stickers add some fun details to the set so I can’t complain there.

The first bag builds some of the smaller items in the set. This includes a snow mobile pulling a sled, an out house, and then a tree. It seems that every year the LEGO designers come up with another way to make a Christmas tree and this year is no exception. The sled attached to the snow mobile can pull minifigures or you can place the tree on top to carry it to the lodge. The outhouse is a simple design and looks like one should with a hole for taking care of business. There is a small tree next to it which is built using the fern pieces. The top pieces are white for snow. This bag contains a female minifigure with gray hair. She comes with a cap and goggles for driving around on the snow mobile.

Bag two builds a small ice skating area. It reminds me of the skating area from set #80109-1: Lunar New Year Ice Festival. There are translucent wall pieces placed on their side for the ice and then you use plates to create a shape around the ice for them. It’s a small skating area, but it gets the job done. There is a small dock leading to the pond. The dock has minifigure snow foot prints on it which is a fun detail. There is a table with some ice skates that I assume you are supposed to rent given the $100 bill that comes with the bag and is placed next to the skates. There are also two trees. One is a small molded tree and the other is similar to the one from bag one with the fern pieces. This bag come with one kid minifigure who has a hockey stick and puck. The minifigure comes with a hat and scarf as well as a hair piece. There is a small snowman like figure in the build as well. My kiddo thought the hair should go on the snowman.

Bag three starts the lodge. You start with the front wall which includes an arched doorway and a window. There are some good details here including the shutters, some plants as decor, the lamps around the door, and the use of textured bricks and different bricks to show details on the walls. This bag comes with a male minifigure who we can assume runs the lodge.

Bag four continues on this floor with the start of the chimney, a stack of logs, and building up some of the wall.

Bag five starts to add some structure on top of the walls so you can get to the next floor. You also get some details on the inside to include some chairs with a table, a drink and cookie area, and a guest sign in log. This bag comes with a female minifigure who we can assume is a guest at the lodge. She has a suit case. There is a small gray cat as well.

Bag six starts the next floor with building up the walls. This is where the use of the new-ish rounded pieces comes into play to create a log cabin effect. I like how they did this and overlapped them to make it look like they are stacked on each other. This bag also builds a small bird house with a red bird on the perch outside.

Bag seven builds the rest of the outside (seen in my picture for bag eight) and then details on the inside to include two beds, some night stands, and a dresser. There is a door that goes out to a balcony area and like the dock at the pond, there are two snowy minifigure footprints where a minifigure didn’t wipe their feet good enough.

Bag eight adds more to the chimney and some structure on top of the second floor. As mentioned, you can see how they finished up the log cabin look on the second floor. The light brick is buried in the chimney and my kiddo was concerned he wouldn’t be able to reach it to turn it on. More to follow there.

Bag nine adds the pitch of the roof, some decorations outside, and a Technic sub assembly that allows the roof to be attached on the front section. On the inside, there is a a bed, some furniture and a gift box with some binoculars inside. This bag also completes the chimney. You build up the outer section of the chimney and then a top to the chimney that you can press in to push in the light brick and light up the fire place.

The tenth bag wraps up the build. You add the roof onto the lodge. The front part of the roof attaches to the Technic sub-assembly from the last bag. The rest of the roof attaches to some Technic parts which connect to the lodge. All the roof is made of white pieces to represent snow.

Additionally, this build includes pieces to add a tree skirt and then put decorations on the tree built from bag one. They are just multiple colors of round 1x1 translucent tiles, but they work for decorations.

Not the best picture, but you can see how the light brick lights up a window on the second floor and then the fireplace on the first floor. This is a different from the usual usage of light bricks that light up one section/area of a build.

This build comes with five minifigures. They aren’t super out of the ordinary, but it’s a good mix for playability. For some context, last year’s set had six minifigures and the previous year’s set had four.

Here is the final build. I like where the design team went with the set this year. The price remained the same from the previous year, there are a decent number of pieces, there is some good playability with the set, and it comes with some good pieces. I definitely recommend this one if you haven’t been sucked in by the Winter Village sets already.

Happy building!

Set Review - #10318-1: Concorde - LEGO Icons

LEGO has gone into some different directions over the past few years and this set is another venture into something we haven’t seen before. #10318-1: Concorde is a model of the first supersonic, commercial airliner the world has seen. This set was released in the US on 4 September 2023. It contains 2,038 pieces and retails for $199.99. At that price, it works out to $0.096 per piece which is right about the 10 cent per piece average we all tend to use as acceptable for a set.

I ordered my set online from LEGO Shop @ Home. It arrived in it’s own box with some damage to the shipping box that caused damage to the set box (thanks UPS!). Nothing major and the set was still intact, but kind of disappointing.

The front of the box shows the full set built minus the stand. It has the set name printed in the same font as printed on the aircraft. It also contains the Airbus logo. The box back includes some cut aways of the set to show what it looks like inside the various parts of the set. It also has a diagram showing the length of the set and a picture of the actual aircraft.

The set contains 12 parts bags and then another box inside with more parts bags. In the end you get 21 numbered parts bags with one bag per number. You also get a paper bag with the cockpit wind screen. This is my first look at the new paper bags. They look okay to me. I’m glad LEGO made the switch to something a little more Earth friendly. The instruction book comes in a paperboard envelop so it’s nice and protected.

The instruction book includes details on the aircraft, its design, and information on the LEGO design team.

Bag one starts off the build of the wing. It starts with the back of the wing and starts to move forward. The center of the wing box starts to build the hardware that will work the landing gear movement.

Bag two continues to move forward with the delta wing and Technic pieces to continue the gear mechanisms. Additionally, you build some orange pieces into some parts that help you build the wing assembly. These pieces clip on and are removed later on in the build.

I failed to take separate pictures of bags three and four. They build out the wing further and you get some of the main hardware of the rear landing gear assemblies.

Bags five and six continue to build out the wing box and the center fuselage section with the landing gear mechanisms. The bag five picture is of the top of the aircraft and the bag six picture is the bottom of the aircraft.

The orange build support pieces are removed at the end of bag six. Bag seven continues the wing build and adds on some larger pieces as the top of the fuselage. These pieces have printed windows on them. Bag eight continues the wing, Technic parts, and fuselage.

Bags nine and 10 build the forward edge of the delta wing and then the front fuselage section of the aircraft without the nose section. The bag 10 picture shows the place where the front landing gear will be stowed. For bag 10, you really had to pay attention to how the Technic pieces were assembled, but I think the instructions did a good join pointing that out. You install more orange plates for ease of build in bag 10. These are removed shortly, but they help to keep the set together during assembly.

Bags 11 and 12 start to look more like an aircraft with the wing compete. You also start to build the fuselage out more. Bag 12 includes a small section of the passenger compartment with two bathrooms and some seats. This is the only section of the aircraft with an interior and I’m okay with that. It’s a display model and not a play model (in my opinion).

Bag 13 adds in the wheels and completes the landing gear. The Technic axle in the rear of the aircraft is what will spin to raise and lower the gear. It’s an impressive assembly and I’m a fan of how the design team put it together.

Bags 14 and 15 add the engines on either side of the aircraft. The builds are mirror images of each other, but the slight repetition wasn’t too bad.

Bag 16 begins the cockpit assembly. It doesn’t look like much when completed as you can see, but it will come together in the next bag.

Bag 17 finishes the cockpit area along with the paper bag that was included with the windscreen piece. I was thankful for the printing and no stickers. The set is mostly white, but the red stripe and logo help to distinguish the set. As advertised, the nose does the “droop snoot” movement like the actual Concorde did which is some great functionality for the large set.

Bags 18 and 19 add the tail section of the fuselage. Bag 18 is mostly internal structure and then bag 19 adds the external panels and connects the section with the rest of the aircraft. Spinning the tail cone section will raise and lower the landing gear.

Bag 20 completes the aircraft. This includes the ailerons and flaps on the main wing, the tail, and rudder. This is all minor functionality, but another great addition to the model to make it seem more realistic.

Bag 21 finishes the build with a stand. Despite the massive size of the model, it all sits rather well on this small stand. The stand also includes a printed tile with studs on the back. So glad that it wasn’t a sticker!

Here’s the final monstrosity. It was a great build and I think it looks incredible. Despite the abundance of white pieces, there are a lot of great pieces for future MOCs (inside) if that’s what you do with your sets. I really enjoyed this one and would recommend it to anyone, but I will say that you need to consider your space limitations. It’s big and finding a spot for it could be a challenge if you don’t have a dedicated LEGO display location. Maybe hanging it from a ceiling would work? I haven’t found a spot for it yet.

I think it would be great if LEGO did more sets like this one. Is anyone else on board with that thought?

Happy building!

Kids with Cancer + LEGO Sets = Joy!!!!

At least that’s the plan anyways…

V for Victory is a non-profit in the Jacksonville, FL area focused on supporting people battling cancer. One of their programs is called Bricks of Love. Kids with cancer receiving treatment get a token to go into a room and pick out a set to build or play with (some sets are pre-built).

Picture from V for Victory

This is an awesome idea and I’m sure it helps to distract kids from the not so fun task of battling cancer.

Sadly, this story takes a turn for the worst. The non-profit’s LEGO storage area was recently cleaned out by thieves. You can view the local news station’s story on it here. This isn’t the first time this has happened to a LEGO charitable organization either… Sad.

V for Victory is asking for help. They have set up an Amazon.com need cart and they are asking for folks to purchase sets there to be shipped to them to help make up for their loss. You can also go to their website and donate that way. If you’re in the local area, feel free to donate in person this weekend.

Happy giving!

Set Review - #21343-1: Viking Village - LEGO Ideas

It’s LEGO Ideas set #51! This one is #21343-1: Viking Village. It is the result of the LEGO X Target fan vote that took place in May 2022 between this design and two other designs that reached 10K votes, but were not selected during their original reviews. Thankfully, this set is not exclusive to Target as you can buy it from LEGO as well. The set was released on 1 September 2023. It contains 2,103 pieces and retails for $129.99 in the US. This works out to $0.062 per piece which is quite good.

The box is black with the 18+ greebling and the Ideas logo. The front of the box shows the front of the set while the back shows another view and some of the play features of the set.

The set contains 15 numbered parts bags and two plastic rope strands for the rope bridge. The instruction booklet is in a cardboard envelope for protection. The instructions include details about Vikings, the fan designer, and LEGO designers .

The first bag builds a base to what will be a blacksmith’s hut. Like many of the recent sets, this one does not have a base plate, but instead puts plates together to create the base. The plates are light blue to capture that this village is near the water. Bag one includes a female minifigure. She has a paint brush and a hammer which has printing on it.

The second bag adds some details to the base and then builds up the structure of the blacksmith hut area. It comes with some extra gear stored on the wall and in a barrel nearby. Additionally, there is a simple Technic built function that lets you shoot the flames up as the metal worker is working. I like the use of the decorative, curved piece colored in white as chimney smoke.

The third bag finishes up the shop area and tops it off with a roof. The roof is removable in one piece so you can get inside as you need to. There are also a number of trees and plants on the outside added in. Most have white pieces on top for snow.

The fourth bag builds a base for what appears to be a main chamber type building. It includes a small fire pit in the middle of the base. This bag comes with a male minifigure equipped with a bow and arrow and a quiver of more arrows.

The fifth bag adds in some details to include a back wall with a throne in front and then the start of a front entry way. There are a number of printed tiles in this build and thankfully no stickers. Yay!

Bag six adds more details to include the side walls, turning the fire pit into a cooking area, and adding in some cooking gear, weapons, a cup, and a small lantern. This bag also adds in a male minifigure who appears to be the lead Viking. I failed to take a picture of it, but you’ll see it later in the review.

The seventh bag adds in some banners on the walls as tiles inside, front doors that pivot open and closed, and then the pitch section to create the angled roof.

The eighth bag completes the roof. The roof is held on by gravity and includes a roof/chimney section in the center. I like the details and coloring. It’s pretty simple, but achieves the desired effect. Plus there are gold colored hot dog pieces.

Bag nine starts the base to the next section of the build.

Bag 10 adds in some pieces assembled which end up as rock stairs and then some drying fish on a pole.

Bag 11 builds more base which attaches to the base from bag nine.

Bag 12 connects the two bases and adds in a lookout tower, some kegs of a beverage, and adds a female minifigure holding a shield and ax.

Bag 13 adds a small room on top of the small hill-like structure with the steps leading up to it. There is a door to get in and a ladder to climb up. Inside are a few food items and a small shelf. The windows have an interesting design for a window awning. I like how they used rod connecter pieces of different sizes to make it work.

Bag 14 adds the rope bridge. It uses the two rope pieces included in the set and then you add each of the bridge steps. It’s a little challenging to attach it all, but I managed.

The 15th and last bag adds walls and a roof on top of the room on top of the hilly area. The roof is built in a similar style as the throne room building.

The set comes with four Viking minifigures. I used my own plates to get them to stand up. You don’t get the plates in the set (sorry). Each comes with their own weapons/gear. I like the styles and I’m glad they have fun facial expressions. While I’d always like to see more minifigures, I think four is a decent amount for this set. If you are looking for more Viking minifigures, check out the Bricks for Bricks Bricklink store to grab some more.

Here’s the final build front and back. From a price standpoint, it’s not too bad, but there are a lot of smaller pieces so that could be part of the reason for the low price per piece ratio. It is a pretty sizeable set though. When you connect the different sections it adds up to 18 inches long. The set has good playability and could easily be added to a larger Viking MOC if you wanted to. It was a fun build and has some good pieces. Not a lot of varying colors, but that’s to be expected considering the theme. Getting the four minifigures is a win too. Overall, I recommend the set. It’s a great build with a lot of potential. Maybe if you wait a year or two, it’ll even go on sale…

What are your thoughts?

Happy building!

How Many Botanical Gardens Do We Need?

On Tuesday, 19 December 2023, the LEGO Ideas team released the results of their last half of 2023 review with 71 designs under consideration. You can read the post and watch the video here. The second set listed was by Fan Designer Valentina Bima (aka Goannas89) and it’s titled “The Botanical Garden.”

Image from ideas.lego.com

It’s an awesome design with some great details and 8 minifigures. We’ll see what the final set looks like, but hopefully the LEGO designers can do it justice.

But wait…

Don’t we already have a Botanical Garden set?

We have #41757-1: Botanical Garden from the Friends theme as seen here.

I realize there are a lot of differences. Minifigures versus minidolls, one is designed as a play set while the other is a… bigger play set… maybe… and obviously size, but I’m curious as to why the Ideas team selected another Botanical Garden set when LEGO has one available already?

If LEGO is looking to appeal to a wider audience, I think they have done that already. I posted Tiago Catarino’s review video below. Around the 4:45 mark, he starts to talk about buying two of these sets and making a larger Botanical Garden. Tiago used two pieces from his collection to make it work and I have seen numerous other posts of people doing a similar thing. The Friends set has appealed to a larger audience already beyond the normal Friends fans. Why would LEGO need to try and do it again? #41575-1 costs $79.99 in the US. Two will set you back $159.98. Will this new Ideas set have more details at a lower price point? We’ll have to wait and see I guess.

Happy building!

Giving Campaign - Brick Chalk Guy - 28 November through 20 September 2024

We donated $460 worth of LEGO sets to the Chalkguy LEGO Service Project at the end of 2022. We heard from Ben Glenn and he asked if we’d be willing to run another campaign to support his organization. Our answer… of course!

From 28 November 2023 to 30 June 2024, 15% of the profits from the Bricks for Bricks Bricklink Store will support the Chalkguy LEGO Service Project. You can learn more about this project at their site here.

We look forward to sending them some sets in 2024. Thank you for your support!

Happy building!

Some of our 2022 donations to the Brick Chalk Guy drive.

Set Review - #21342-1: The Insect Collection - LEGO Idea

It’s the 50th LEGO Ideas set. I’m surprised LEGO didn’t make a big deal out of this one. Usually they celebrate all kinds of anniversaries. Oh well. #21342-1: The Insect Collection was released on 4 September 2023 for $79.99. It contains 1,111 pieces which works out to $0.072 per piece which isn’t too bad. A lot of the pieces are smaller, but some are special printed or unique pieces so that may make up for it.

For the review, the front of the box shows the three different models with the set name and Ideas logo on the top. The back shows another view of the set and some close up shots along with a display suggestion.

The set contains seven numbered parts bags. Bag one contains a piece separator. There are then four instruction booklets that come in an envelope (Thank you LEGO!). The first book gives some detail on the models and designers. Then the remaining three are for each of the builds.

The first bag begins building the Blue Morpho butterfly. It builds a base with a brick built plant or stick coming out of the base. Around the base are a few flowers and other plants and leaves.

The second bag adds the butterfly. The first instruction book shows the fan designer build of the butterfly which was built with SNOT techniques. This one is made with plates and tiles stacked on top of each other. The advantage is that they have some printed tiles on the edges of the wings. The disadvantage is the build isn’t as exciting due to the techniques used. It still looks great though as a blue butterfly with the different shades of blue. You also get a miniature honey bee. The bee is fun although I would rather have had a larger sized bee like the fan designer originally submitted. I guess this bee is more to scale so it fits into the scene better.

One bonus though is everything is printed. There are no stickers. YAY!

Bag three starts the Hercules Beetle build. The build starts off with a base similar to the last build. Then you add on a piece of a plant or a branch that the beetle is crawling on.

The fourth bag begins to build the beetle. It’s an interesting build with some fun techniques. The horn piece is big. I’m not sure if they are unique to this set or not, but it would have been interesting to see if they could have built it with additional pieces instead of one larger piece.

The fifth bag finishes up the beetle. You add in two blue mushrooms and then finalize the beetle. Besides the legs, you add in the wings and the covering of the back of the beetle (I’m not sure of the official term for it). You can pose the beetle with the wings out or remove the wings and have the yellow pieces covering the back. I like this feature and decided to picture it as if it’s just taking off from the branch.

The sixth bag starts the build for the Chinese Mantis. You start with the same base that the other two insects are on. Then you build a small stem with some leaves and flowers on it. There are also some round 1x1 red tiles printed as ladybugs. The fan designer submitted a larger scaled ladybug to Ideas and I would have preferred that as well, but I’ll take what they created.

The seventh and final bag adds in the Chinese Mantis. The designers did a good job capturing the shape and details of the insect. I like the use of the pistols at the bottoms of the legs and crow bars for antenna.

Here are the final builds. Definitely something outside the ordinary sets we see so that’s good. I would have liked to see more of the fan designer submissions (larger ladybug and bee), but I can’t complain with what we received. These are definitely display pieces which is fine for the 18+ audience in my opinion. Pricewise, it’s not bad considering the price for piece and maybe as it gets closer to retirement, we’ll see it go on sale which would be awesome.

What were your thoughts on this one? Can you mix them in with some of your Botanical sets?

Happy building!