Creator Expert

Set Review - #10297-1: Boutique Hotel - Creator Expert/18+ - Modular Building

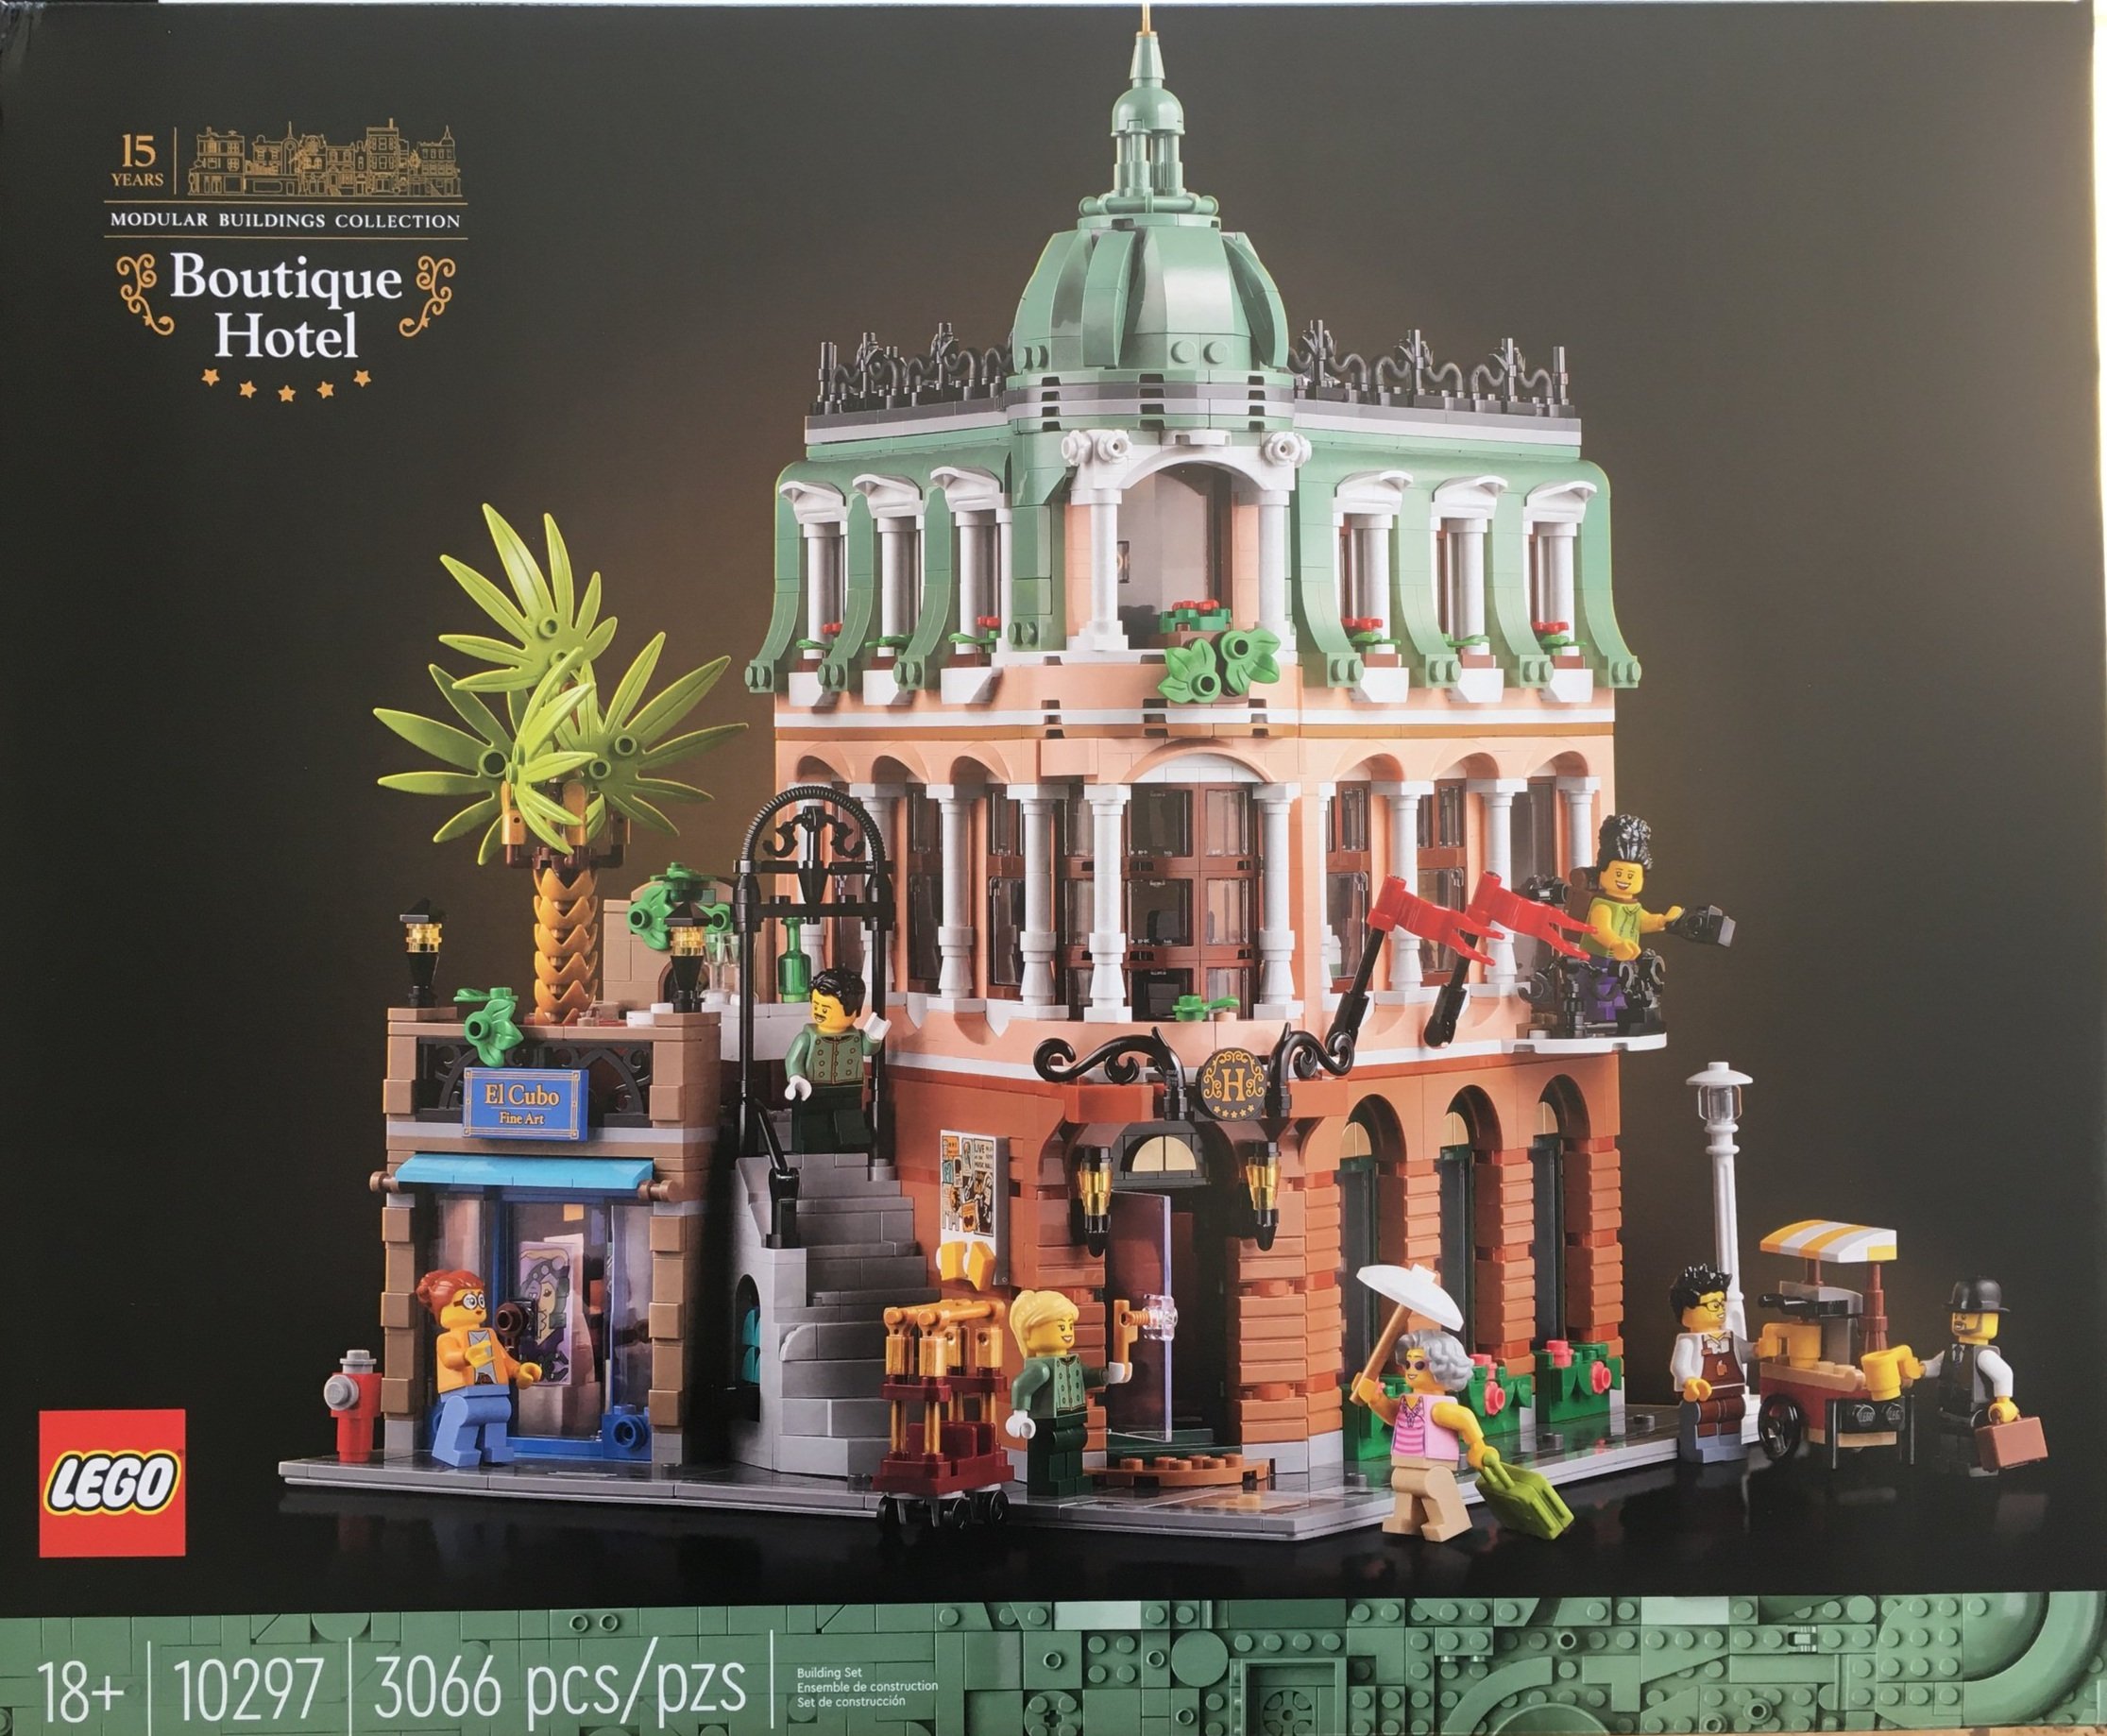
The LEGO Group successfully sucked me into the modular building fandom a long time ago and I’m always in line to get the latest version every year. This one is the 15th anniversary of modular buildings called #10297-1: Boutique Hotel. It was released in the US on 2 January 2022. It retails for $199.99 and contains 3,066 pieces. This works out to $0.065 per piece which isn’t too bad. To be fair, a lot of the pieces are smaller so maybe it’s not a huge win, but I can’t complain.

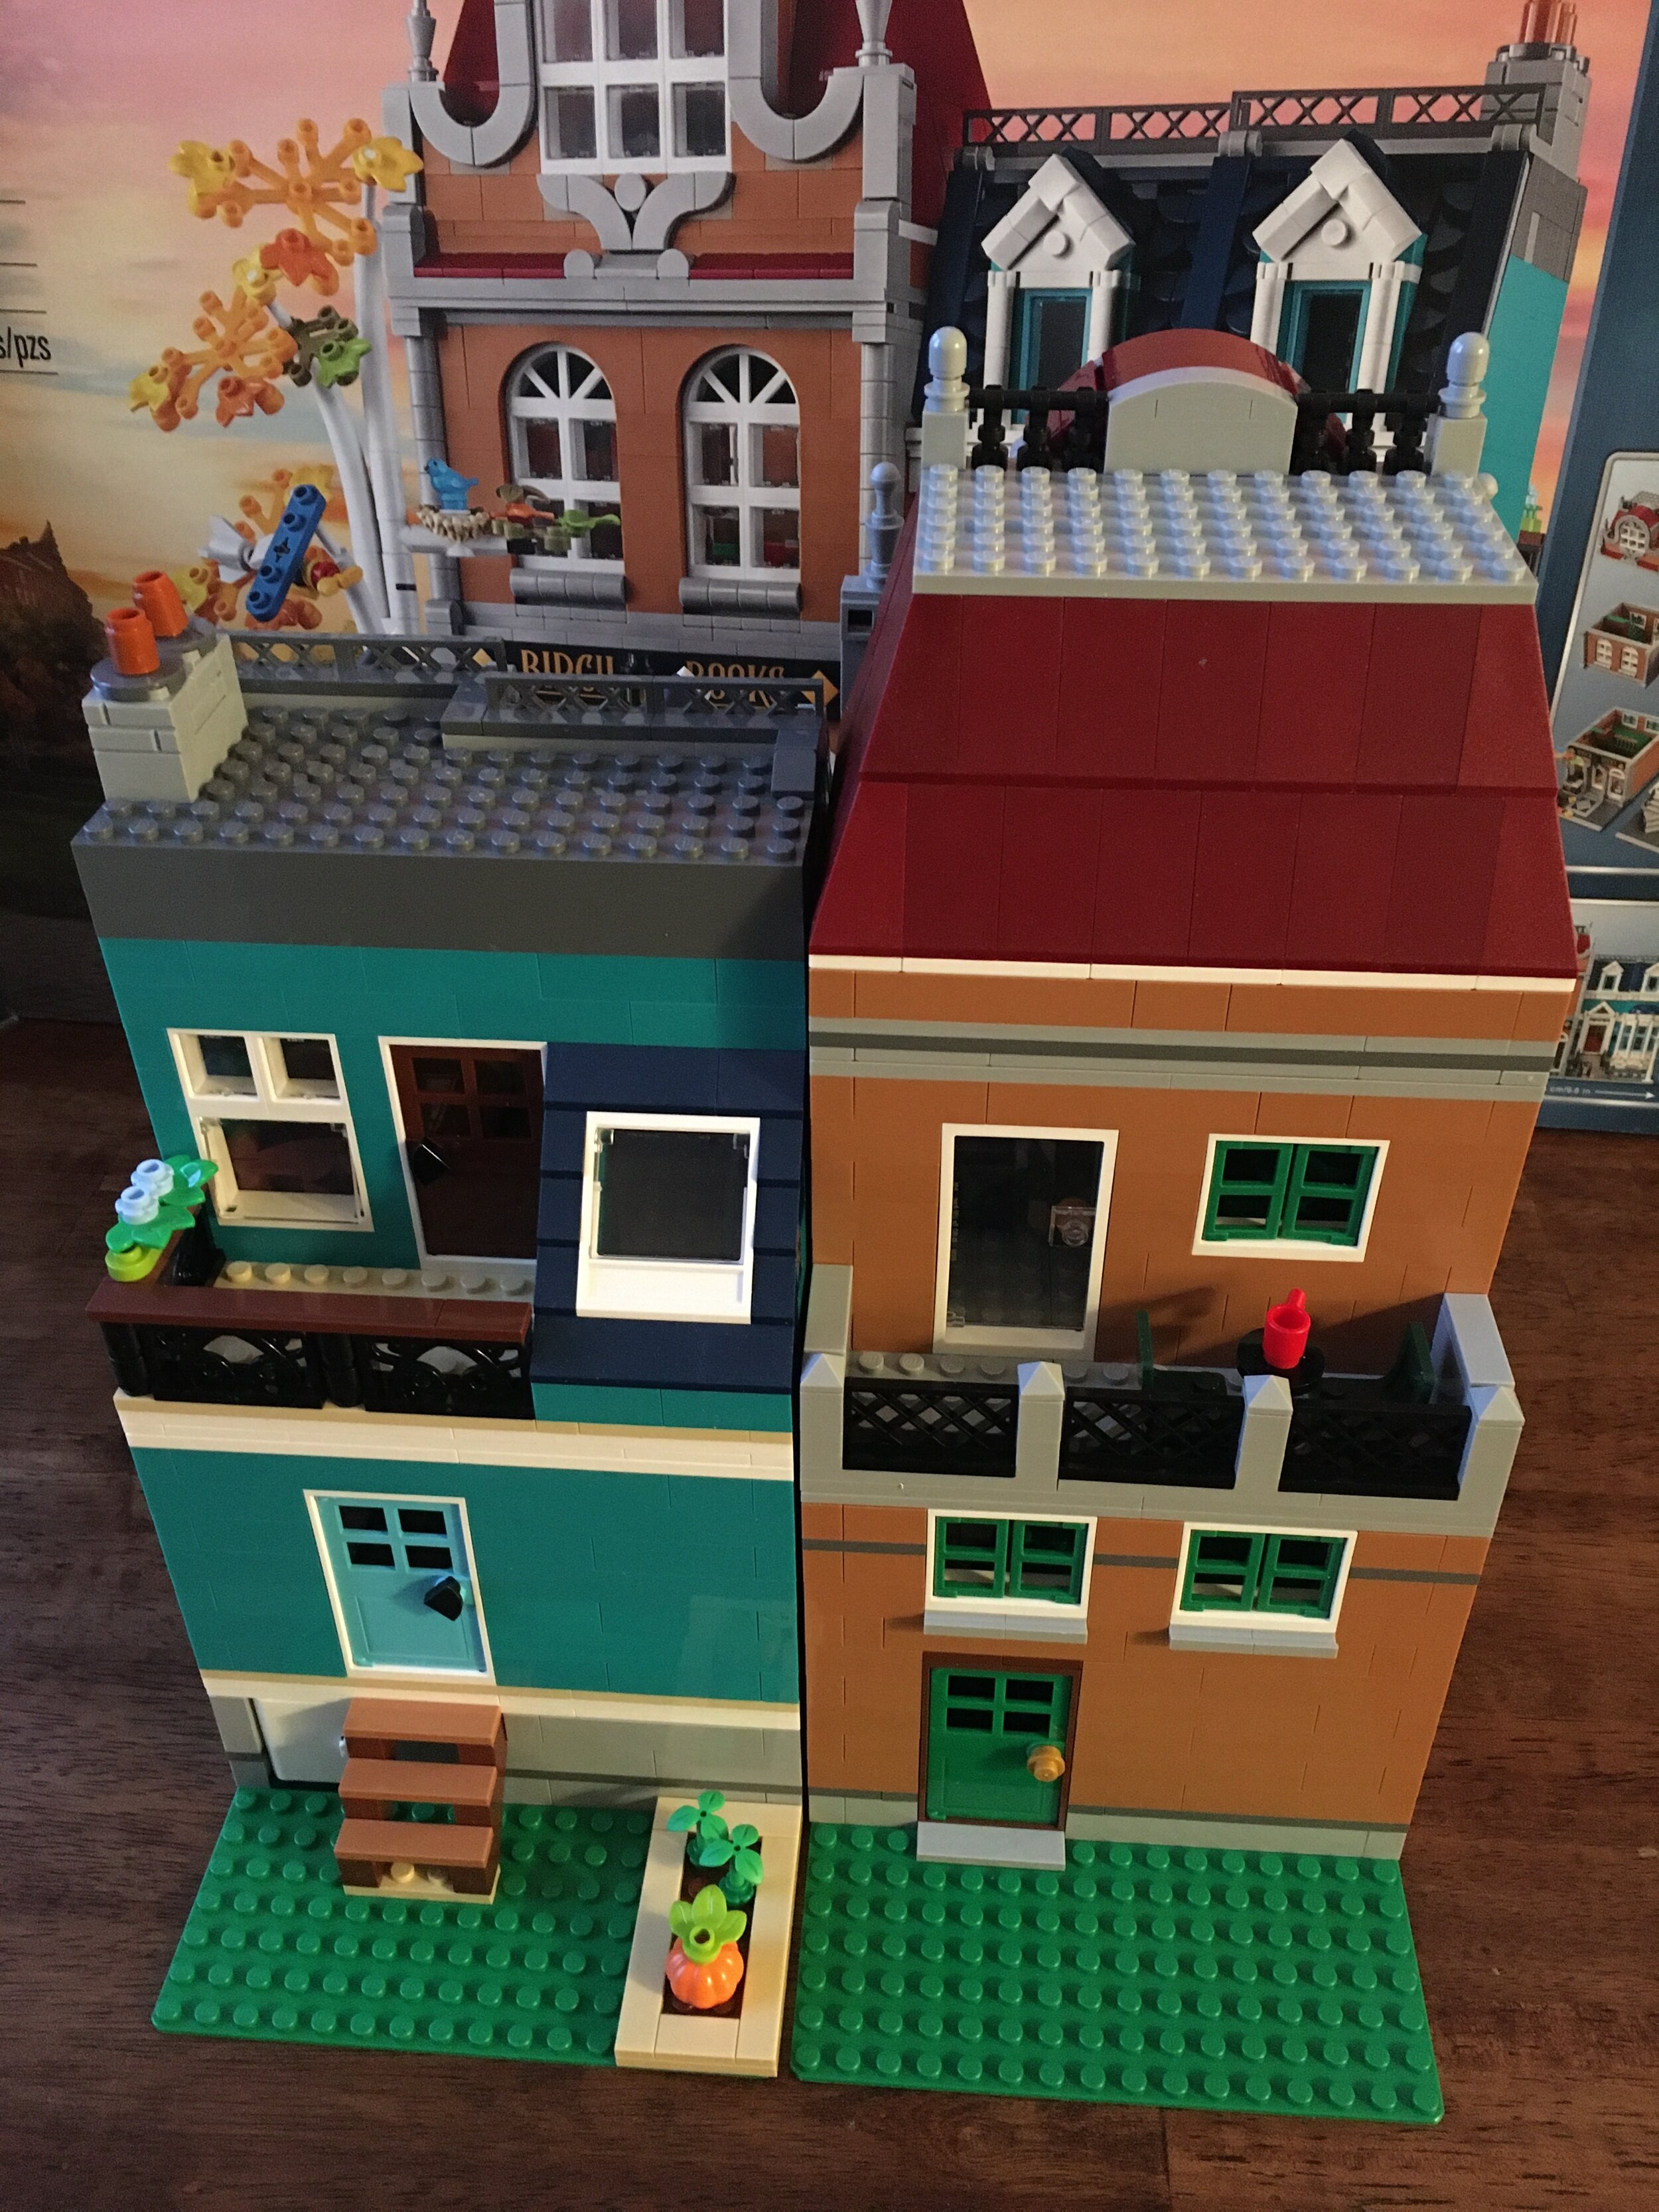
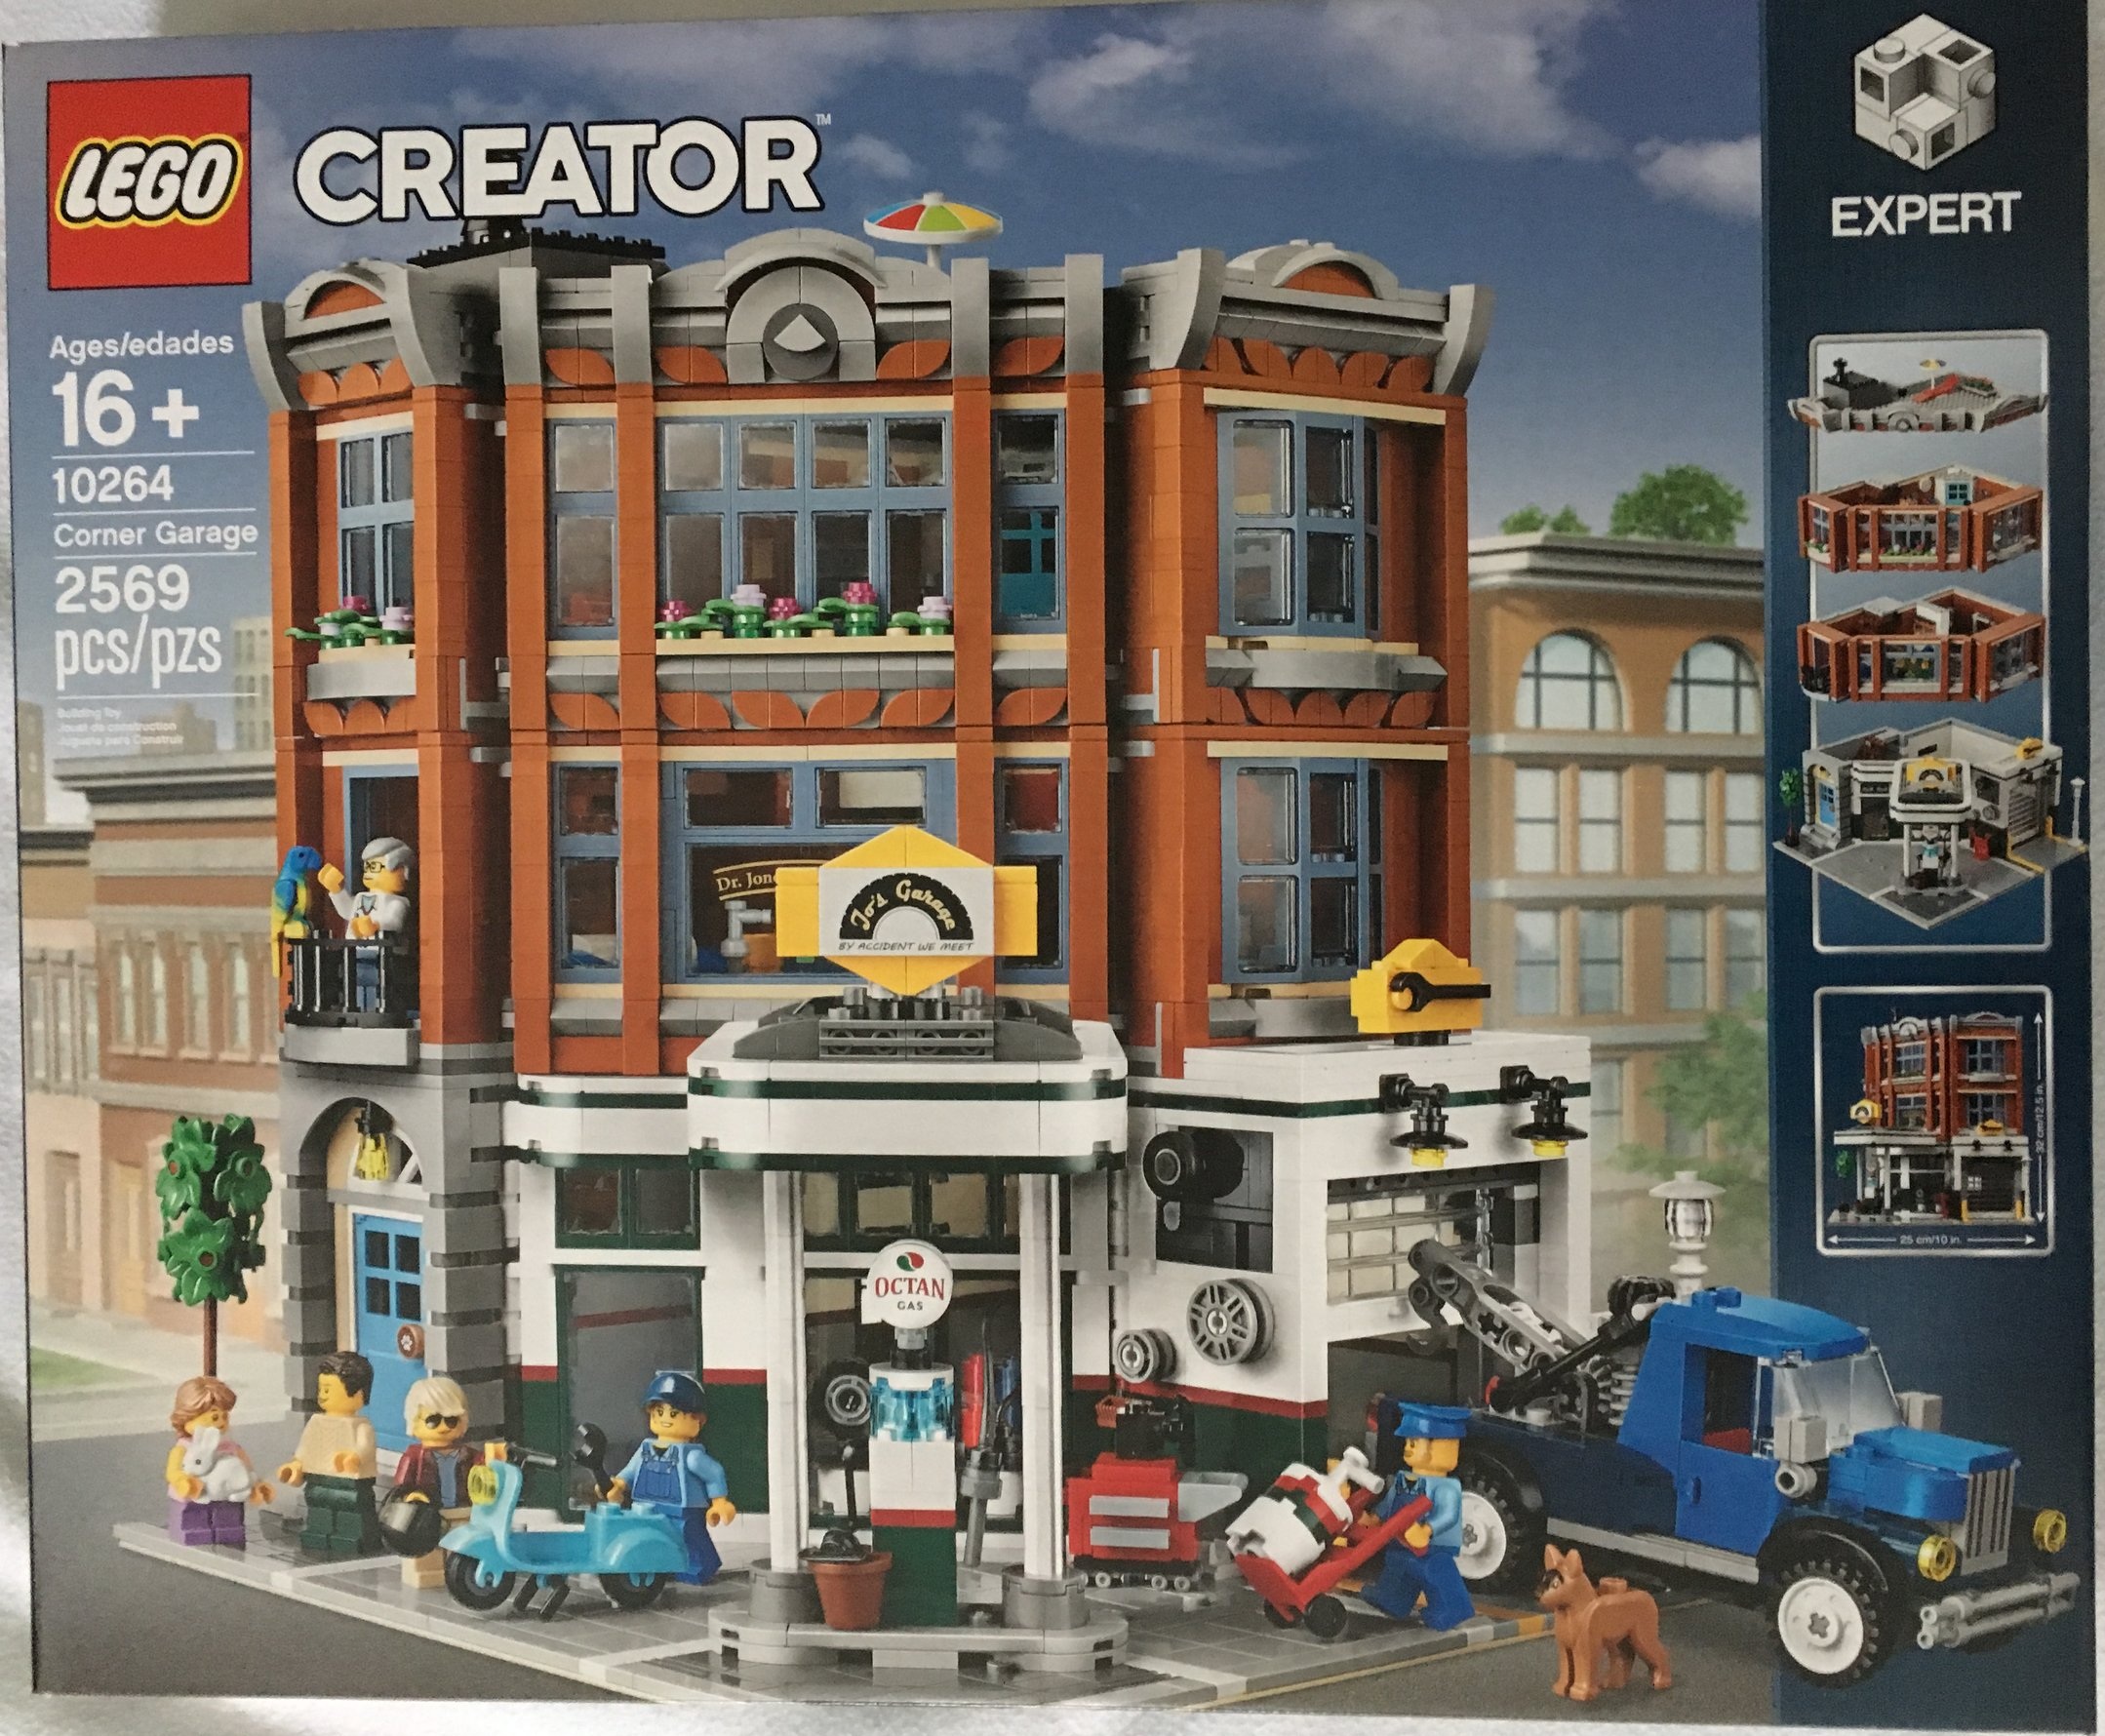
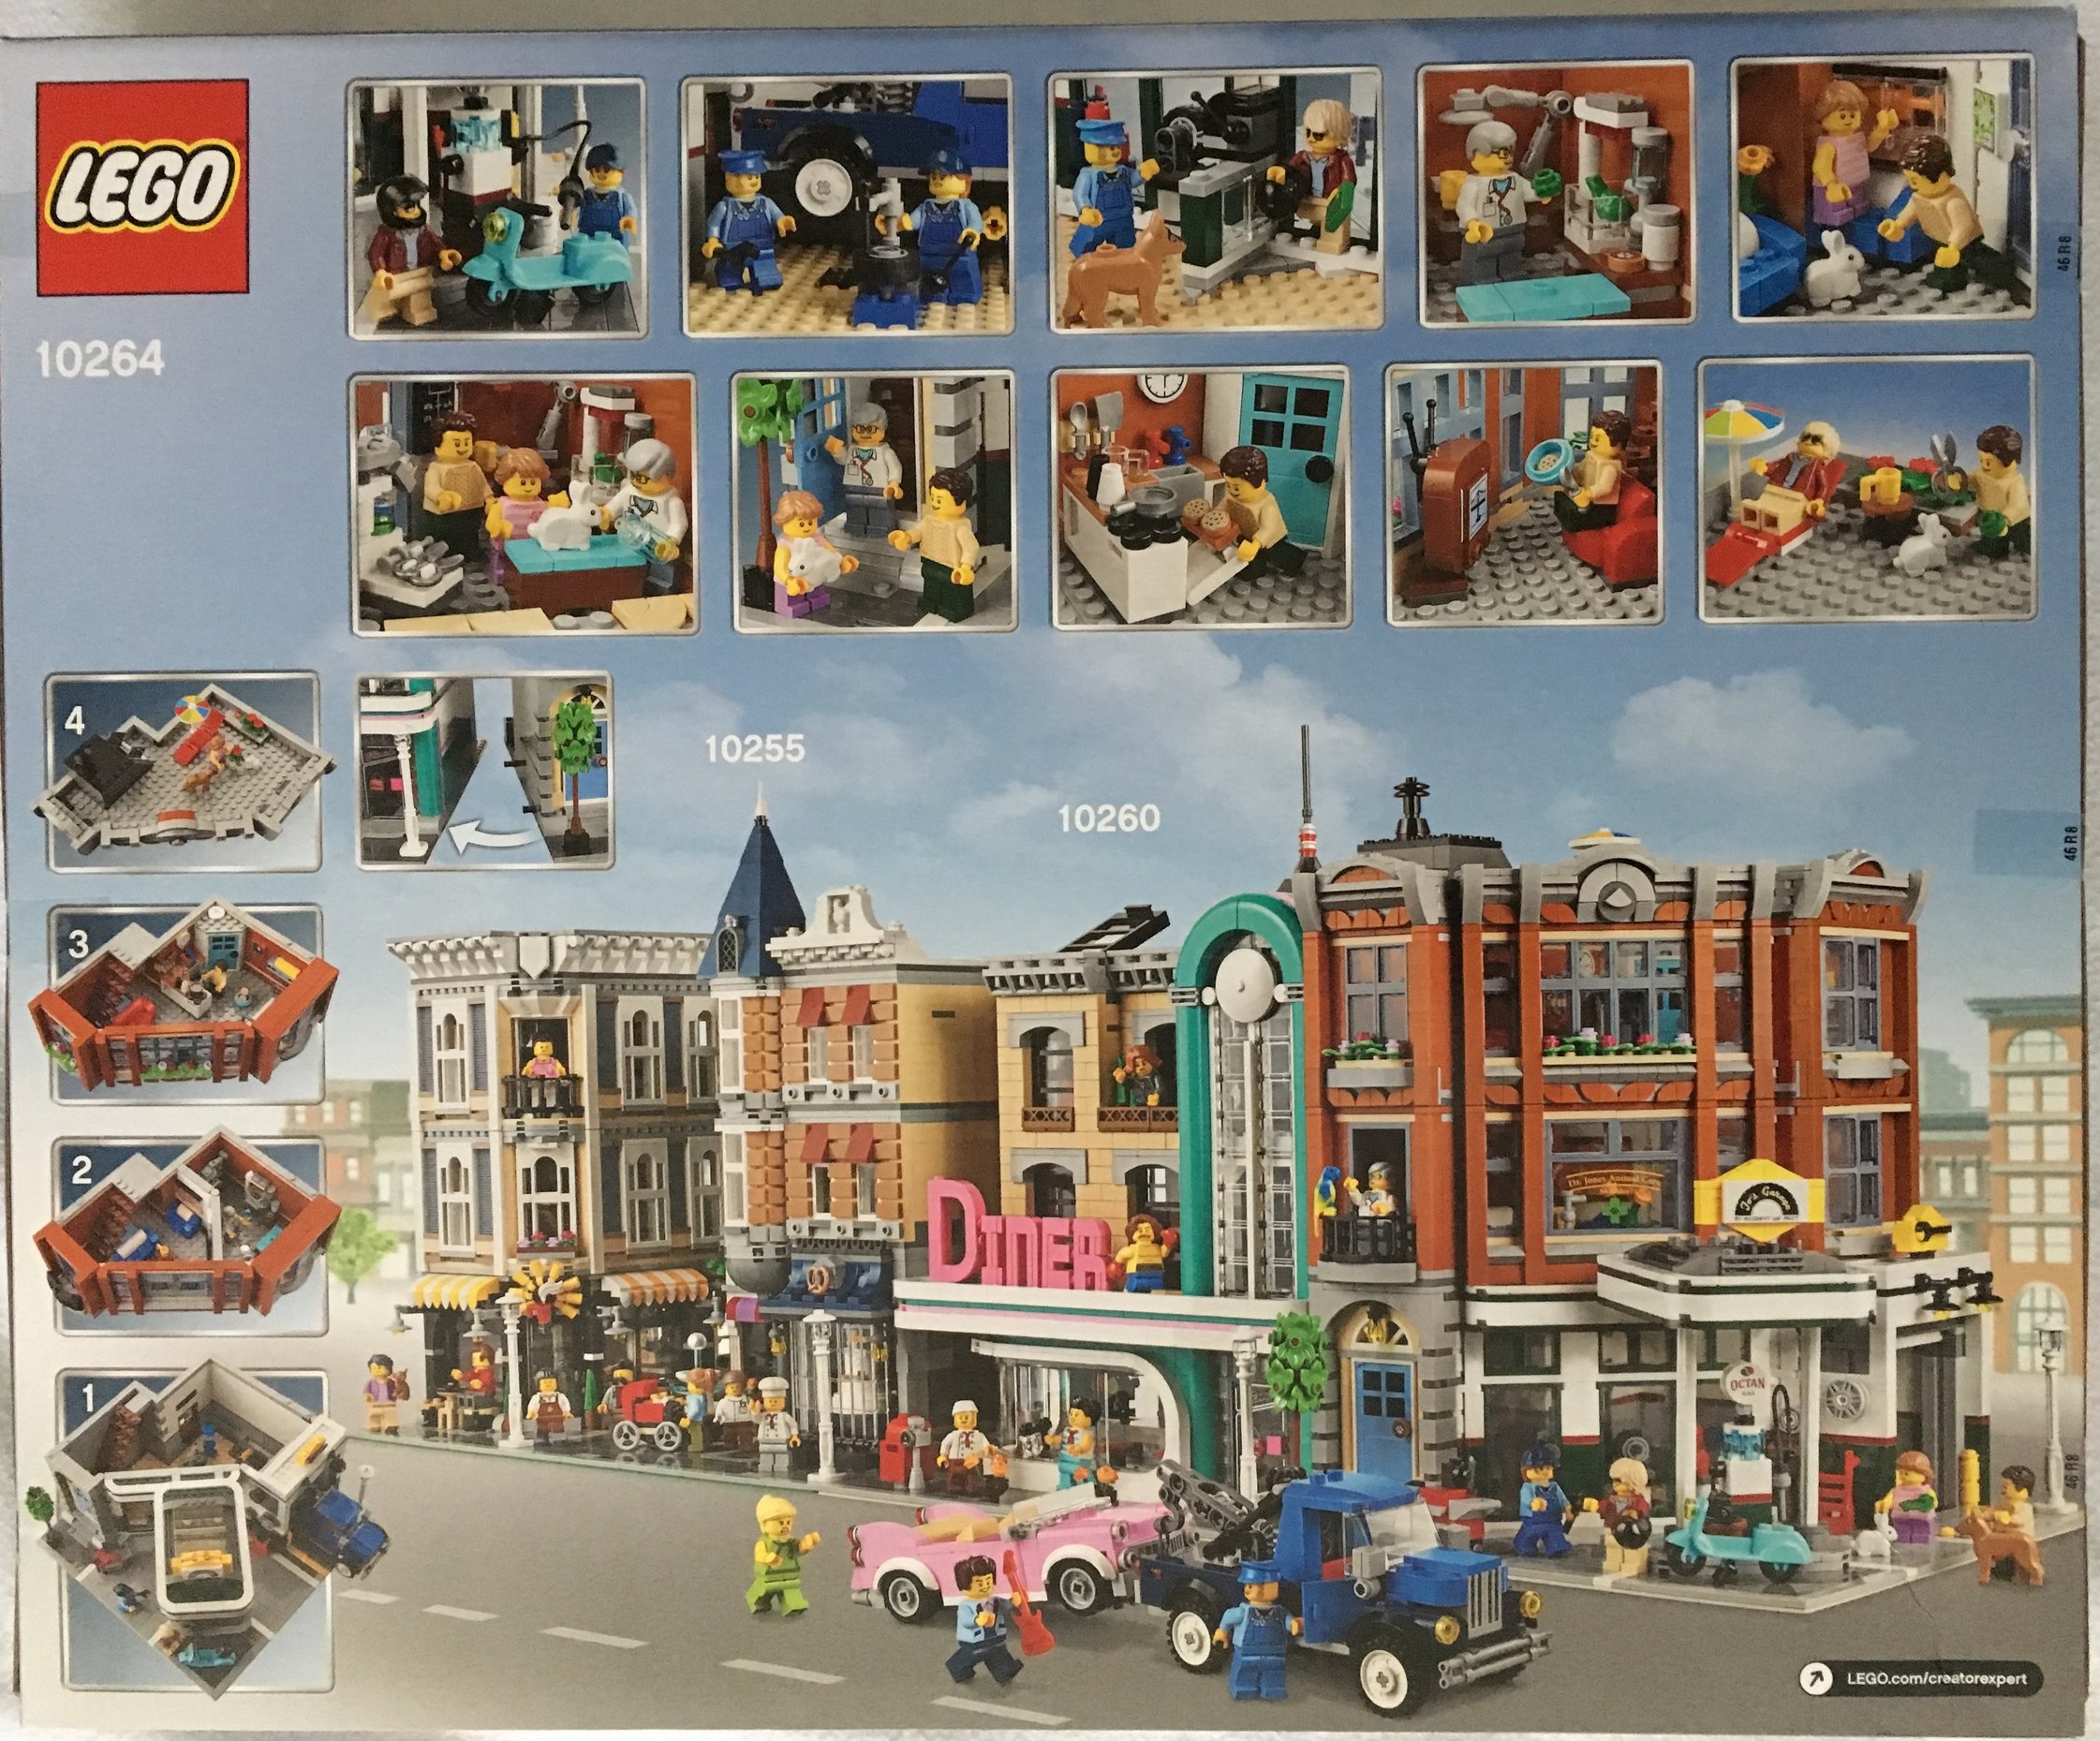
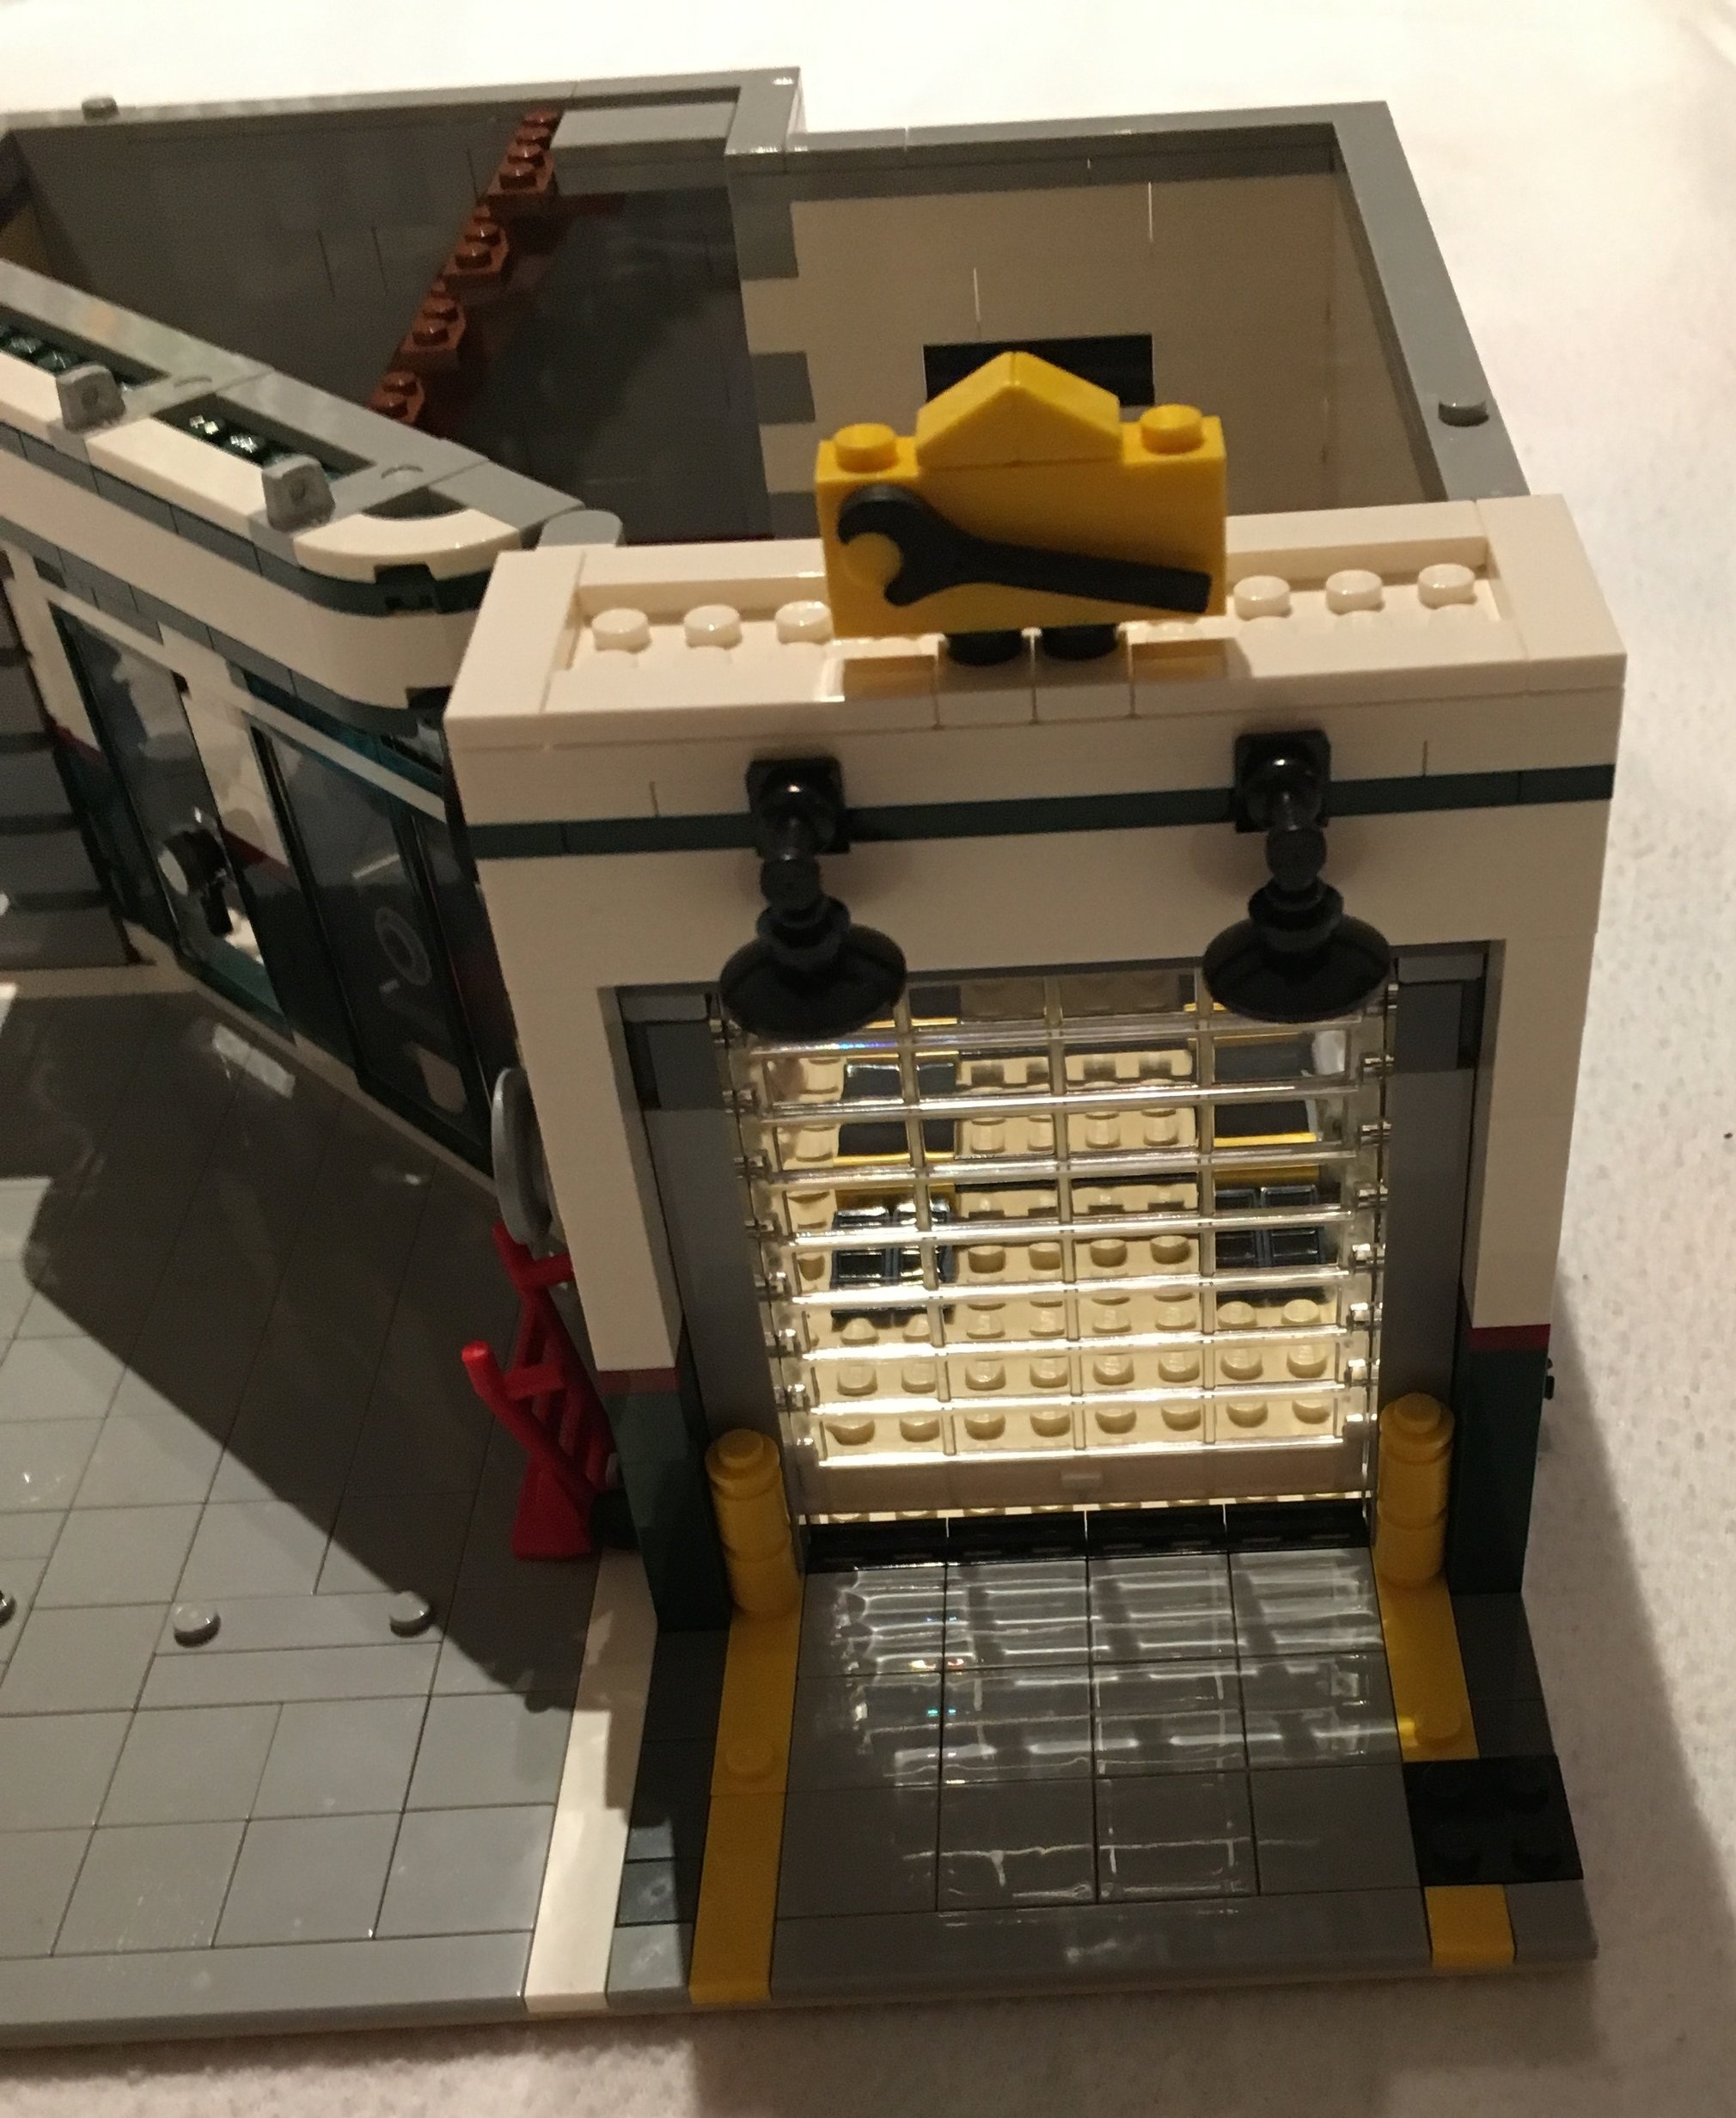
The box has the 18+ branding on the front and is black. The full set is shown with all of the minifigures. There’s a logo for the Boutique Hotel and then the mention of the 15th anniversary. The back shows a few details, the dimensions of the set, and how the set assembles together. It also shows it next to #10278-1: Police Station and #10270-1: Book Shop.

The set contains 20 parts bags… or at least that’s what I can count in the picture I took. They are all numbered. It also contains a 32x32 baseplate colored gray. The instruction book is wrapped.

The instructions have a few pages on the design and the designer as well as a picture of the designers who have contributed to the theme over the years. Also throughout the book are little tidbits about various pieces used, references to other modular buildings, and other fun facts.

The first bag starts with adding the basic layout to the base plate. This is usually lots of tiles and there are no exceptions here. The first bag comes with a female hotel worker.

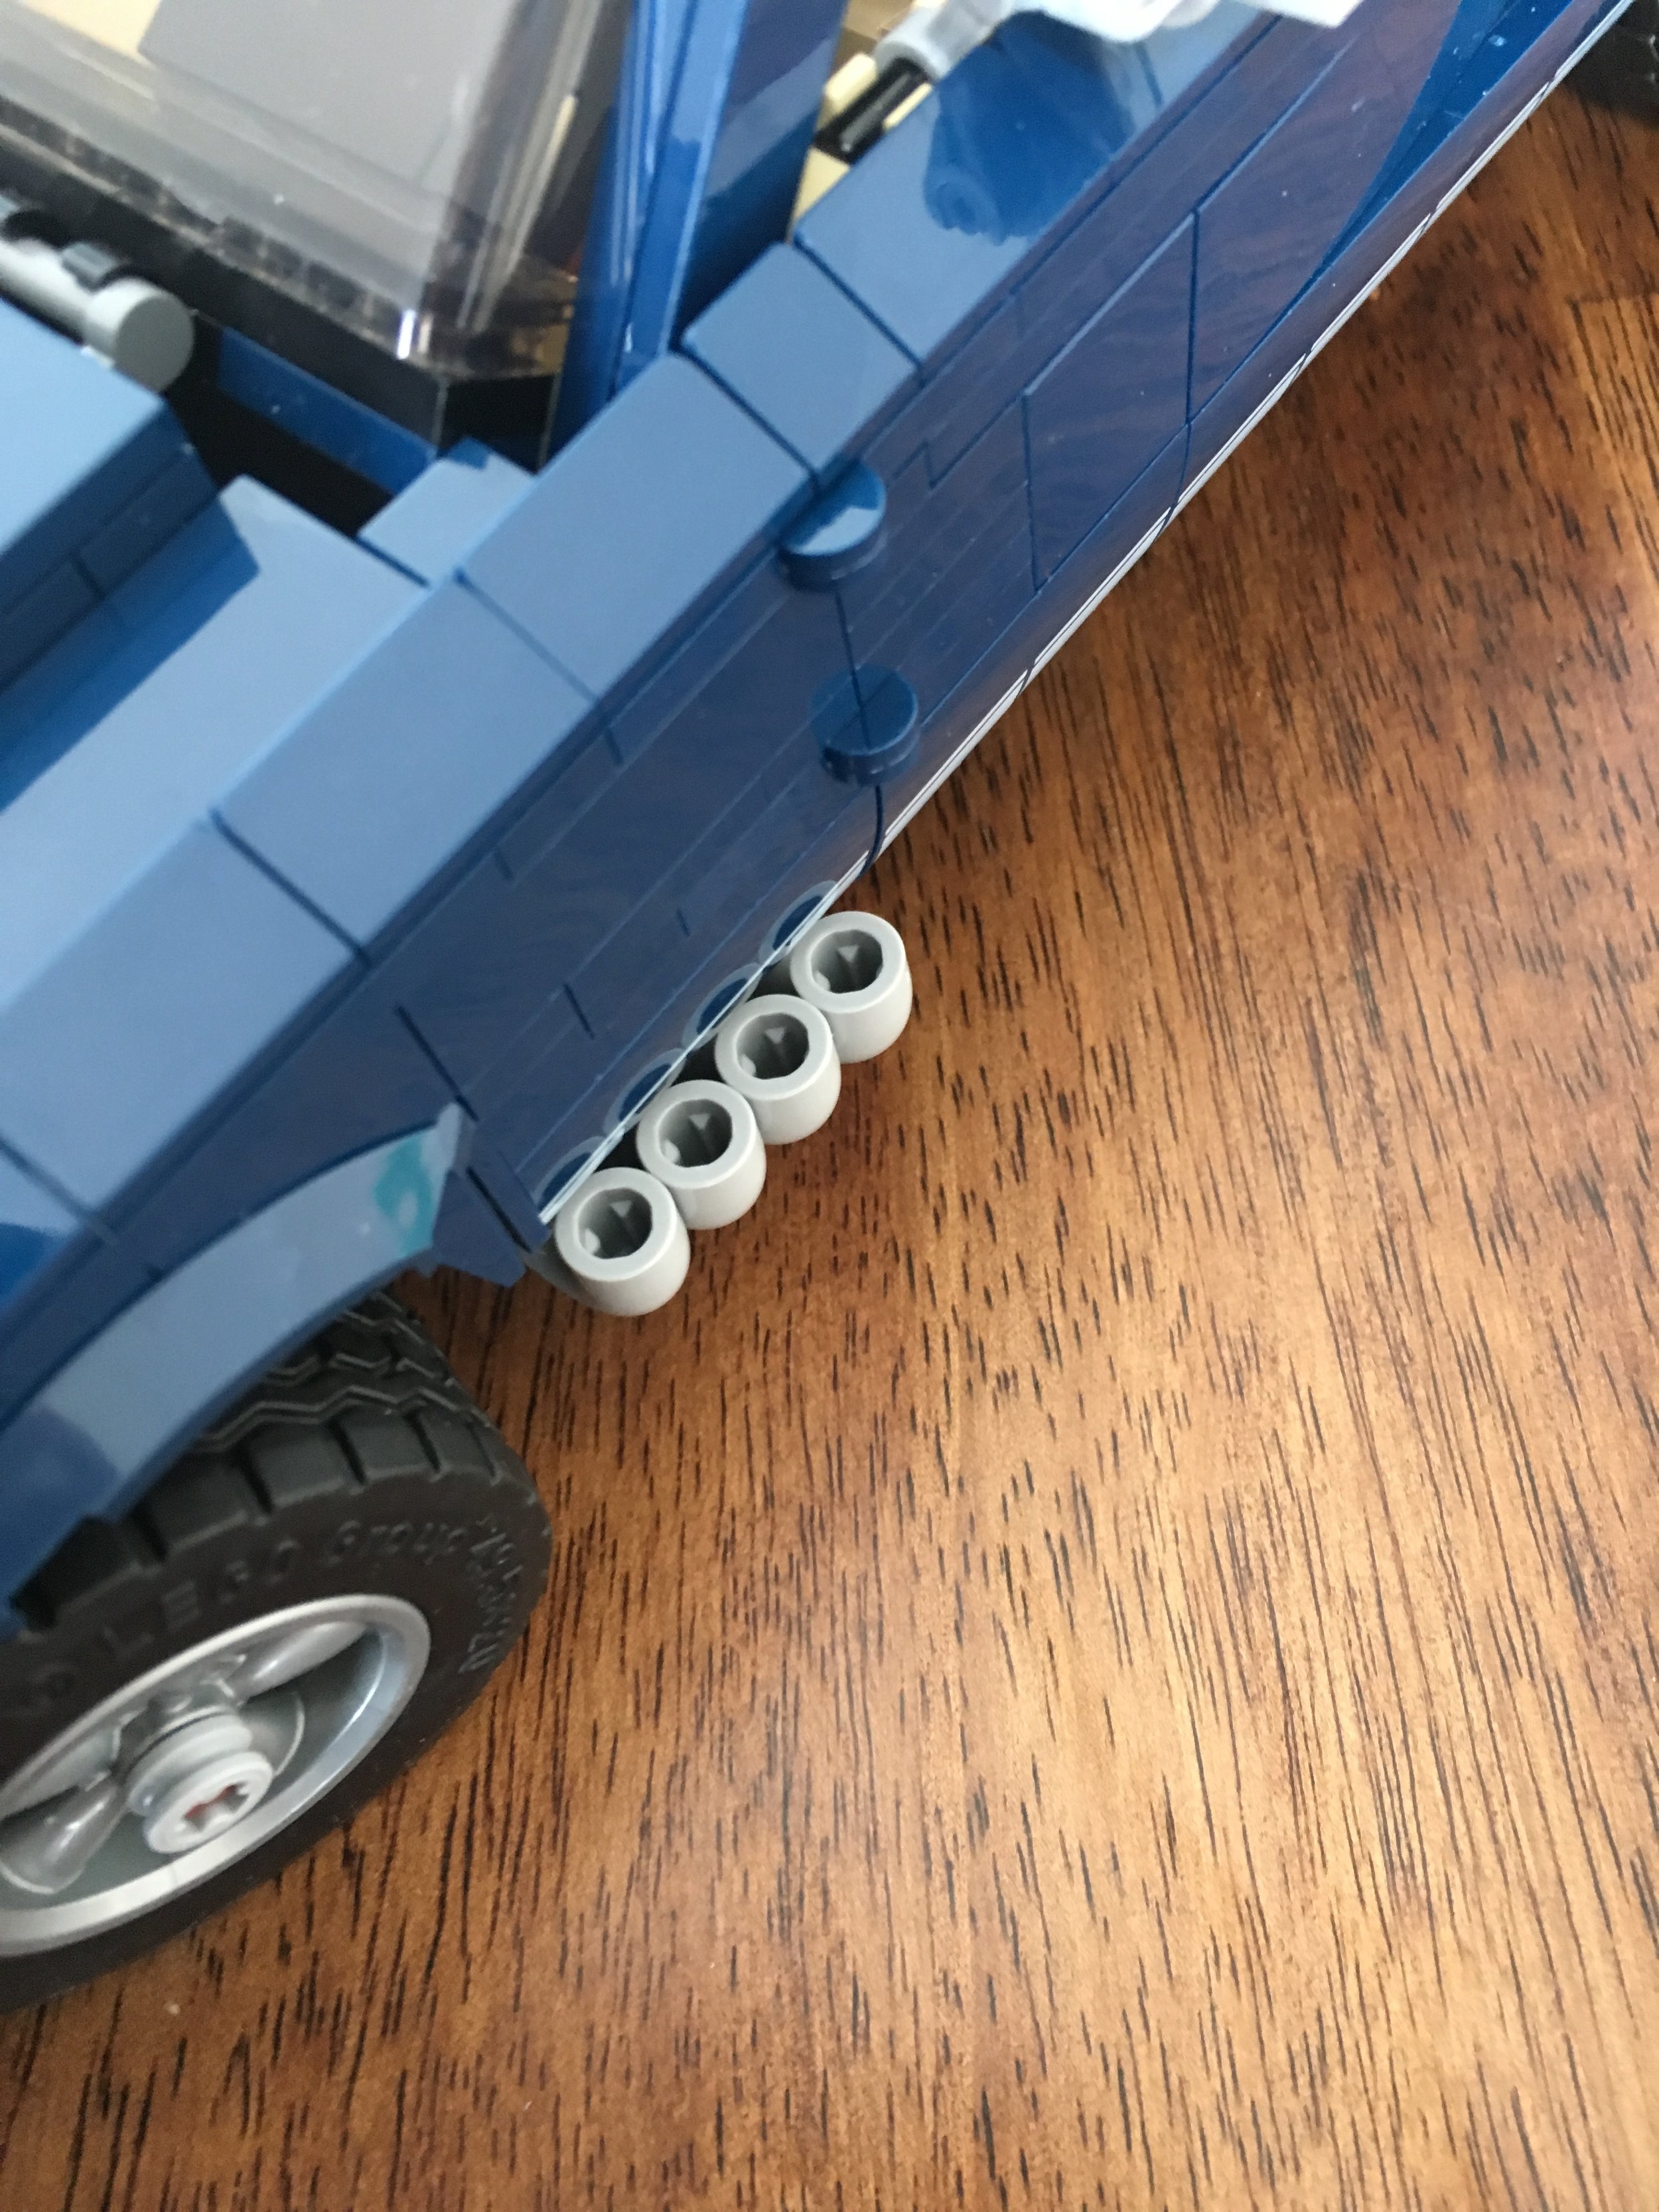
The second bag builds up the first floor with tiling on the inside in a fun pattern. It also starts the stairs and then adds a dumpster outside with a white croissant in reference to #10243-1: Parisian Cafe. This bag contains a male minifigure who works at the hotel and you build a small luggage cart.

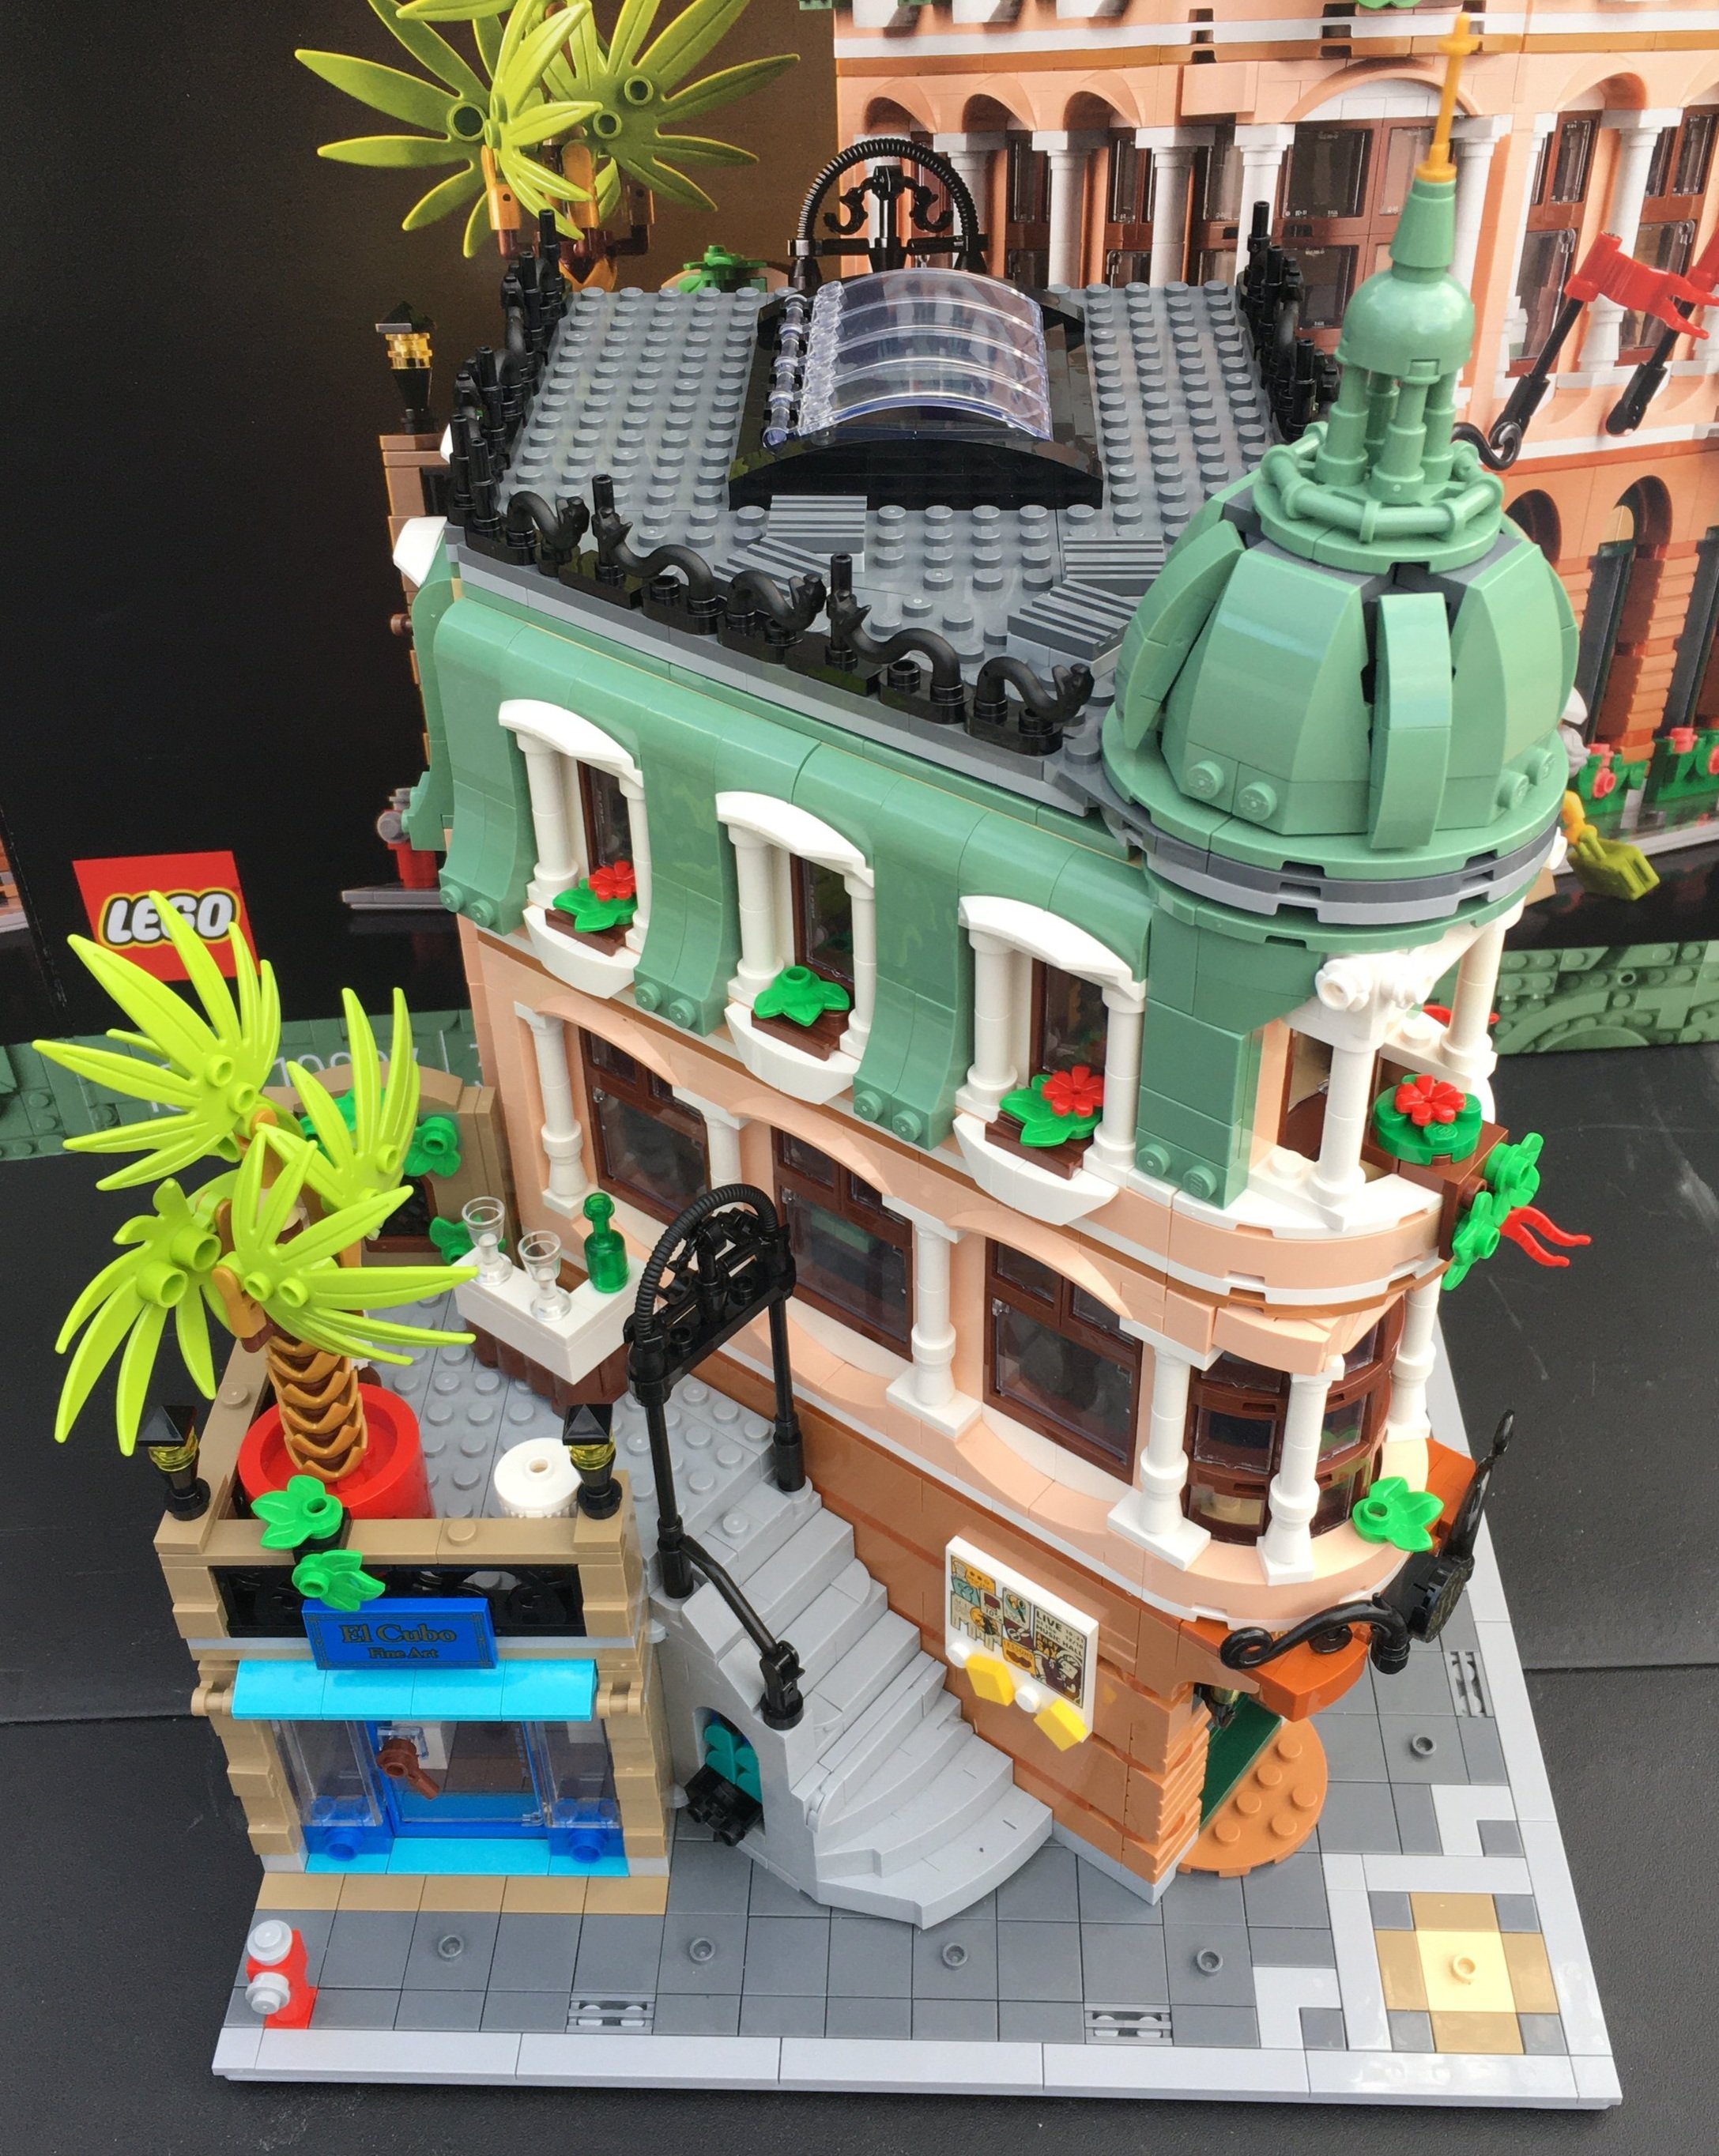
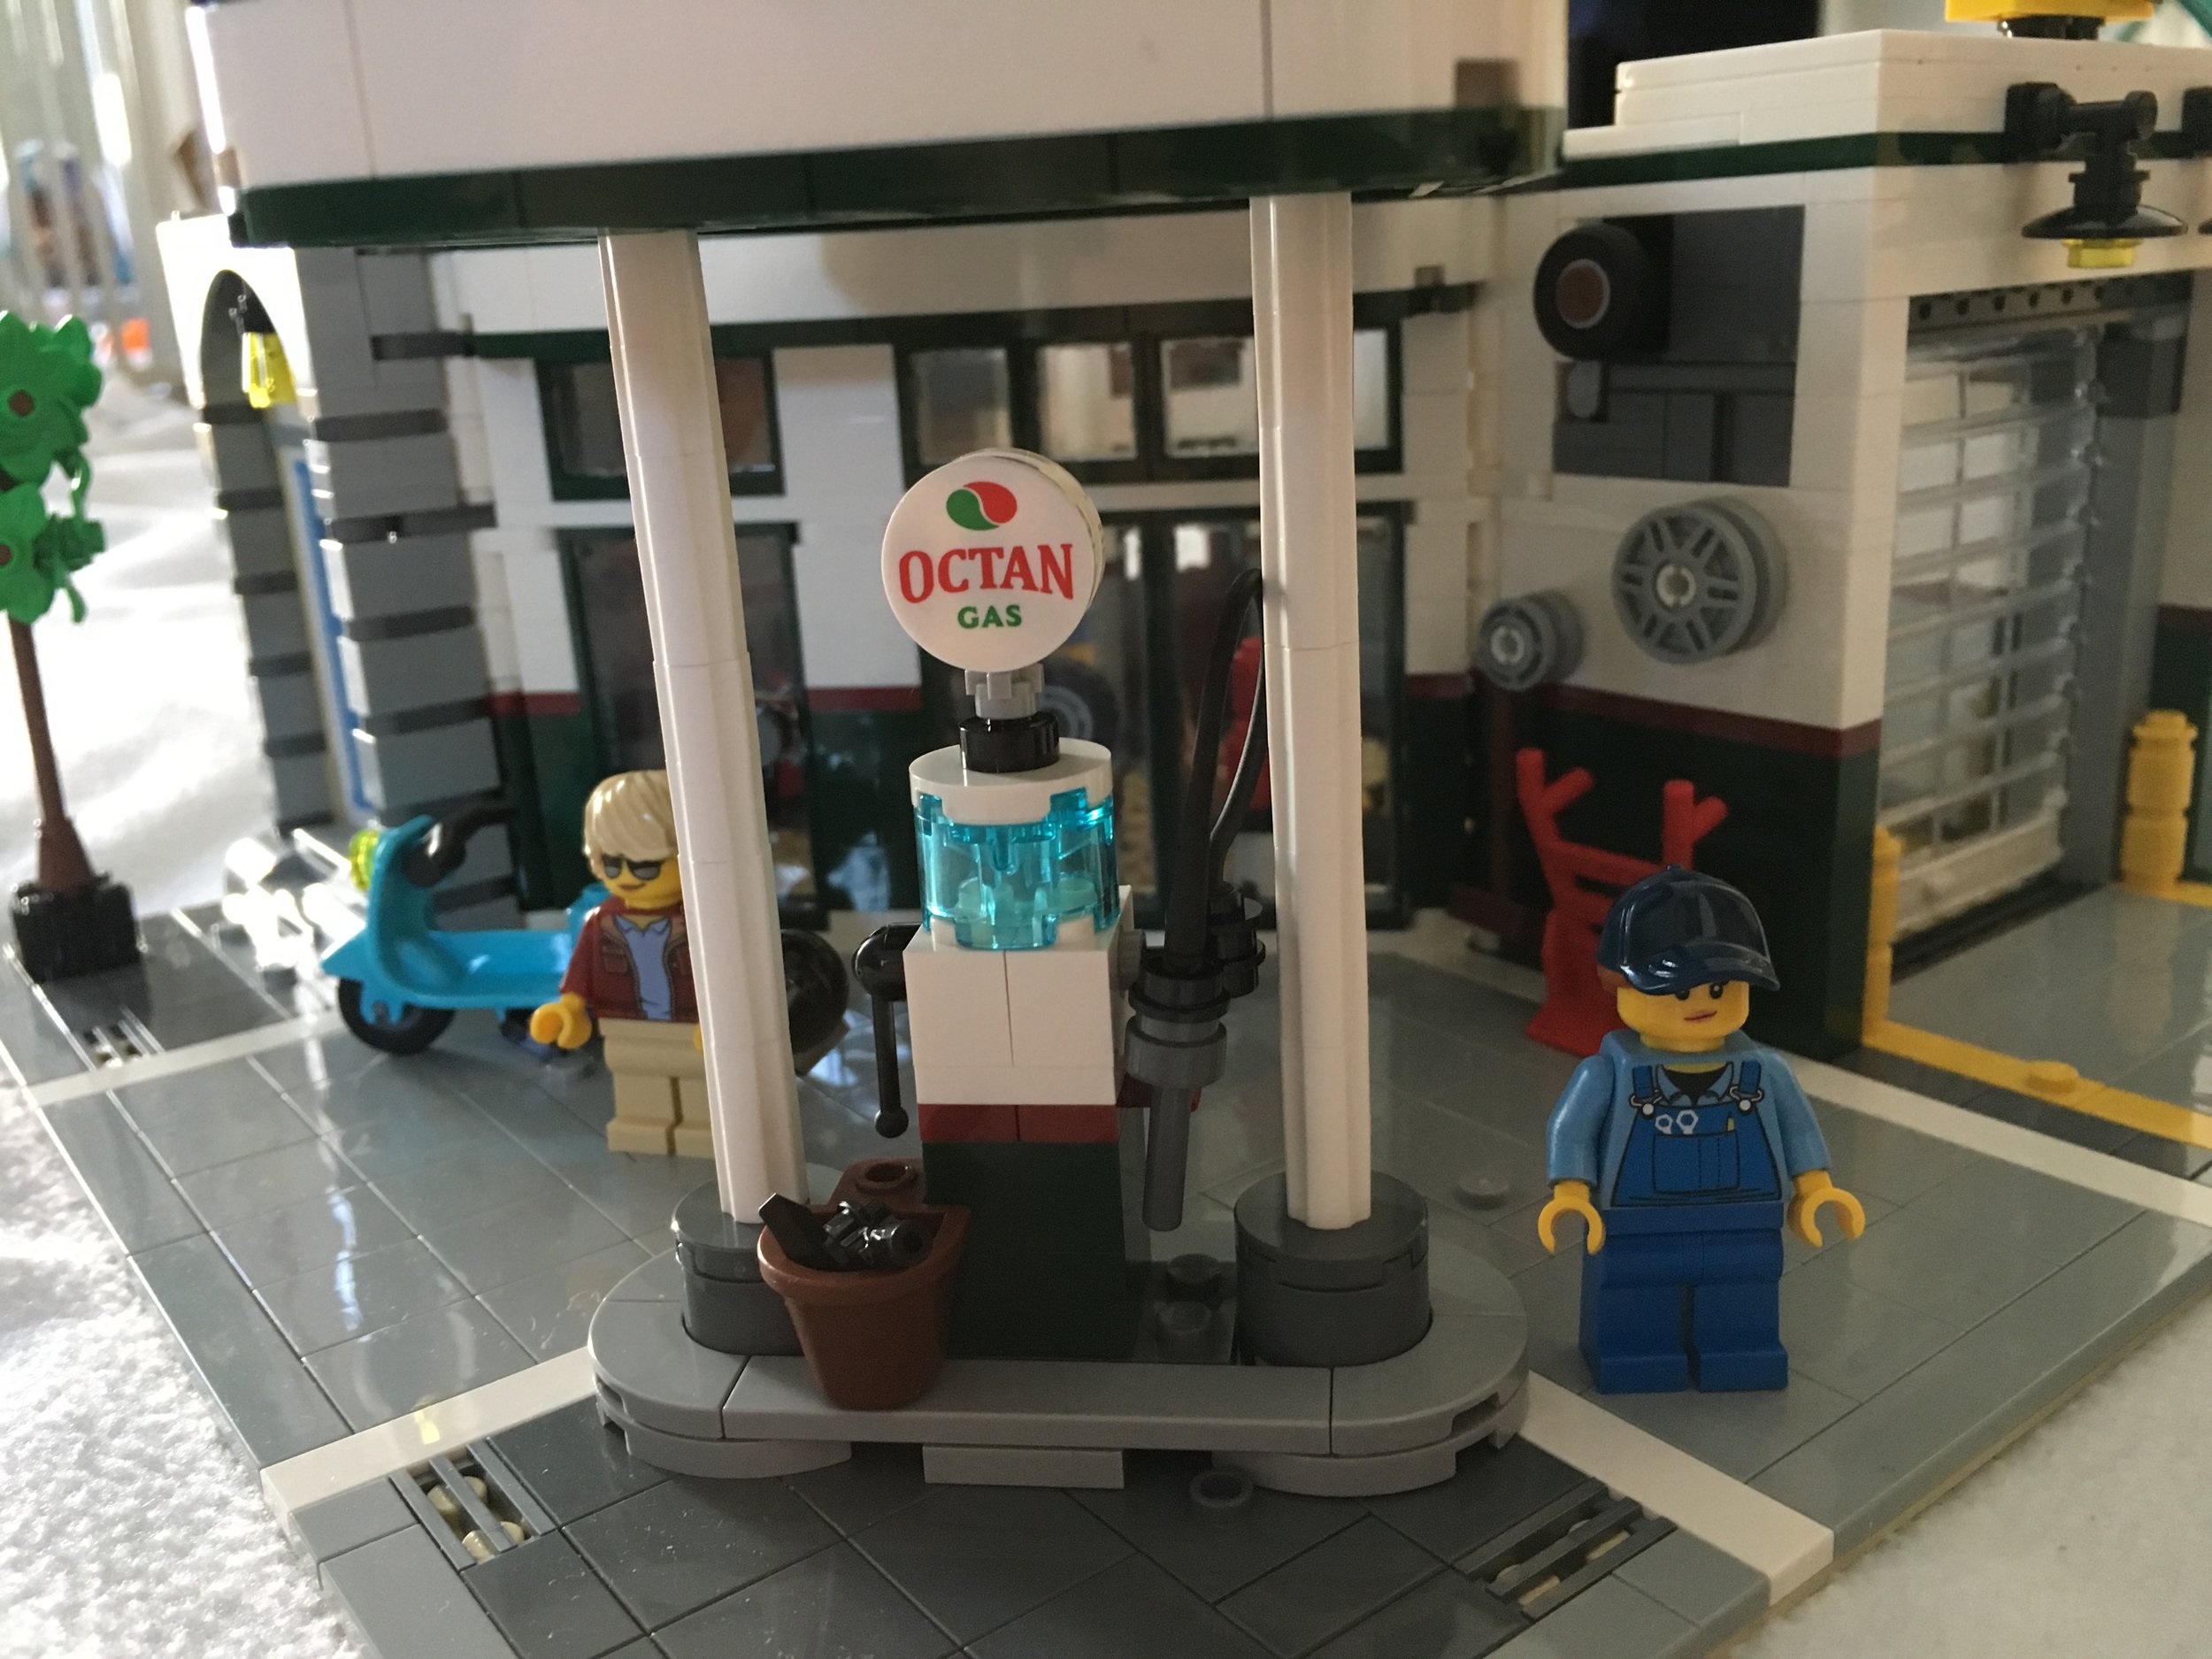
Bag three builds up more of the first floor with steps in the hotel and the check-in desk. The check-in desk has a fun telephone, some flowers, and then actual keys for the rooms. The back of the wall for the check in desk has some art work for the art gallery behind the hotel.

Bag four adds a couch in the lobby of the hotel and then builds up the art gallery. You put in a desk and then a few pieces of art to include a brick version of the Creator Expert logo. You also construct the stairs to the cafe above the art gallery. Bag 4 comes with a female minifigure who works at the art gallery.

I really appreciate the use of angles and how this set isn’t just the standard building with 90 degree angles.

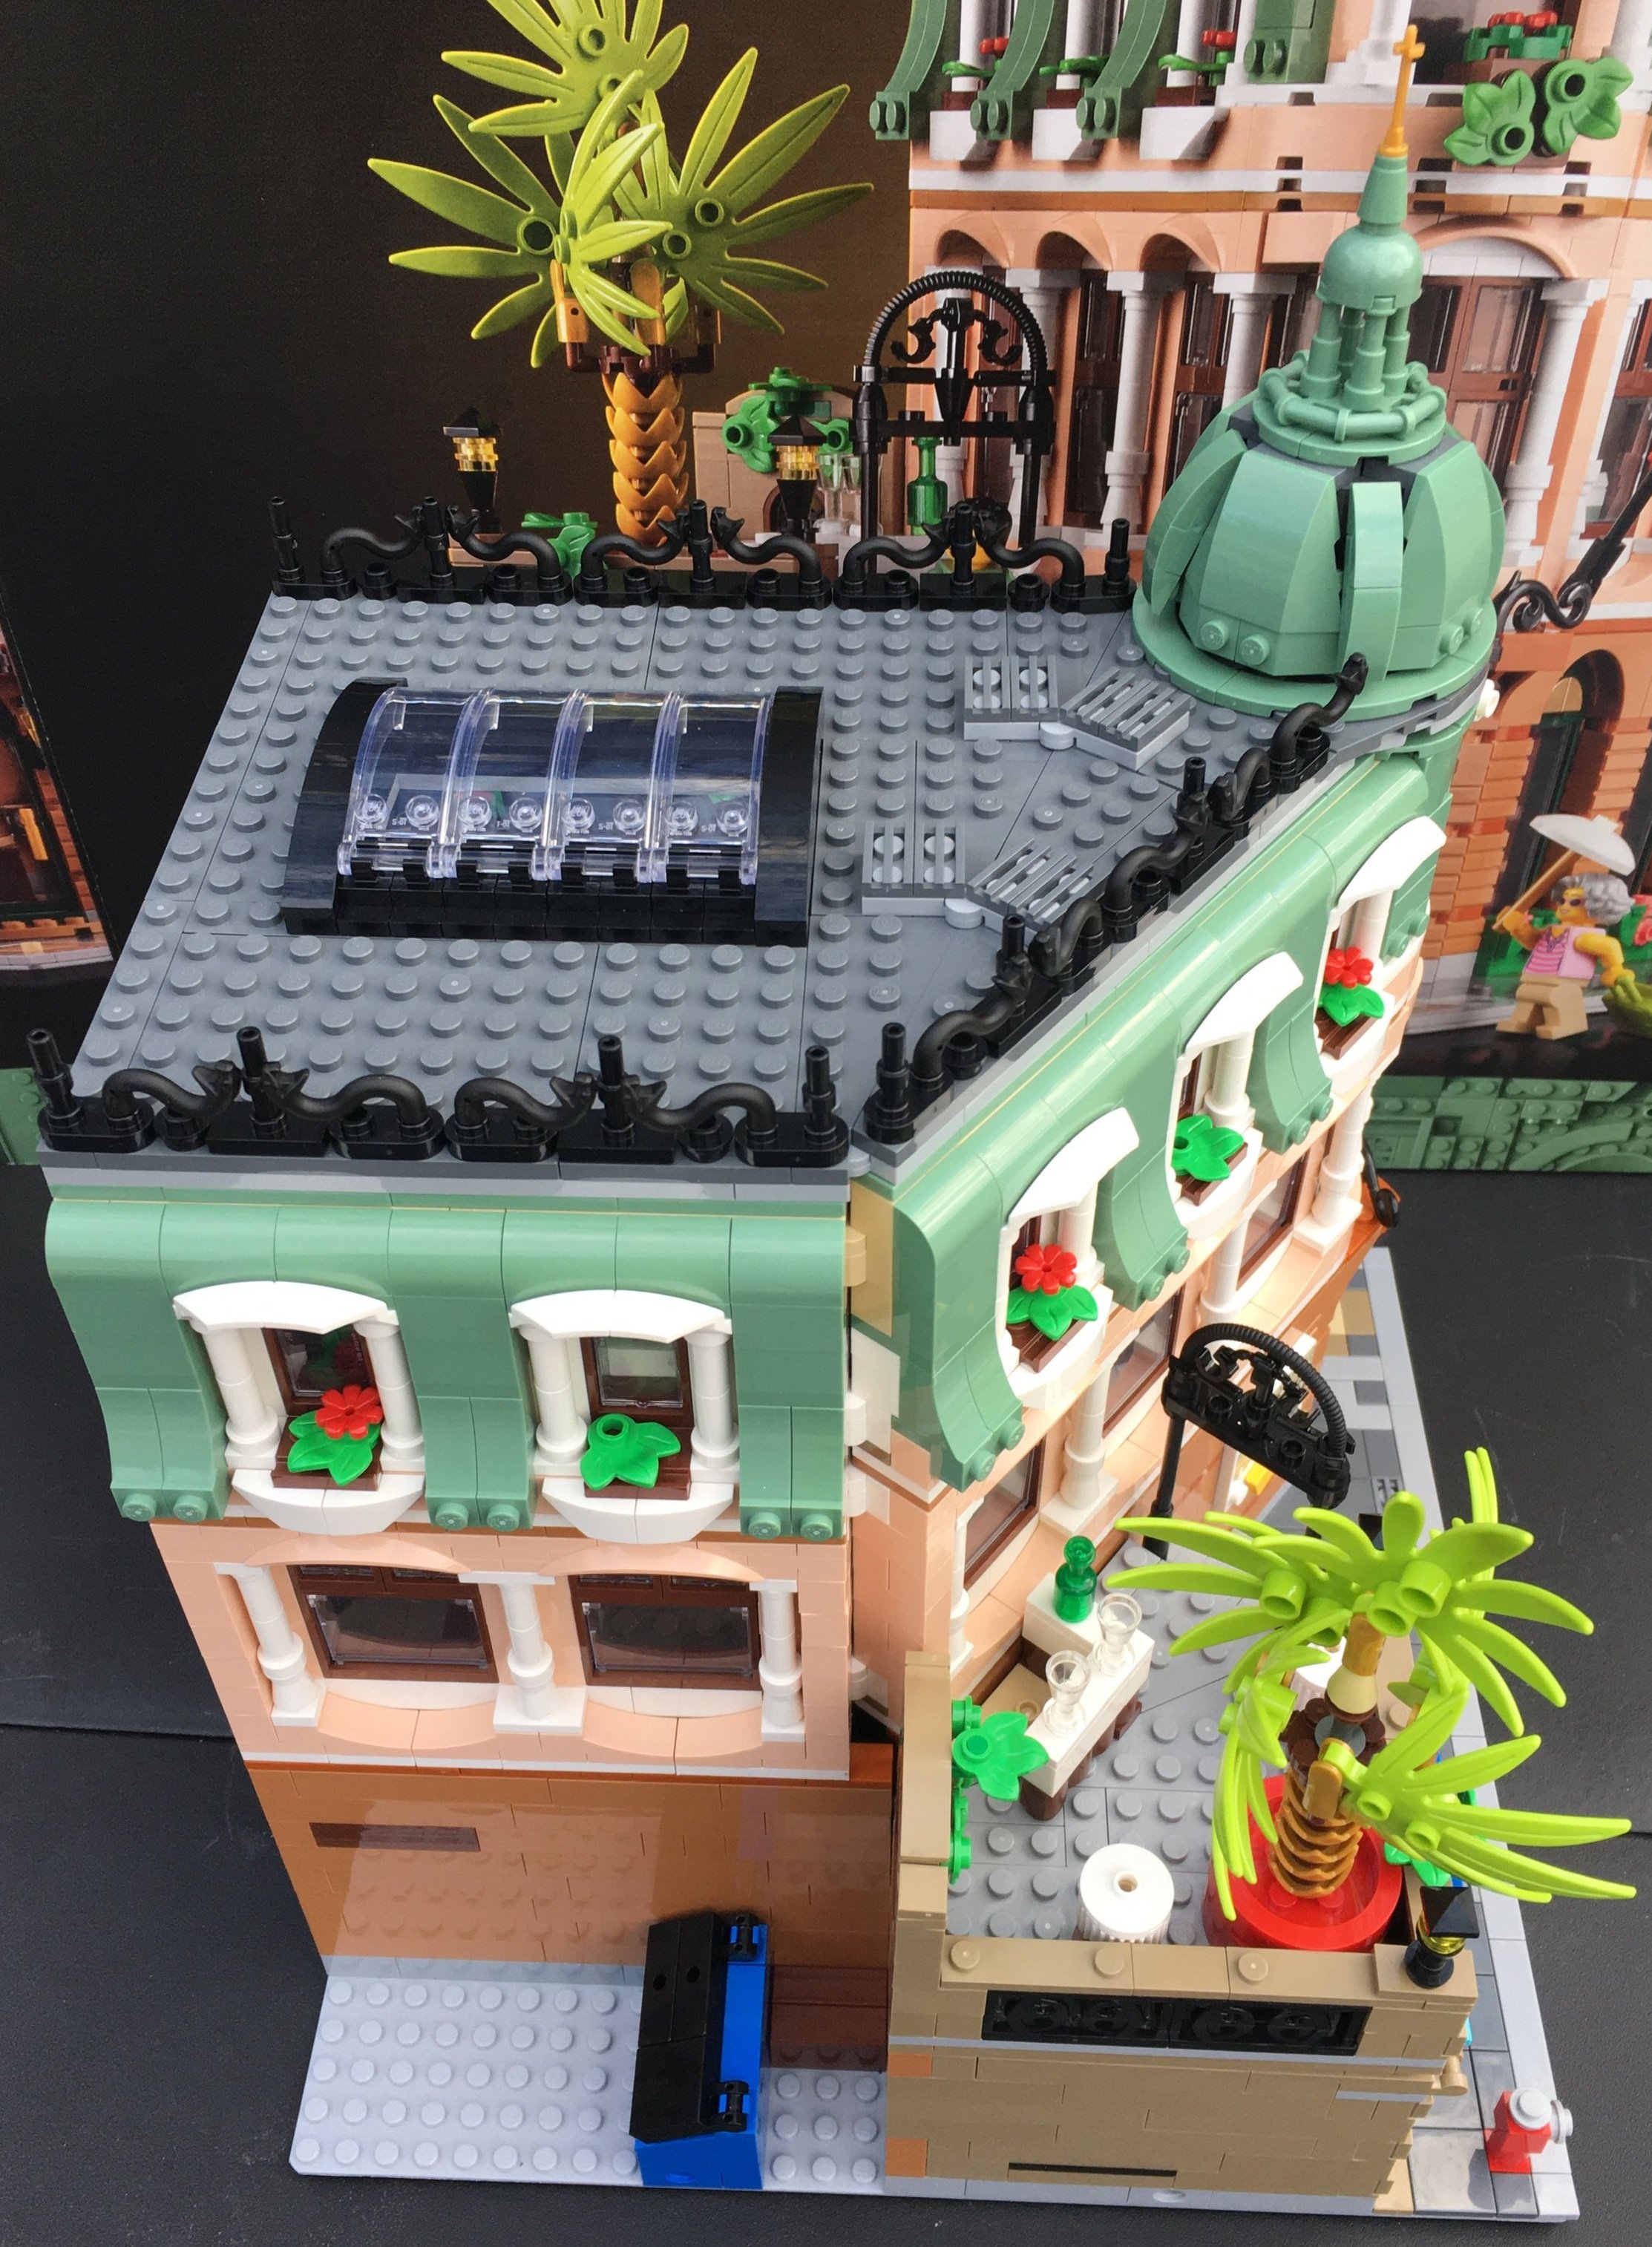
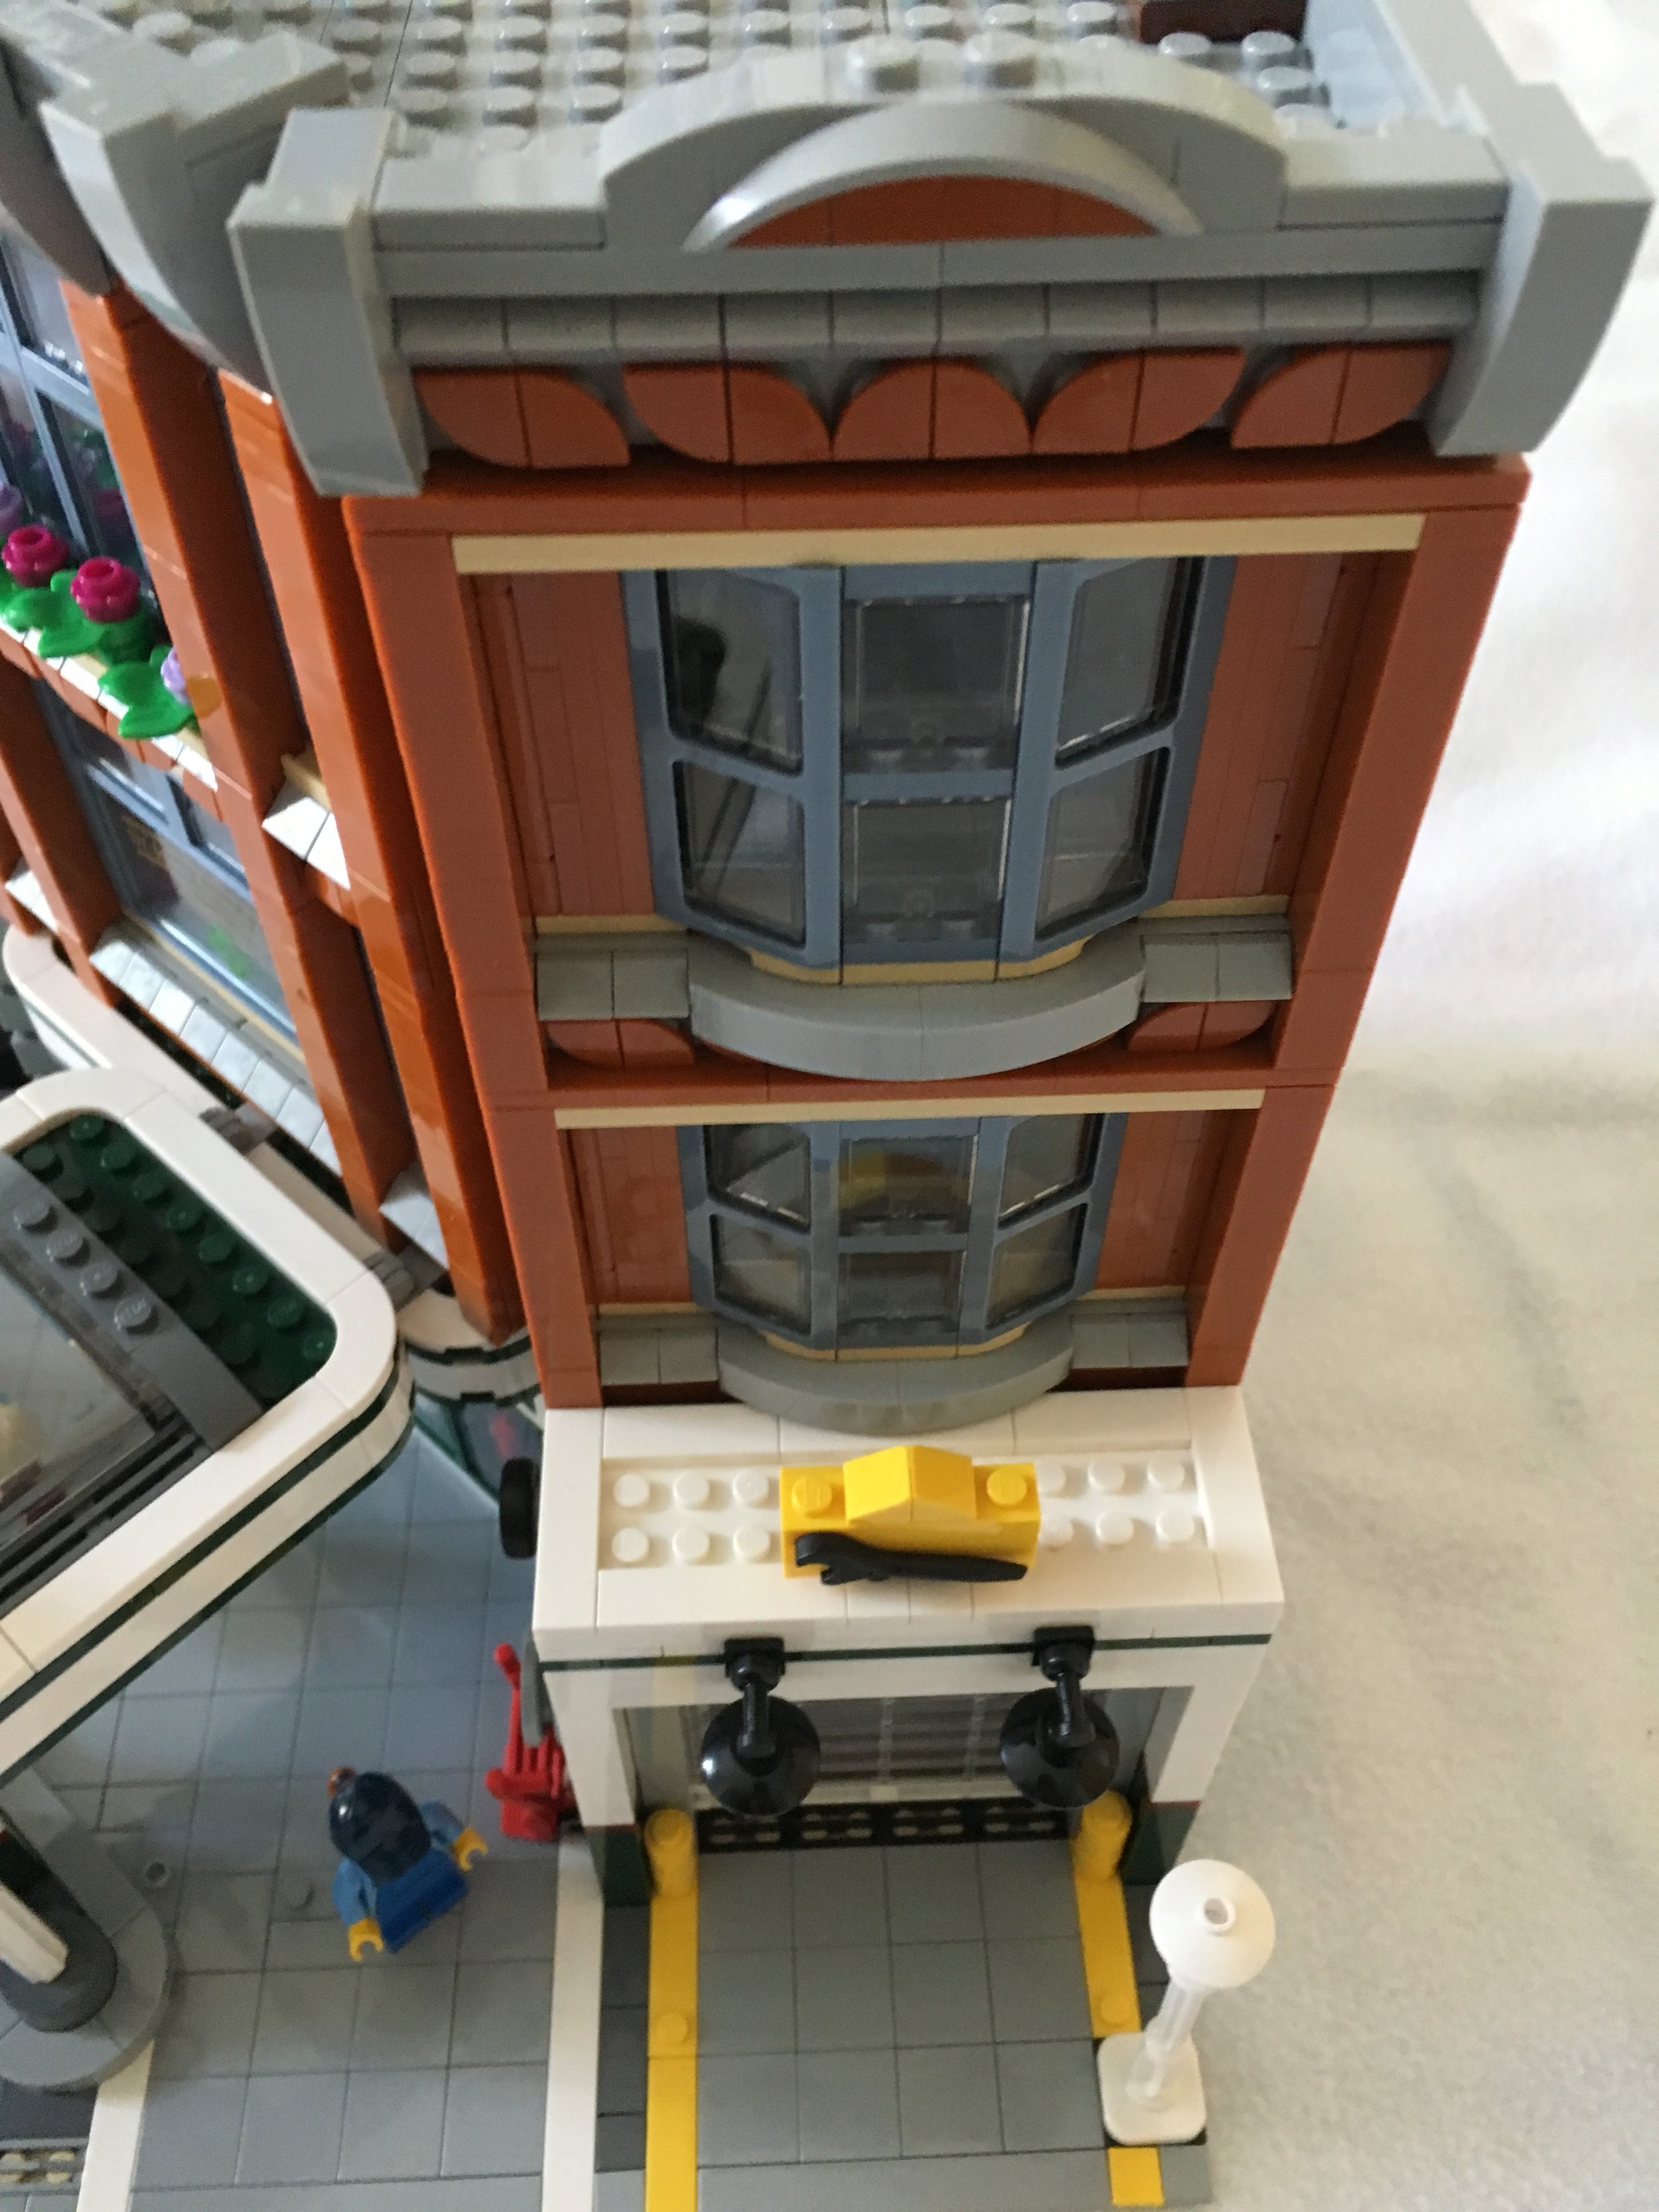
Bags five and six wrap up the first floor. The biggest section of the build is the front façade of the hotel with doors, windows, some texture to the outside, some plants, and the curved arches. Inside, you finish up the stairwell to include a handrail. On the outside, you add a lamp post.

Bags seven and eight start on the second floor which is all hotel rooms. Bag seven builds the base with plates and then starts on walls. I like the peach color which you don’t see too often. Bag eight adds in windows, furniture, and stairs to the next floor. One of the rooms comes with a typewriter which is very similar to #21327-1: Typewriter.

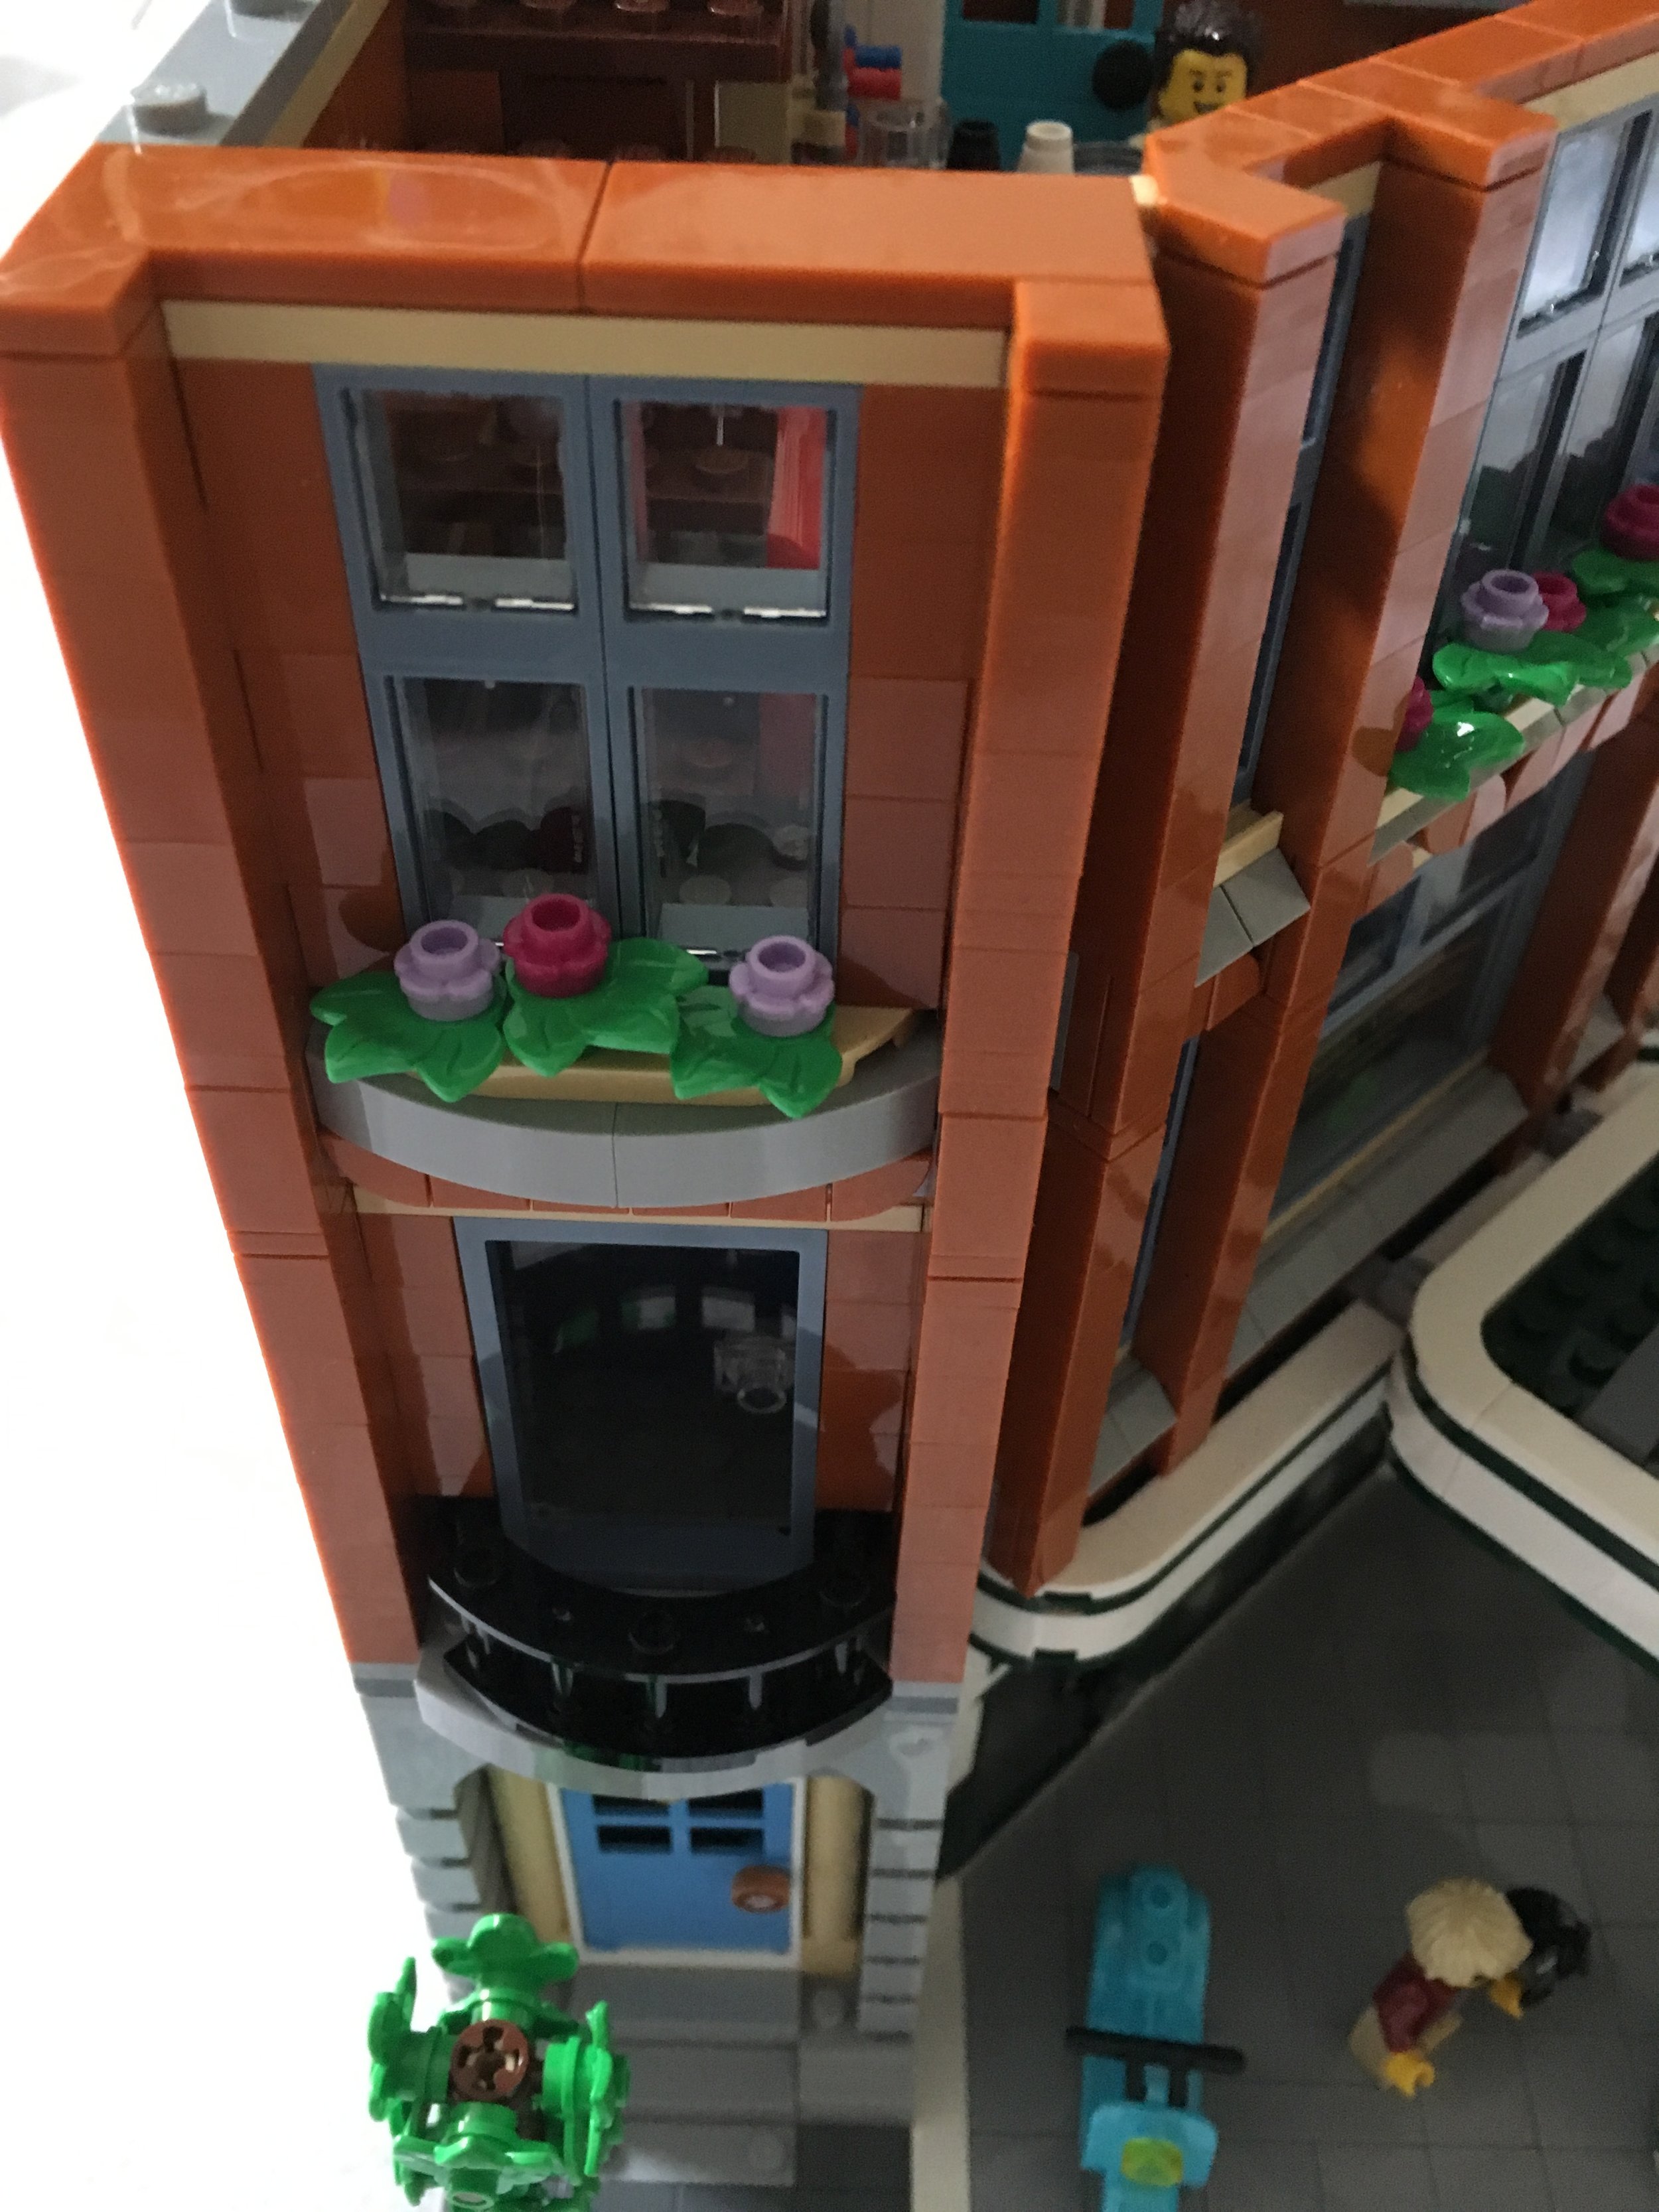
The ninth bag wraps up the second floor. It also comes with a male minifigure with a suit case. The arches over the windows look good along with some of the columns. The one room has a balcony with some decorative fencing made of brick handcuffs.

Bag ten adds a small cafe above the art gallery called “El Cubo.” It has a few tables and then a bar with some glasses and bottles. This section also has a larger palm tree made up of some fun pieces and then an entrance similar to the Market Street modular building.

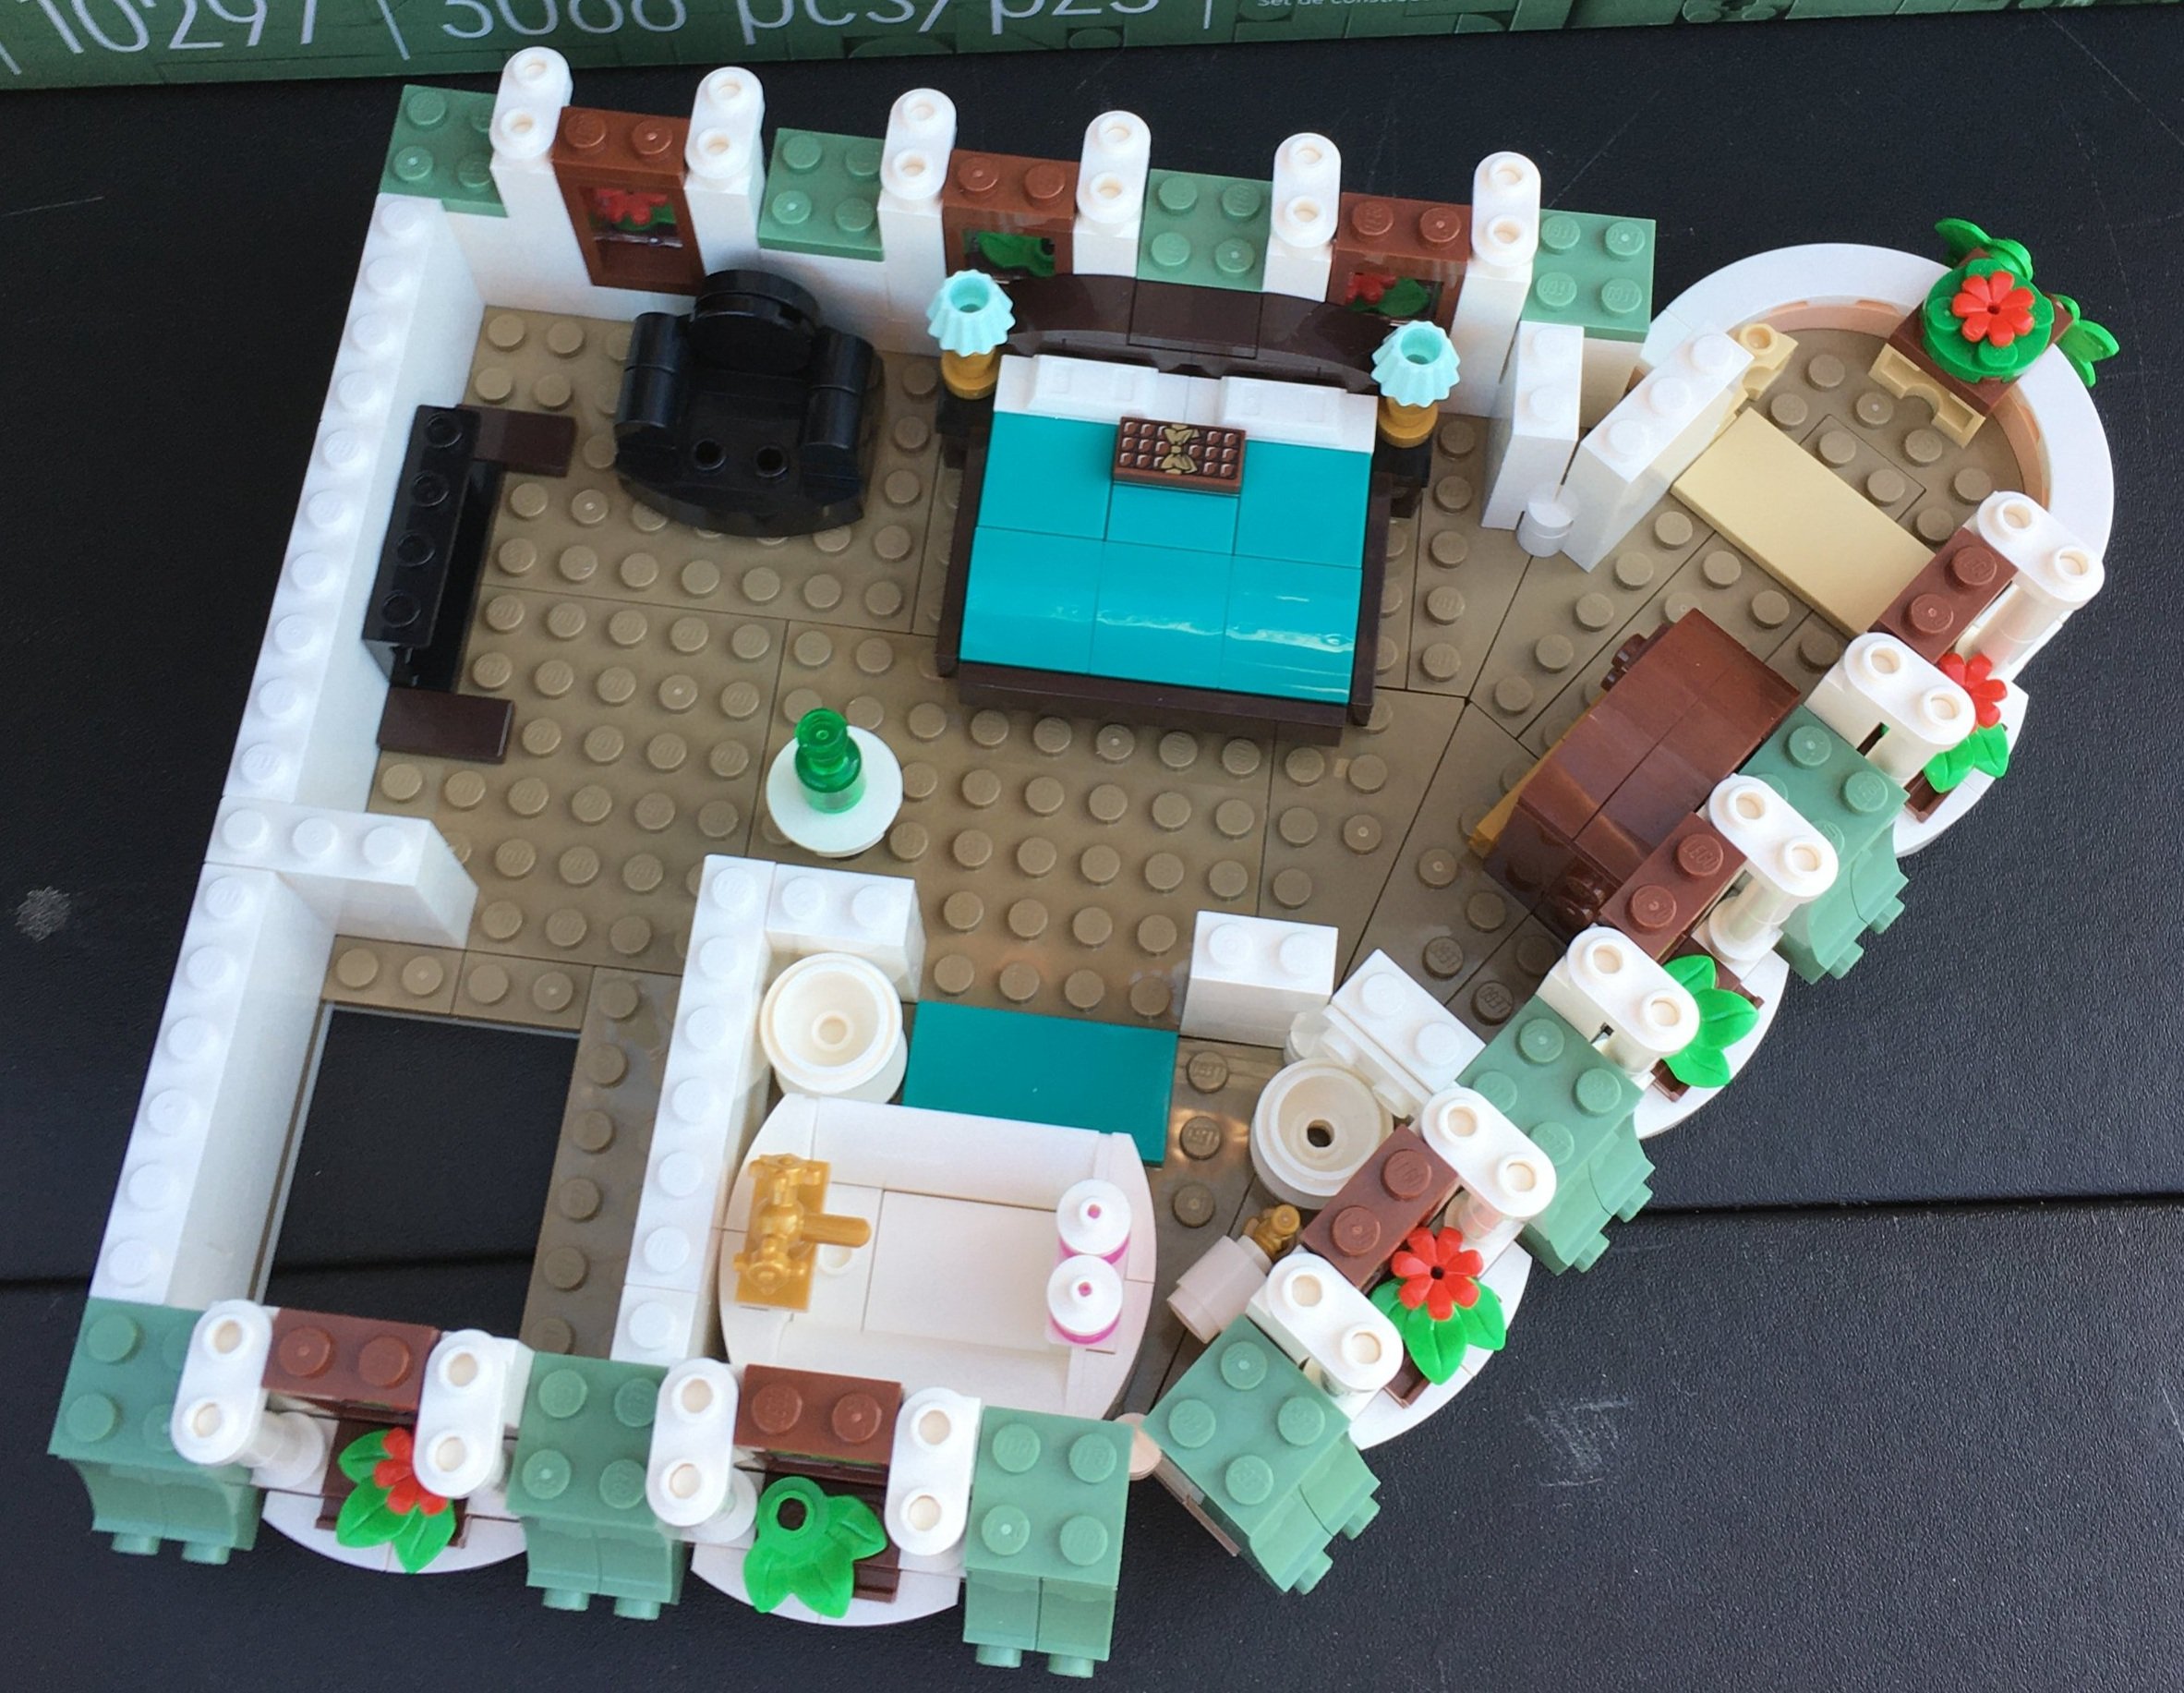
Bag eleven starts the third floor with the floor plates, some wall sections, and the start of a bathroom.

Bags 12 and 13 finish up the third floor. There’s a large bed, a chair, an old fashioned TV, and a wardrobe in the main bedroom. The bathroom has a sink, toilet, and tub. The windows all have some greenery and a few have flowers.

Bag 14 is the final bag and builds the roof along with the rounded point at the top. The large skylight is done with simple wind screens, but it looks good.

It also includes a small coffee cart and a coffee seller minifigure.

There was an error in my set with this bag. For the roof, I was supposed to get a light gray 1x2x2 plate corner. Instead, I was given a 1x2 light gray plate with slide. I replaced the part with a part from my collection, but it has been a while since I’ve seen an error in a set. Has anyone else had this issue?

Here are the minifigures. I’m glad that LEGO decided to get away from the traditional two dots and a smile to the faces with expressions. I think it’s a good mix here. A few have dual expressions.

Here is the final set from all the sides. I’m a big fan of this one. I like the building at different angles instead of the 90 degree angles. The colors are fun as well and there are a lot of great pieces. Well done design team!

The price continues to creep up on these sets with them being $200 now, but thankfully, the part count goes up. A lot of the parts are smaller though. I recommend waiting for opportunities to get double VIP points or a fun gift with purchase before diving in. You should be able to get this one for a few more years (hopefully) so there shouldn’t be a rush to get this one.

Happy building!

Set Review - #10290-1: Pickup Truck - 18+

There have been a number of vehicles in the line formerly known as Creator Expert and now called 18+. I’m not a die hard collector of all of them so I pick and choose the ones I want to build. The latest one I picked up was #10290-1: Pickup Truck. It was announced earlier in the year, was available for pre-order in the US, and then was released on 1 October 2021 for sale. The retail price in the US is $129.99. With 1,677 pieces, it works out to $0.078 per piece which isn’t too bad.

This vehicle is designed after a 1950s style American brand pickup truck. It is not branded after a specific company and instead takes some of the features of numerous trucks and then gives the truck a LEGO branding. Hopefully the lack branding kept the price a little lower. 10295-1: Porsche 911 has 200 fewer pieces, yet was priced $20 higher. Perhaps this was due to the fees being paid for the license?

The box front shows the full build. The upper left has a logo for the pickup truck. The bottom has sand green greebling with the 18+ branding. The back shows some of the play features and a CAD model of the truck with some basic dimensions.

The box contains 14 parts bags, the wheels, and an instruction booklet wrapped in plastic along with the stickers.

The instructions have a small bit of information in the front from the design team talking about the set. You also get two sticker sheets. One has two stickers and the other has eight.

The first bag builds a number of accessories to go with the truck. From left to right you get a wheel barrow with three flower pots. Each pot has a different set of flowers in it. The wheel barrow has a working wheel and is made of sand green for the fans of that colored brick. Next is an old fashioned milk jug. It has a sticker label so you know what is in it. Next up is a sign advertising the flowers for sale at a farm stand or market. It has a larger sticker which is not fun, but it’s a simple enough build and looks good. For the Christmas time decorations, you get a Christmas wreath and brick built gift. The wreath is scaled so that it fits on the hood of the truck with a stud that sticks out. The gift matches some of the others seen in other sets and can be set on the passenger seat on a stud there. There are then three containers of produce. You get a crate of pumpkins, a half barrel of carrots, and a half barrel of either apples or tomatoes (not really sure which they are). Lastly, there’s a watering can. It seems a bit large compared to the milk jug or even the wheel barrow, but it achieves the desired effect. Overall, they are a nice addition to the set and help you to display it how you want to based on the season.

The next set of bags builds the frame and chassis of the truck. It has some Technic parts for strength, but isn’t overly Technic build intensive.

The third set of bags builds up some of the front and adds the steering column. Like many of the previous vehicles in this line, the steering wheel is connected to the front wheels so you can turn the vehicle when moving it.

The fourth set of bags builds up some of the front sides of the truck I’m not sure if any of the pieces are new, but I like how it achieves the smooth and connected shape of the truck. This includes around the wheel wells and the front bumper. Additionally, you build the structure behind the cab. This includes a window and still maintains the smooth shape of the body of the vehicle. The mix of SNOT and stacking pieces helps to achieve this effect.

There are a lot of great little details in this set. You’ll notice on the back of the cab on the body of the truck is where the gas cap is installed. This aspect could have been easily skipped in a LEGO model, but they included it for accuracy which is cool.

Build five adds a number of details. The engine is included. I’m not an engine expert so I can’t tell you what all the parts are, but it looks pretty accurate to me. Then the front grill is added and instead of just hooking on a piece or two, you clip on each piece. It’s a pretty cool design technique. Lastly, you install the doors. This is impressive to me because you build these so they can be opened/shut, they maintain the smoothness of the body on the inside and outside, and the gaps aren’t too major with the body. The doors have a logo for “Green Farm.” I’m not sure if this is a generic term or a call out to LEGO’s efforts to “go green” and be more environmentally friendly.

Build six adds the bed of the truck. You build the bed assembly off the truck and then connect it once it is built. I appreciate the detail in this section of the build as you really have to pay attention to the instructions here to capture all of the details to include the wheel wells.

The seventh build adds a few details and the hood. Not pictured, but you get your transmission stick. Then you add the front bench seat. It doesn’t look too comfortable, but as I recall, most bench seats aren’t comfortable. Last up is the hood. It opens and closes, has a pole to keep it propped open, and as mentioned earlier, there is a jumper plate added to the front where you can attach the wreath.

The last set of bags finishes up the set. It includes the rear wheel well, wheels, fences for the back, rear bumper, tail gate, roof of the cab, and… I think that’s it. Here’s the completed product.

Lots of functionality to this set. Hood opens and closes, tail gate opens and closes, doors open and close, wheels spin and front wheels turn, and you can remove the fencing on the back. It’s not exactly a play vehicle, but you could play with it and you can find numerous ways to pose your display model.

Here are some details on the front and the back. I managed to put the license plate stickers on pretty well and the front grill logo looks pretty good. I’m a big fan of the older LEGO logo on the back gate. I’m also glad that it’s a printed element versus a sticker.

Overall, I was a big fan of this set. The brick red color is one of my favorites, the functionality is cool, the build techniques to keep it smooth without major gaps were good, and the attention to small details didn’t go unnoticed. It’s not bad pricewise considering the price per piece and as mentioned, it has more pieces and a lower price compared to the Porsche. Not sure if you’ll ever see this one on sale, but if you’re into the Creator Expert/18+ vehicles, I recommend picking this one up.

What were your thoughts on this one?

Happy building!

Set Review - #10270-1: Bookshop - Creator Expert

I finally completed my COVID-19 quarantine build and it took a lot longer than I planned. I think I’ve had the set for over a month now. It’s all good. I completed the 2,504 piece set released in the US on 2 January 2020 for $179.99 ($0.072/piece) and here’s my review.

It’s been out for a while, but here’s the designer video linked on YouTube in case you missed it.

The front of the box shows the set completed with some of the features inside like the ladder, the airplane toy, and the various minifigures. The back shows some of the details of the insides of the set and then what it looks like next to some of the other modulars. In my opinion, the 3 sets they show do not go together at all. #10264-1: Corner Garage and #10260-1: Downtown Diner seem to be different architectural genres and don’t look right next to the Bookshop. Not a big deal when you factor the set in by itself though. Moving on…

10270_box_front.jpg
10270_box_back.jpg

The set comes with 18 numbered parts bags numbered one through eight. There is one bag with some larger plates that is not numbered. There are two green base plates which are both 16x32 studs. The two instruction books are sealed in a plastic bag. No sticker sheet!!!!!! WOOHOO!!!!!!!!

10270_contents.jpg

The bookshop is the first part of the build. The first set of bags starts with the ground floor to include the sidewalk outside and the flooring of the shop itself. I like the colors of the tiles and if anything they are good for use in other builds if you don’t like the set. This bag includes a boy minifigure in a scarf and hat with a toy airplane. As with most Creator Expert builds, you get a piece separator.

10270_build1.jpg

The second set of bags finishes the first floor and the book shop itself. It comes with a male minifigure holding a book titled “Moby Brick” and a flower. The bookshop has a used bookshop feel versus a more modern mega store type shop. I like the style used and the various methods of making it look like there are different books on the shelves. The only trouble I had was trying to tell apart the sand yellow 1x1 plates and the warm gold ones (had to look up the color names in Brickset). Or maybe those aren’t the colors I confused? Either way, later on in the build I had to re-build a bookshelf as I realized I used the wrong colors. Not a big deal, I just didn’t catch the mistake earlier.

10270_build2.jpg
10270_build2b.jpg
10270_build2minifig.jpg

The third set of bags builds the living room area of the upstairs apartment. There is a chair, a grandfather clock, a lamp, and a patio outside in the back where minifigures can enjoy beverages together. Nothing super interesting about this floor. I like the clock and chair builds, but there isn’t much else to the floor. Not a bad thing… just that’s it.

10270_build3a.jpg
10270_build3b.jpg

The fourth set of bags finishes the book shop with the top floor. The facade on the front is awesome. I like the use of colors with the brick red and light gray. Using tiles to complete the facade detailing really helps it stand out.

I think this is a change from other builds, but don’t quote me… this build does not remove the entire roof to get to the room below. Instead it removes just the back portion so you can get to the room. It’s a fun technique to use and it helps with the details versus a flat roof you can pull off. The room itself is simple with a bed and a chameleon in a tank area. Not a lot of space to add other furniture, a bathroom, or anything else. I get it. We’ll take it.

Next is the birch tree. This is the first time we’ve seen this technique used and I like the addition of the fall colored leaves. The bird in the nest is a new detail I have not seen before either. Along with the fencing at the bottom, I like this method. I’m not sure it is super realistic, but it fits into the LEGO world well.

Finally, this bag includes a female minifigure with a large amount of hair on top. I can’t imagine having to tame that amount of hair on top.

10270_build4.jpg
10270_build4c.jpg
10270_build4_tree.jpg
10270_build4_minifig.jpg

The fifth set of bags starts on the apartment next door. There is a crawl space under the apartment with some storage and a mouse trap. Out back is a miniature garden with a pumpkin and some other greenery. I like how the designer used the shield tile to make the stairs curve. This is the first time I think we’ve seen this done. The front also includes a lamp post and some flowers.

This set includes a male minifigure. He appears to be older with his gray hair and he has some facial hair along with a red plaid shirt.

10270_build5.jpg

The sixth bag finishes the first main floor of the apartment. I am a huge fan of what Brickset calls the light bluish green bricks and tiles. The white outlining with tiles and the windows go well with that color. The inside has a bunch of detail with a fireplace, a table with a tea setting, some furniture to store various items, and a window seat type area.

Much like the bookshop build, the stairs take up a bunch of space. Not sure how to get around this other than adding in elevators. Not a big complaint, but an observation.

I’m a big fan of the rounded window on the front. This is not the first time it has been done, but I like the way this one was done.

This set of bags comes with another female minifigure.

10270_build6a.jpg
10270_build6b.jpg

The seventh set of parts bags starts the second floor. Inside there is a larger bed and a small dresser or chest for storage. Outside, I am a fan of the printed house number on the triangle tile with the white triangle slopes as the outline. I also like the use of the circular type pieces in the dark blue over the top of the rounded windows on the floor below.

10270_build7a.jpg
10270_build7b.jpg

The eight set of bags finishes the set out with the roof and patio area. The roof and windows are great and the dark blue with the bluish green go together well. The chimney picks up again after not continuing from the first floor into the second floor (oh well). Once again, the room is smaller and there is a patio area for the minifigure to hang out on. Like the bookshop, the back comes off versus the whole roof. I think this works although I would have preferred three full floors versus a crawl space and two floors.

10270_build8a.jpg
10270_build8b.jpg
10270_build8c.jpg

Here’s the final completed set. Overall I think the outside looks great. The inside doesn’t have a ton of detail, but for my purposes I usually have them either displayed or as part of a city scene so the inside isn’t as important. Also I could look to expand the inside or make the buildings taller. One of the joys of building with LEGO bricks!

I don’t have my #10243-1: Parisian Restaurant set with me, but I suspect this set would look great next to it. I can’t wait to some day be able to line up all my modulars next to each other. It should look pretty cool!

In terms of pricing, the modulars seem to keep creeping up in price, but thankfully the piece count has remained high. However, I will point out that this set contains a lot of smaller pieces so you’ll have to make the value assessment on your own. I do think LEGO has a strong fan base for these sets and they can continue to expect people to buy them if they keep them highly detailed and intricate. I took advantage of a Double VIP points sale as well as the free with purchase set #40370-1: Steam Engine so that made the purchase a bit easier. Typically these only go on sale at the end of their lifetime which will be a few years from now. Recently it has been over the Black Friday shopping weekend at a 20% off or so price and they go pretty quick.

In summary, keep these sets coming LEGO, but don’t jack the price up too high!

Happy building!

10270_finala.jpg
10270_finalb.jpg

Wrap up

Set Review - #10267-1: Gingerbread House - Creator Expert - Winter Village

LEGO has a few lines where they repeat the theme at specific times each year. The Winter Village is one of those themes with 2019’s set being released on 1 October 2019. #10267-1: Gingerbread House retails for $99.99 in the US. It contains 1,247 pieces which works out to be $0.068/piece. As of late, LEGO has been discounting these sets at their end of life time period which is usually after 3 years (but not always). You can look for deals at other retailers too so be on the lookout!

Here’s the box. The front of the box shows the full set while the back of the box shows the back of the set and some of the play features. The box also notes that you get a light brick with the set which seems to be pretty standard for the Winter Village buildings.

10267_box_front.jpg
10267_box_back.jpg

The contents are 10 parts bags. The bags are labeled 1 though 5 and there are 2 bags each. You also get a 16x16 white plate. Additionally, there is a sealed package with the instructions and a small sticker sheet. The instructions contain 2 booklets. The first is for the first set of bags and includes everything not attached to the gingerbread house. The second is the build for the house.

I was glad to see a small sticker sheet with only 3 stickers on it. The stickers were also decent sized so I’m glad I didn’t have to put stickers on 1x1 or 1x2 tiles. This set gets the detail by using bricks and printing. Yay!

10267_contents.jpg
10267_instructions.jpg

The first 2 bags build everything not connected to the house. There is a small Christmas tree which has some similarities to last year’s set (#10263-1: Winter Village Fire Station). I like the star on top and the piece they used to create it is pretty cool. I’m not sure if it is new or not, but I hope to see it again.

The two minifigures are in this bag too. From what I recall, the gingerbread man first appeared back in the Series 11 Collectible Minifigures set. Is that from 2013? Now we get two different versions. The male version has a mustache and the female has a skirt on. There is also a 1x2 tile for the baby. Along with the baby is a bottle about the size of the baby and you build a small carriage with cookie wheels to push the baby around in.

There is a snow blower which is cleverly designed and it looks like it could be candy made.

10267_build1.jpg

The second set of bags starts the actual gingerbread house. The floor has some great tiling work. I’m also a big fan of the translucent, sparkled 1x1 bricks for the windows. I always like the 1x2 or 1x4 bricks with the brick texture on them. No complaints thus far in the build.

10267_build2a.jpg
10267_build2b.jpg

The third set of bags finishes up the first floor of the house. The fireplace reaches through the front of the house and into the first floor. I’m not sure I’m a fan of this, but I’m guessing it is so you can show the light brick on the inside and the outside. The inside has some good details to include a little kitchen, some furniture, and some decorations. Given the small space, I think the designers did a good job at making sure it was detailed without going overkill on details.

10267_build3a.jpg
10267_build3b.jpg

The fourth set of bags builds up the second floor. The use of white tiles and bricks to make the roofs look frosted is cool along with the 1x1 round tiles to make is seem like there are candies as well. You can see the bathtub and the start of the bathroom on the interior of the second floor in this bag too.

10267_build4a.jpg
10267_build4b.jpg

The fifth set of bags finishes off the house. The roof is completed and the upstairs details are completed. I’m a fan of the multiple slopes on the roof versus just one slope. The use of many angles makes it look more like a house.

The interior details include a lamp, a bed, the crib, the rest of the bathroom, and the toilet. Again, great use of parts to maintain the candy feel while adding details.

10267_build5a.jpg
10267_build5b.jpg

Here’s the final picture with everything from the set. Overall, I like this set and I think it was worth the price they set on it. It was a good build with some interesting techniques and some great pieces. The minifigures are fun and this set fits well within the Winter Village sub-theme.

Downsides to the set… I would prefer the full building versus just a half. I realize it would drive up the price or cut down on the detailing, but the builds limit how you can display the sets. Everything has to face one direction or you have to build your thoughts for the rest of the set on your own.

If you’re a fan of the Winter Village sub-theme, I recommend picking this set up. Look for opportunities to get it on sale or to get double VIP points or other bonuses if it is not on sale.

Happy building!

10267_final.jpg

Set Review - #10265-1: Ford Mustang - Creator Expert

If you’ve been paying attention, #10265-1: Ford Mustang has been out in the US since 1 March 2019. I just got it and built it recently. I caught it on a double VIP point period so I paid the full $149.99 price, but got the added bonus of more VIP points. It has 1,471 pieces which works out to $0.102 per piece.

There are a lot of Blogs, YouTube channels, and other social media sites that race to be the first to review a set. Sites like the BrickBlogger claim to not be the first, but to be the most thorough. My goal is to do neither. I want to review sets where I have found a way to get them at a discount or to take advantage of some sort of deal like double VIP points or special edition free offers. That’s why this review is coming out over six months after the set was released in the US.

Onto the review…

The front of the box shows a picture of the car with its non-customized build. The set is listed for ages 16 and up and the Ford Mustang logo is there as well. The back shows the model with some of its customized options installed as well as some of the movable/removable parts.

10265_box_front.jpg
10265_box_back.jpg

The set contains 6 sets of parts bags. Some have 2 bags per number while some have one. There’s also an instruction book that is wrapped in plastic along with a sticker sheet. Thankfully, the stickers are mainly license plates. There are only 6 that go on the actual model.

10265_contents.jpg
10265_stickers.jpg

Similar to #10266-1: NASA Apollo Lunar Lander, the instruction book contains information about the set. This one gives some background on the Ford Mustang (in English, French, and Spanish) and then gives facts throughout the build on the various pages. The picture below is one of the information pages at the beginning with a bright red Mustang pictured.

10265_instructions.jpg

The first bag includes a piece separator as many of the larger sets do. The initial build is the main frame and base of the car. There are a good number of Technic pieces used to build the axles, steering, and the lift function that we will see later.

10265_build1.jpg

The second set of bags includes the start of the front fender/bumper, some of the engine, the steering column and wheel, some of the interior to include the gear shift, and the rear axle. Of note, the steering column actually turns the wheels, the wheels spin, the rear wheels can be raised or lowered, but the shifter does not actually change anything. It moves, but is not connected with the rest of the car like #42083-1: Bugatti Chiron.

10265_build2.jpg

The third set of bags includes the seats, some of the side paneling, part of the doors, and some of the structure that will support various parts of the car added later. Both seats are the same design and have good use of SNOT techniques.

10265_build3.jpg

The fourth set of bags adds the front and rear windshield, the frame to hold the roof and trunk, the side paneling in the back, and the rear bumper to include the brake lights and the Mustang logo. I added a few other pictures so you could get a look at the other sides of the car.

10265_build4.jpg
10265_build4a.jpg
10265_build4b.jpg

I’m a failure of a blogger or maybe I was just too into the build, but I skipped taking pictures after the fifth set of bags were added to the build. I’ll go with being too into the build. Sorry…

This section adds the front bumper, headlights, front grill, front side body, remainder of engine, and remainder of doors (top and mirrors).

The last set of bags adds the hood, roof, trunk, and wheels. I like the white stripes going across the vehicle. I think it is a nice touch versus just using one color for the whole vehicle. It also has the license plates and then the custom pieces.

10265_build6.jpg

This car has a number of movable parts to include the hood, both doors, the trunk, steering wheel and front wheels, and the roof can be removed. This adds to the play factor, gives you some more options for display, and adds a bit of realism to the model.

10265_functions.jpg

I have yet to decide which plates I would like to use. You get 5 options. In the picture below, I believe the ones on the top left are Australian. The bottom left are UK plates (fun fact, the one plate is yellow so they can better take a picture of your plate with speed cameras at night). The 2 sets of plates in the center are both from the US with the top being from Michigan and the bottom from California. The plates on the right appear to be from Germany (the one with the 2 round logos goes on the back… that’s your registration).

10265_plates.jpg

The inside has a steering wheel and 2 dials on the driver’s side. There’s a radio in the center along with the shifter. The passenger doesn’t get any fun details. Not pictured, but one of the stickers is a rear view mirror with a car in view. I think the car has the right amount of internal details without over doing it or making the model too large and the price too high.

10265_inside.jpg

The instruction book talks about how the Mustang was made to be customized. The instructions list six different ways to customize this set. The first is the adjustable rear suspension. I don’t have it pictured, but underneath the back of the car is a piece that you can spin to raise or lower the back of the car. Next is the “shorty exhaust headers” on either side of the car. I have the driver’s side set pictured below. The next two are the “supercharger with scoop intake” and “front splitter” that I have shown in the same picture. Finally, there is the “real spoiler” and then the “nitrous oxide tank” in the trunk. You can choose to put some, none, or all of these options into the model. The build is made in such a way that you aren’t prevented from doing any of them. There are minimal pieces to remove in order to add the customized options in. Between these features and the different license plates, this is a pretty cool option to have with the car.

Supercharger with Scoop Intake Front Splitter

Supercharger with Scoop Intake
Front Splitter

Rear Spoiler

Rear Spoiler

Shorty Exhaust Headers

Shorty Exhaust Headers

Nitrous Oxide Tank

Nitrous Oxide Tank

Overall, I’m a fan of this set. If you have read some of my past reviews, I talk about the combination of System and Technic pieces in a build. I am personally not good at combining the two, but I enjoy building using both. Having the functionality offered by Technic and the detail that comes with System is awesome and this set gives you that. Unlike the Technic cars, this one is more detail than functionality, but I think LEGO achieved a good balance between detail and functionality in this set.

The price is on the borderline of being a bit high. The Creator Expert sets don’t often go on sale and usually they don’t until their end of life. Getting a discount now will most likely involve using VIP points or catching some other sale. If you find it cheaper or use some other method to get a discount, let me know in the comments below.

What are your thoughts on this set?

Happy building!

Set Review - #10266-1: NASA Apollo 11 Lunar Lander - Creator Expert

It’s the 50th anniversary of the first moon landing and LEGO decided to put out a set to recognize the event. This one has received a lot of press on the fan media so there probably isn’t a whole lot I can say about this set that people haven’t heard so I’ll focus on the review. The basics are that it was released 12 June 2019 in the US. The price is $99.99 for 1087 pieces. This works out to $0.092 per piece. You can see the official LEGO Designer video here. You can see my review of #21309-1: NASA Apollo 11 Saturn V Ideas set here.

Onto the review…

The front of the box shows the set on a lunar surface with the Earth in the background. The back shows the assembled set with close ups on some of the details.

10266_box_front.jpg
10266_box_back.jpg

The contents are 8 parts bags with 7 of them being numbered and one of them containing larger pieces. The instruction book is in a plastic sleeve and the stickers are there as well to make sure they are protected. Bag 1 includes a part separator.

While I am not a big fan of stickers, I like how these stickers provide a chrome look to the set to re-create the heat shield. So maybe they’re not all that bad. I still hate applying them though. I never seem to be able to line them up right.

The instruction book starts off with an interesting introduction that repeats in Spanish and French. Throughout the book, there are various references to the design and what part of the actual lunar lander it relates to.

10266_contents.jpg
10266_stickers.jpg
10266_instructions.jpg

Bag 1 completes the base of the model. It is very similar to an Architecture theme build with the black tiles around the outside and the printed tile with the name of the set. While Apollo 11 actually landed on a much smoother surface, the designer tried to replicate his version of the lunar surface. The minifigure footprints are a nice touch.

Along the corners are where the landing gear of the model sit which helps you to display the model itself.

Bag 1 includes one of the minifigures. Not sure which astronaut it is, but that’s okay. There’s also a US flag (sticker) to attach to the surface of the moon.

10266_bag1.jpg

The second bag starts the construction of the actual lunar module. The initial build includes some of the main structure to include the start of the heat shield. It also includes the oxidizer (white) and fuel (red) tanks. The first 2 pictures I posted show the one heat shield folding down to reveal a camera. As I understand it, this is the camera that recorded the astronauts as they reached the surface of the moon and walked around.

10266_bag2a.jpg
10266_bag2b.jpg

The next 2 pictures show the other side. This includes one of the shields that folds down to reveal one of the laser reflectors. The “laser reflector” is a separate assembly that you can remove and place on your lunar surface if you want. Fun fact… they still use the laser reflectors to this day for experiments.

10266_bag2c.jpg
10266_bag2d.jpg

Here is a top view of the build after bag 2. The build is not your normal build of stacking bricks as you would expect from a Creator Expert set and includes some good building techniques.

10266_bag2e.jpg

Bag 3 adds on the landing gear and finishes the heat shield. When initially building the landing gear, they seemed pretty flimsy to me. Once they were finished, they are actually pretty sturdy. In looking at pictures, the designer did a good job recreating the actual gear. I have said this before, but I’m a fan of mixing System and Technic parts into a model. This set is no exception to that statement.

The gold colored pieces help to match the coloring of the heat shield. Even if you don’t like the model when you are done, getting so many of this color in a set is pretty rare so there are lots of opportunities to use the gold color in MOCs elsewhere.

10266_bag3a.jpg
10266_bag3b.jpg

Bag 4 completes the crew compartment or Ascent Stage. The outside contains various antennas as well as some of the thrusters for maneuvering. The inside doesn’t have a lot of space for minifigures, but then again I don’t think it was designed for play. There are some details inside to include some stickers that I assume are the various control panels, but the 2 minifigures with their gear on will definitely have to squeeze in here. As you can see from my pictures, the designer built it so you can take a side off to see inside or put a minifigure in.

There’s a lot of SNOT use on this section and it is a pretty fun part to build in my opinion. I like the techniques used to capture the design of the actual section of the craft.

This section snaps into place onto the Decent Stage of the lander. Thankfully it snaps in easily and you don’t have to force it in or yank it out. I didn’t break the set while attaching or removing these parts.

10266_bag4a.jpg
10266_bag4b.jpg

Here’s the final model. Overall it was a fun build with some challenging techniques, but it went pretty quickly. I believe the designer captured the design of the original system well and still added some features that you would expect in a LEGO set like being able to disconnect the stages and being able to see inside the crew compartment. Someday when I have a nerd cave, this set will definitely go on display next to my Saturn V rocket.

The price isn’t too bad. I bought when the patch and #40335-1: Space Rocket Ride were being offered so that helped. If you’re looking for a better price, wait for double VIP points or maybe towards the end of its life we’ll see discounts on Amazon or at Walmart. Have fun building this one if you buy it!

10266_final1.jpg
10266_final2.jpg

Set Review - #10264-1: Corner Garage - Creator Expert - Modular Building

The modular building line for Creator Expert started in 2007 and is back this year with #10264-1: Corner Garage. It was released on 2 January 2019. This one cost $199.99 and with 2,569 pieces, it works out to be $0.078 per piece.

You can see the previous Modular Building reviews at the following links:
#10246-1: Detective’s Office (2015)
#10251-1: Brick Bank (2016)
#10255-1: Assembly Square (2017)
#10260-1: Downtown Diner (2018)

A lot of the reviews I’ve read or watched have been negative towards this modular set. They’ve said it’s rather plain and doesn’t have a lot of the detail others have had. So we’ll see…

Like others, the front shows the full build with the different floors on the right side. The back shows some of the inner details and then how it looks next to some of the previous modulars. The box shows it next to the Assembly Square and Downtown Diner. I think it looks pretty good there.

10264_box_front.jpg
10264_box_back.jpg

The contents are six sets of bags, an instruction booklet (that comes wrapped), a 32x32 stud tan base plate, and two 8x16 light gray plates. I’m not sure why the 2 light gray 8x16 plates are separated as there are also some in bags too. Oh, and no stickers! Whoo-hoo!

10264_contents.jpg

The first set of bags starts the first/ground floor. It includes quite a few 2x2 light gray tiles for the floor and road portion. You can see the start of the garage as well as the lift. There is a tool box in the garage for the mechanic to use and a broom and dolly outside. This set of bags come with a dog and a male mechanic minifigure (I’ll hit on the minifigures later).

10264_bag1.jpg

One thing out of the ordinary for this portion of the build is the lift. There is a simple function that allows you to have the lift go up and then down. As you can see in the 2 pictures, you slide the piece out and it goes down and then you push it in and the lift goes up. Nothing to challenging, but it is cleverly integrated in the build without taking away from the aesthetics too much. So far I have only tried it with the vehicle that comes with this set and it works with that one, but that one is slightly heavy. I have yet to try it with a lighter vehicle.

10264_lift_down.jpg
10264_lift_up.jpg

The second set of bags mostly finishes the ground floor. Internally, there are some items for sale to include tires and maybe motor oil. There is also a cash register and counter. Then there’s a door entrance opposite the garage to go up to the higher floors. On top of the garage door is a small sign for the shop with a wrench on it.

This set of bags include a small Vespa type motor bike and a male minifigure who is the rider.

10264_bag2a.jpg
10264_bag2b.jpg

The garage has a door that can be opened and closed. It is the standard door used in some of the CITY sets, but it does not have the same attachment. There is a wheel on the outer wall that you spin to open or close the door. When you open it, the door parts roll up. When it closes the door goes down in a track along the walls. Some of the CITY fire stations just have the garage doors stay on the track the whole time. When the door goes up, it just slides up above the vehicle stall versus rolling up like it does in this set. I had a bit of trouble putting this together correctly, but eventually figured it out so it works fine.

10264_bag2_door.jpg
10264_garage.jpg

The third set of bags builds the gas pump, the covering over the pump, and the tow truck. The gas pump is an old fashioned pump with a cool Octan logo on it. The covering over the pump has a sign that reads “Jo’s Garage” with the catchy and clever saying of “By Accident We Meet.” A blue tow truck is included too. It’s in the older style… maybe 1930s or 1940s… and has a simple mechanism to raise and lower the hook. This parts bag also has a female minifigure who is a mechanic.

Also included in this parts bag is a small tree that uses one of the newer leaf pieces to make the branches.

10264_bag3a.jpg
10264_tree.jpg
10264_bag3b.jpg

The fourth set of bags builds the second floor which is a Veterinarian’s Office. The front window says “Dr. Jones Animal Care - No Snakes.” Yet another clever graphic by the designers.

10264_bag4a.jpg
10264_bag4b.jpg

The waiting room has a small waiting area to wait for your animal to be taken care of. There is a girl minifigure who can’t actually sit on the couch or chair and a parrot who hangs out there. The waiting room also has a small table with a coffee mug, some flowers, and a fish tank with a fish in it that is build into the wall that divides the office with the waiting room.

The Office has an examining table, a work desk for the vet, a lab station, and a table with some equipment for the vet to use. The instructions have the vet examining a rabbit on the table.

Despite the size of the floor, the designers were able to squeeze a decent amount of detail in. I’m impressed.

10264_bag4c.jpg
10264_bag4d.jpg

The fifth set of bags completes the third floor. This floor is a studio apartment with one male minifigure that lives there. The apartment has a small kitchenette, a bathroom, a bed, a TV, a couch, and some decorations on the wall (a truck and a record). The front of the building continues with the brownish color (I’m not sure of the official term used by LEGO) with the blue-gray colored window frames. The third floor has some flowers growing on the window sill. You can also see some of the design done by the 1x1 pizza slice tiles (my name, not the official name) on the second floor.

10264_bag5a.jpg
10264_bag5b.jpg

I wanted to make sure the windows get captured because I like the way they were designed. The ones on the second and third floor above the garage door are made using SNOT techniques with one of the clear pieces used for truck windshields. I like that the windshield pieces are still framed by the same blue-gray color as the other window frames. The side above the front door has a balcony on the second floor and a window on the third floor. I’m not sure why the vet’s office needs a balcony versus the studio apartment, but you can always swap them if you want.

10264_bag5c.jpg
10264_bag5d.jpg

The sixth set of bags finishes up the build and completes the roof. The roof has some flowers growing, a lounge chair to relax on with umbrella overhead, and the doorway to get up there from the stairwell. This floor also completes the facade on the front. The facade design is pretty simple, but I still think it makes it look a bit more elegant and fancy versus just a plain corner on the top.

10264_bag6a.jpg
10264_bag6b.jpg

I added pictures of both sides so you can see the designs above each of the side windows. I like the use of the new-ish 1x1… um… it looks like more of an equilateral triangle or isosceles triangle versus a cheese slope… piece.

10264_bag6c.jpg
10264_bag6d.jpg

This set comes with six minifigures. On the top there’s the vet (Dr. Jones we assume) and 2 mechanics (a female and male). On the bottom are the “cool guy” who has a helmet to ride the motor bike, the girl who brings her pet to the Vet, and the man in a sweater who lives in the studio apartment. In my opinion, it’s a good mix of minifigures and I think having facial expressions adds to the set versus the original smiley face they used to have in the original modular building sets.

10264_minifigs.jpg

A closer shot of the vehicles… The tow truck has 2 tones of blue which gives it a nice look and then the motor bike.

10264_truck.jpg

Overall, this is not my favorite modular building, but I don’t have as many complaints as I saw in other reviews. I like how the angled wall in the front was done to create a corner building. There are a lot of pieces in great colors you can use in MOCs if you decide to tear your building down. The signage is clever with some of the humorous clips and the old fashioned Octan logo should become pretty popular on the secondary market. I’m a fan and I can’t wait to add it to my other modular buildings some day.

As for downsides, I think the garage portion could use a bit more detail. Maybe some more equipment for fixing cars or more things to sell. Also, the color transition from the white and green to the tan-ish and blue-gray on the second and third floors doesn’t go well with my untrained eye. I’m not sure what to recommend, but it seems to clash slightly with me. To be fair, if I’m going to complain, why don’t I just redesign it myself, right?

What are your thoughts? Is this modular building really awful? Or maybe just not as good as some of the ones in the past? Or maybe it’s just different from some of the ones we’ve had in the past like the Parisian Cafe or Grand Emporium. Let me know what you think.

Happy building!

10264_final1.jpg
10264_final2.jpg

So That's Why We Haven't Seen More Creator Expert Trains!

I wrote a post a while back complaining that it’s been a while since we had a Creator Expert style LEGO train. Well I think I may have found our answer.

I found an interview with LEGO Designer Jamie Berard by the show Assembled which is an interview done by Mike Psiaki. It’s about a 30 minute interview and I found it pretty interesting. They talk mainly about the new Roller Coaster set (#10261-1)., but they also talk a few more topics like set re-releases and to the point of this post, Creator Expert trains.

Mike asks why there aren’t more Creator Expert themed trains at the 27:50 mark or so. Without directly stating it, Jamie’s response is pretty much that LEGO doesn’t make the money they want to on Creator Expert themed trains. There is a subset of LEGO fans out there that love trains, they each buy one or two of the train sets and that’s it. So LEGO will release the standard LEGO CITY passenger and freight trains on a regular basis, but that’s mostly it.

Jamie also brings up some of the other ways they have tried to incorporate trains. The goal is to get a group that enjoys another theme and to add a train to that theme. He brings up #10254-1: Winter Holiday Train as an example. There is a larger group that enjoys the Winter Village theme. They may not be into a Creator Expert style train, but when a train fits in with the Winter Village theme then it is a buy for them.

After hearing that, you can tell LEGO has done that elsewhere. For example the Hogwarts Express (#75955-1) and the upcoming Hidden Side theme has a set titled Train (#70424-1). It will be interesting to see where else LEGO can add the train line into another theme in the future.

With that being said it leaves us LEGO Creator Expert train fans left out. As Mike mentions in the video interview, he likes the Winter Holiday Train, but it’s not on par with the Horizon Express (#10233-1). I don’t think the LEGO Ideas platform will work either based on Jamie’s interview response. If LEGO doesn’t think there is a market out there to sell advanced train sets, then even if a train set does get 10,000 supporters it might not go into production. Another way to get advanced train sets out there might be the Bricklink AFOL Designer Program. There are some design limitations that I’d have to look up and there are potentially some piece restrictions too, but it could be a possibility. If BrickLink sees this program as a way to increase profits in the future, then submitting train designs there might be the better way to go versus LEGO Ideas.

Dear LEGO,
I would still like to see more Creator Expert themed train sets. Thank you for your understanding!
-Bricks for Bricks

Set Review - #10268-1 - Vestas Wind Turbine - Creator Expert

In 2008, LEGO worked with Vestas to build a wind turbine set to be released to employees of Vestas. Of course that created an opportunity and the set is now currently going for almost $400 on the secondary market sites. If you were like me and you weren’t able to get #4999-1, you’re in luck as the re-release of the Vestas Wind Turbine (#10268-1) happened on 24 November 2018. Or as the LEGO Designer video says, there is now a “Vestas for the rest of us.”

The 826 piece set retails for $199.99 in the US which works out to $0.242 per piece. Yikes! It’s high, but it also includes a 32x32 stud baseplate and Power Functions gear. So is it really not that bad? Maybe. Let’s take a look at the set.

Here’s what the box looks like. The front shows the set, the back shows the functionality. It also highlights the fact that the tree pieces are made from the sustainable plastic similar to #40320-1.

10268_boxfront.jpg
10268_boxback.jpg

The contents are 12 parts bags, a wrapped instruction booklet and a 32x32 stud base plate. The parts bags are not numbered so you just open them all and start building versus opening bag one to build a specific part. With 826 pieces this method was manageable. I knew that some of the bigger pieces weren’t needed right away so I didn’t have to open them all at once.

The instruction booklet is part instruction booklet and part propaganda campaign. LEGO gets a chance to boast about their program to go green and to talk about how great wind turbines are for the world. Not only does the front of the booklet contain a few pages of details, but throughout the build there are little tidbits here and there that talk about wind turbines.

I think what the LEGO Group is doing is great in terms of becoming more sustainable, but I didn’t need all of the information in the instruction booklet to tell me that. I’ve read articles on it and have seen news videos about the program. I don’t want to have to spend money on a set and pay for instruction booklet pages for something that I could just click a link to online.

10268_contents.jpg

The build starts with the Vestas maintenance vehicle, the 2 workers, and their equipment. The truck looks more like an ambulance than a maintenance vehicle. The back even has a place to stick their equipment which could also be used for a stretcher. Page 8 of the instructions shows a pick up truck and a small SUV next to a wind turbine tower. I would have preferred a pickup versus the bulky ambulance.

10268_vehicle.jpg

Next up is the house at the base of the wind turbine. I’m not sure what to make of the house. None of the pictures of wind turbines in the instruction booklet shows a house nearby and I have never seen one in the US or in Europe. I understand the concept of trying to show that we can use wind energy to power our houses, but I’m not sure if the house fits. The house has a mailbox, a small patio with 2 chairs and a table, a small cot (not really a bed), and some simple random appliances. The house build doesn’t do anything for me. I would have preferred a transport truck to carry blades or some sort of equipment used to install or maintain the turbine.

10268_housefront.jpg
10268_houseback.jpg

The bottom of the tower contains a small park which is not realistic. Have you ever seen a park bench at the bottom of a wind turbine tower? Enough complaining. The green BURPs are a nice touch and will be great for future MOCs needing green settings. The door on the back leads to… nowhere, but I get what they’re trying to do. It works as you see some of the pictures in the instruction booklet where there’s a door at the bottom.

10268_towerbottom.jpg
10268_towerback.jpg

Okay, so I’ve been pretty negative so far, but I will say that the building of the turbine was much better and made up for what I didn’t like about the building and the vehicle. So 5 positive things to make up for my negativism:
1 - There are zero stickers in this set. YAY! All of the parts with logos are all printed.
2 - Having recently built the Technic #42083-1 Bugatti Chiron, I was a fan of using System pieces to detail a Technic set. This set is mostly System, but it has Technic pieces to make it function. I’m a big fan of the combination of the two. I know the Creator Expert carnival sets use this as well and it would be cool to have more of the same in the LEGO world.
3 - The set is expensive, but having the Power Functions stuff included makes worth it in my opinion. Instead of having to build the set without it all, you can just install it at once. The set is not ideal for building and then easily putting in Power Functions equipment later. Some of the train sets that I own are good at designing it so you can easily add Power Functions. For this set, you might as well re-build the whole turbine, tower, and house.
4 - The tallest set out there is the #21309-1 NASA Apollo Saturn V set. This set is the second largest and it is a big one. I don’t have a photo shoot area (as you have seen) so trying to get a picture of this one was tough. I think between the movement with the Power Functions and the sheer size, this set will be a great addition to some of the LUG displays out there. I’m looking forward to seeing pictures and videos of this one being used in large City scene displays.
5 - The turbine can spin about the tower portion as the wind changes. So not only do the blades turn, but you can rotate the turbine itself. There are Power Functions wires inside so it doesn’t spin forever, but you can spin it about 180 degrees in either direction. Also, the blades can be inserted in a separate Technic pin to change their angle. This mimics how changes in conditions require changes to the blade directions of an actual turbine. Two simple things, but they really add to the set in my opinion.

10268_turbine1.jpg
10268_turbine2.jpg

I fit the entire blade section into one picture and then put a foot long ruler next to one of the blades.
The diameter of the blades is 28 inches (72 cm) so each one is about 14 inches. The tower is 26 inches (67 cm) so almost 40 inches total to the top of the blade.

10268_turbine3.jpg
10268_turbine4.jpg

Overall was it worth it? The wind turbine is great, but the rest of the set is lacking in my opinion. I picked this one up during double VIP points, I used EBates to get 2.5% back, and I got a free #40292-1 set along with it so it wasn’t a complete waste. Will this one go on sale? Hard to say. I’d like to see it on Amazon.com for 20% off, but there’s no telling what LEGO will do with the sales of this set. Should you get it? I think it depends on what you plan to do with it. Like I said, it would be great in a large City display, but on it’s own it is a tough sell.

What are your thoughts?

Set Review - #10263-1 - Winter Village Fire Station - Creator Expert

The 2018 Winter Village set was released on 2 October 2018. It’s a fire station and adds to the line of sets that started back in 2009. This is the 10th set in the line. This year, the set is 1,166 pieces and retails at $99.99 in the US. This puts it at $0.086 per piece which is pretty decent. It’s slightly less than last year’s set ($0.089 and keep in mind that the set includes a light brick which is probably more expensive to put together).

You can see my review of the 2017 set Winter Village Train Station here.

Here is the box. Like many sets, the front shows the whole set while the back shows some of the set features.

10263_front.jpg
10263_back.jpg

The set contents are 3 sets of bags, the two instruction booklets in a bag with the sticker sheet, and a piece separator (in the first set of bags).

10263_contents.jpg

The first set of bags builds what I will call the accessories. It includes a bench with a lamp post, a Christmas tree with some gifts, an ice skating rink, the fire truck, and a sled. The Christmas tree design is one that I have not seen before. It’s better than just throwing in a one piece molded tree, but I think it misses out on some of the realism of branches that can be created using LEGO bricks. The ice rink includes a hockey player with a hockey stick on the ice. The skating area is rather small and it includes a fireman statue. The fire truck does not have a ton of detail, but it fits into the theme of vehicles used in previous Winter Village sets. This bag includes 2 fire fighters. There is a female and a male and they each come with a hair piece and a helmet. And don’t forget the fire dog! In my opinion, the stickers on the fire truck were a pain. I always find it challenging to put a sticker on a 1x2 tile or on the 1x2 cheese slope. I find it hard to get the sticker exactly centered on the tile part. I’d rather have bigger stickers on bigger pieces and printed small tiles or cheese slopes. Finally the sled includes some gifts and there is a baby minifigure with a gift on his/her shirt to ride on it. The set shows a girl minifigure along with the sled.

10263_bag1.jpg

The second set of bags completes the first floor of the fire station. As you can see, the front includes a fire hydrant and a snowman. The main doors on the first floor open in to allow the fire truck to drive in or out. There are stairs leading up to the second floor that have some white pieces attached to show the poor shoveling job that was done. Like the rest of the Winter Village theme, the back is not completed (something for you to do on your own). The truck is longer than the building itself. The back does show you some of the items in storage to include another helmet, an ax and a pick, fire extinguishers, and a clock. This set of parts bags includes a saxophone playing minifigure to… I’m not sure how he fits in.

10263_bag2a.jpg
10263_bag2b.jpg

The third set of bags completes the build and adds the second floor and roof. It also includes another fire fighter. From the front, you can see the station is covered in some Christmas decorations of greenery with red. The tower above the fire pole slide area has a pretty cool design on the front and right sides. The building also has some snow along the edges. Looking inside you can see a small kitchenette with a coffee maker, stove top, and sink to help cook the hot dogs you can have with your coffee. There’s an old school red phone to get calls and a radio installed into the wall. A fold up bed is attached to the wall (the bed uses a sticker for the pillow and sheets… really?). Under the bed is a play area and a dog bone for the fire dog. The living quarters also include a table with 2 chairs.

10263_bag3a.jpg

The top of the building has a flag (with stickers to attach) and a slot for you to attach the light brick. The light brick really only lights up the front two windows and in my mind doesn’t do much for the set.

10263_bag3b.jpg
10263_bag3c.jpg

Here’s a view of the final product. I got it during double VIP points so I got some benefit, but it was not on sale. These sets typically go on sale only at the end of their shelf life so you’ll have to wait at least 2 years on this one if you want to get it on sale. Overall, I think this set fits into the Winter Village line very well. We’ve had a toy shop, a bakery, a post office, and others and a fire station is a great addition. This set has a lot of play built in and the accessories go well with the rest of the theme.

If you’ve been sucked in like me to this theme, definitely pick this set up. Wait for double VIP points or for when there is a cool free set for buying a specific amount. At $99.99, this set should put you at the right place to get whatever set is being offered.

Happy building!

10263_final.jpg