Bugatti

Set Review - #42083-1 - Bugatti Chiron - Technic - PART 2

If you missed Part 1, you can see it here. If you want to see what a real Bugatti Chiron looks like or what the factory looks like, you can see that here. If you want to see more about the set, keep reading…

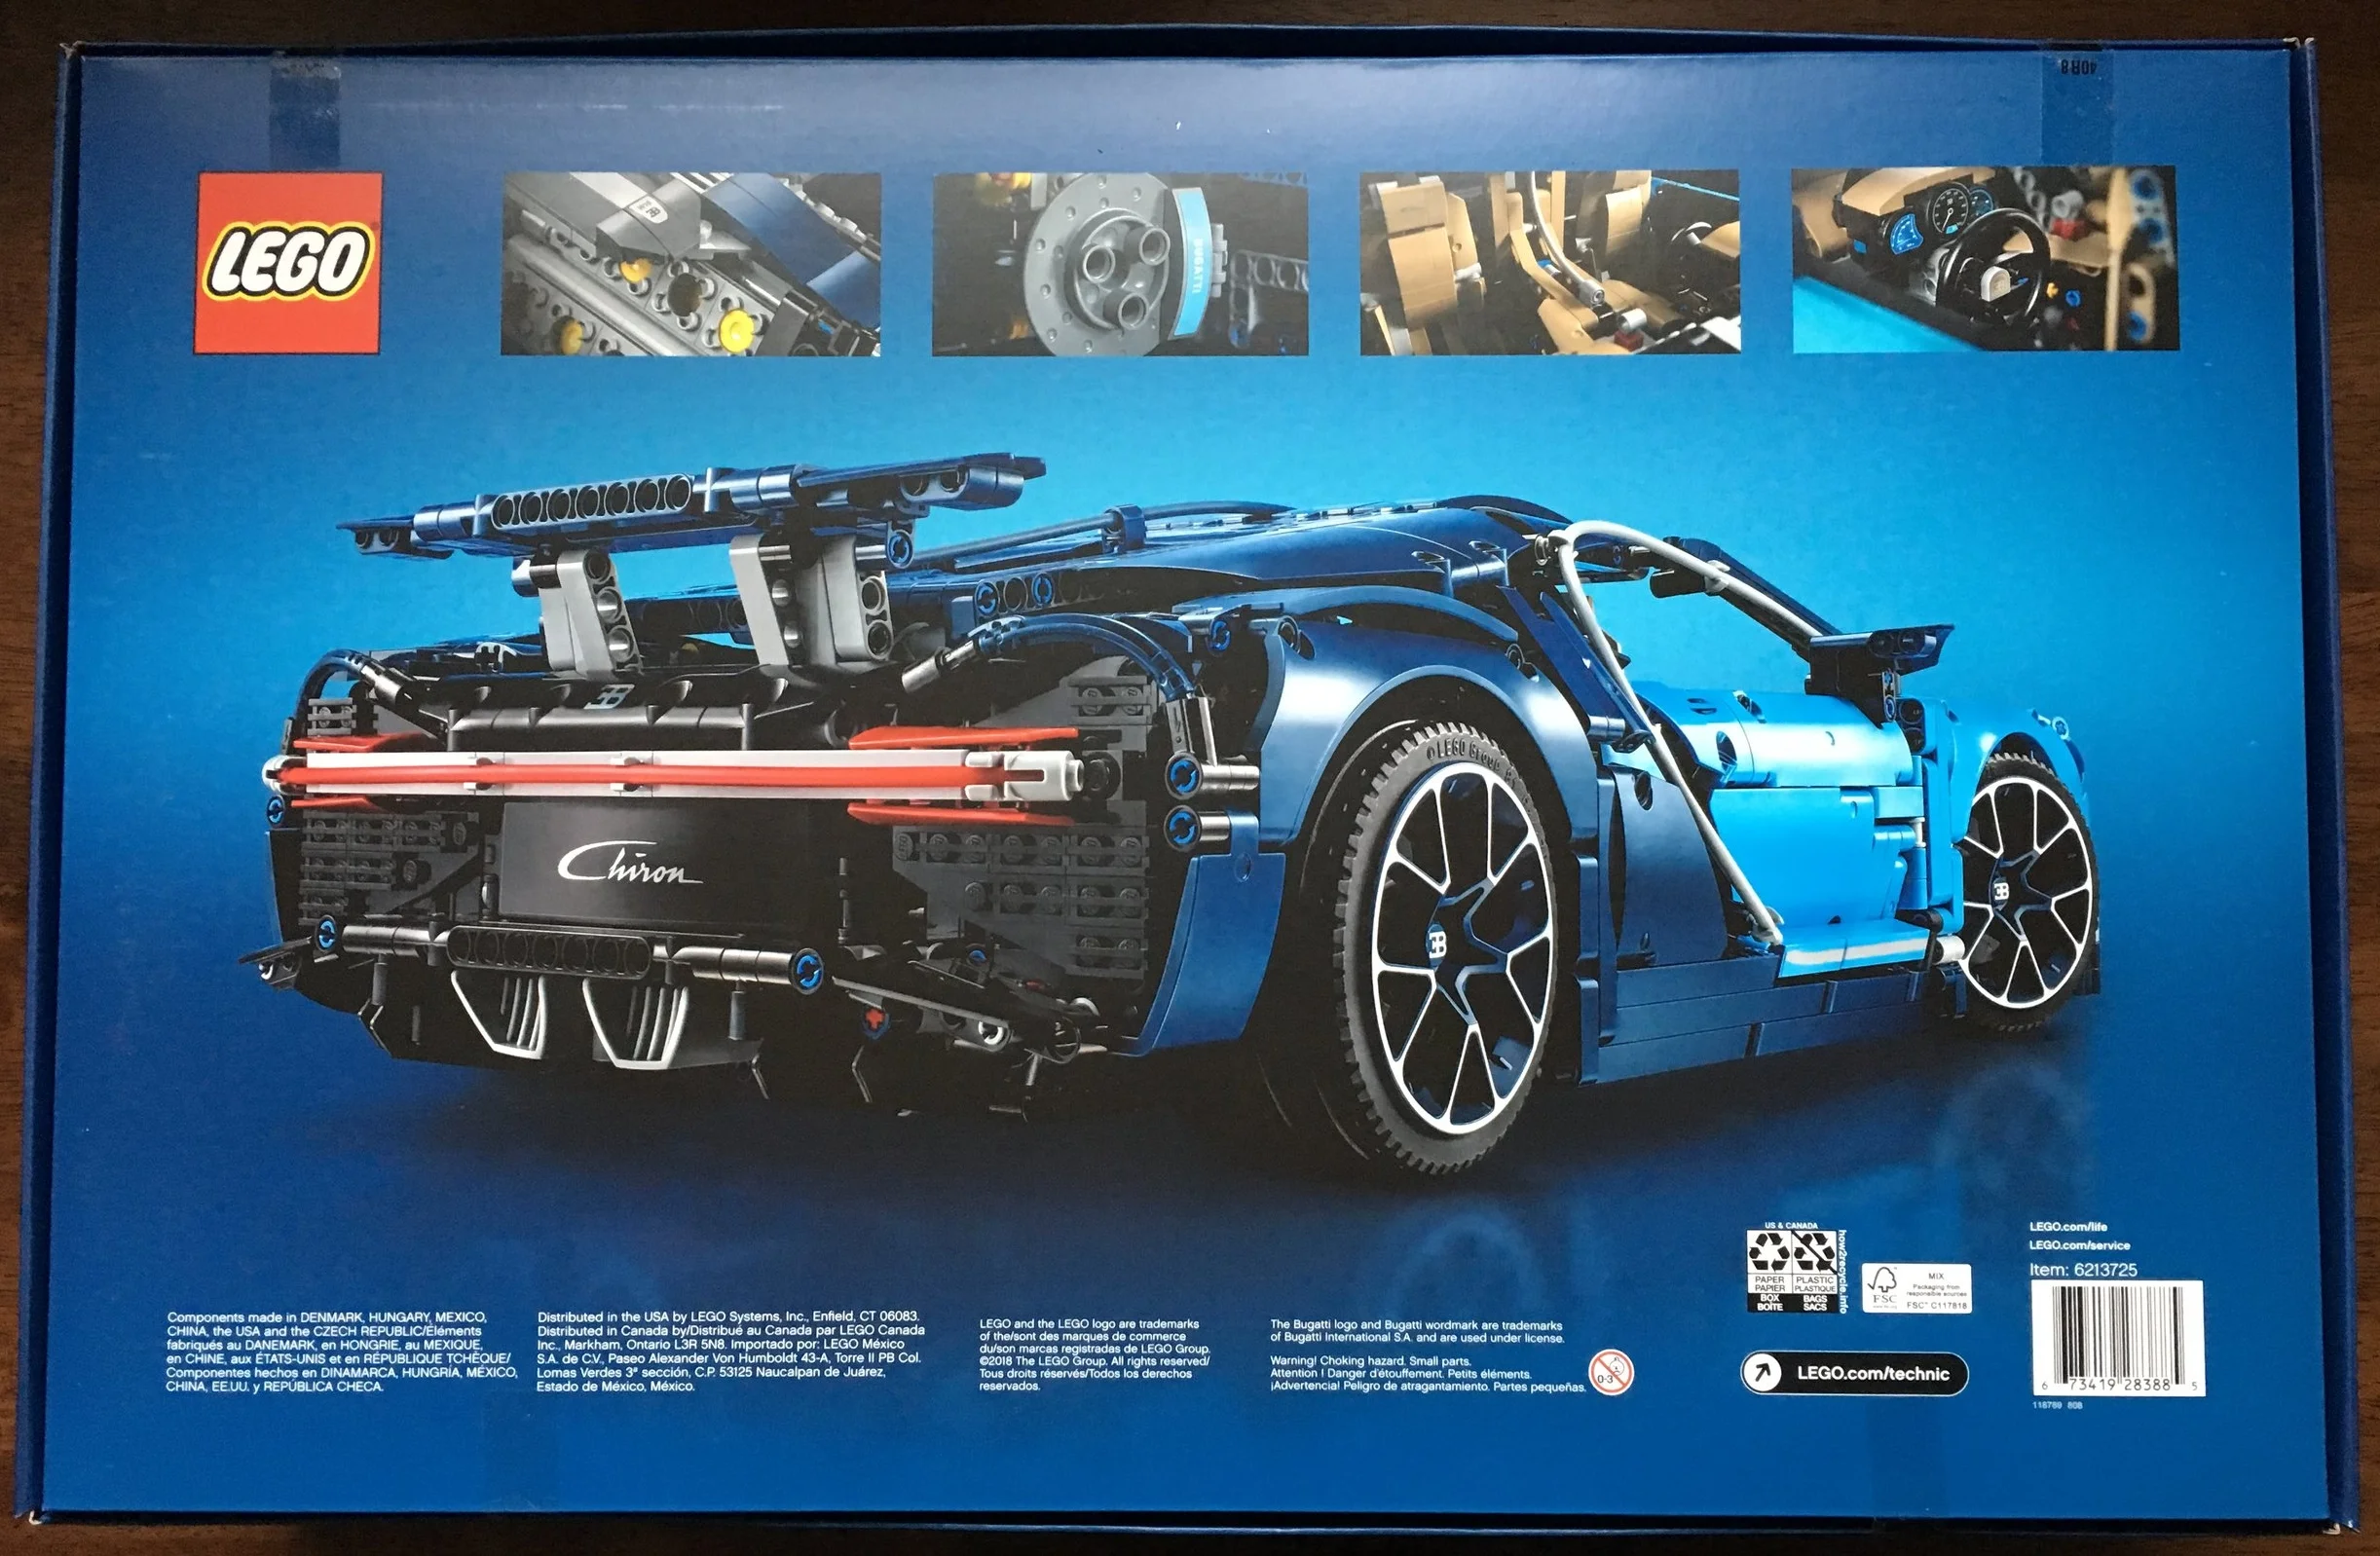
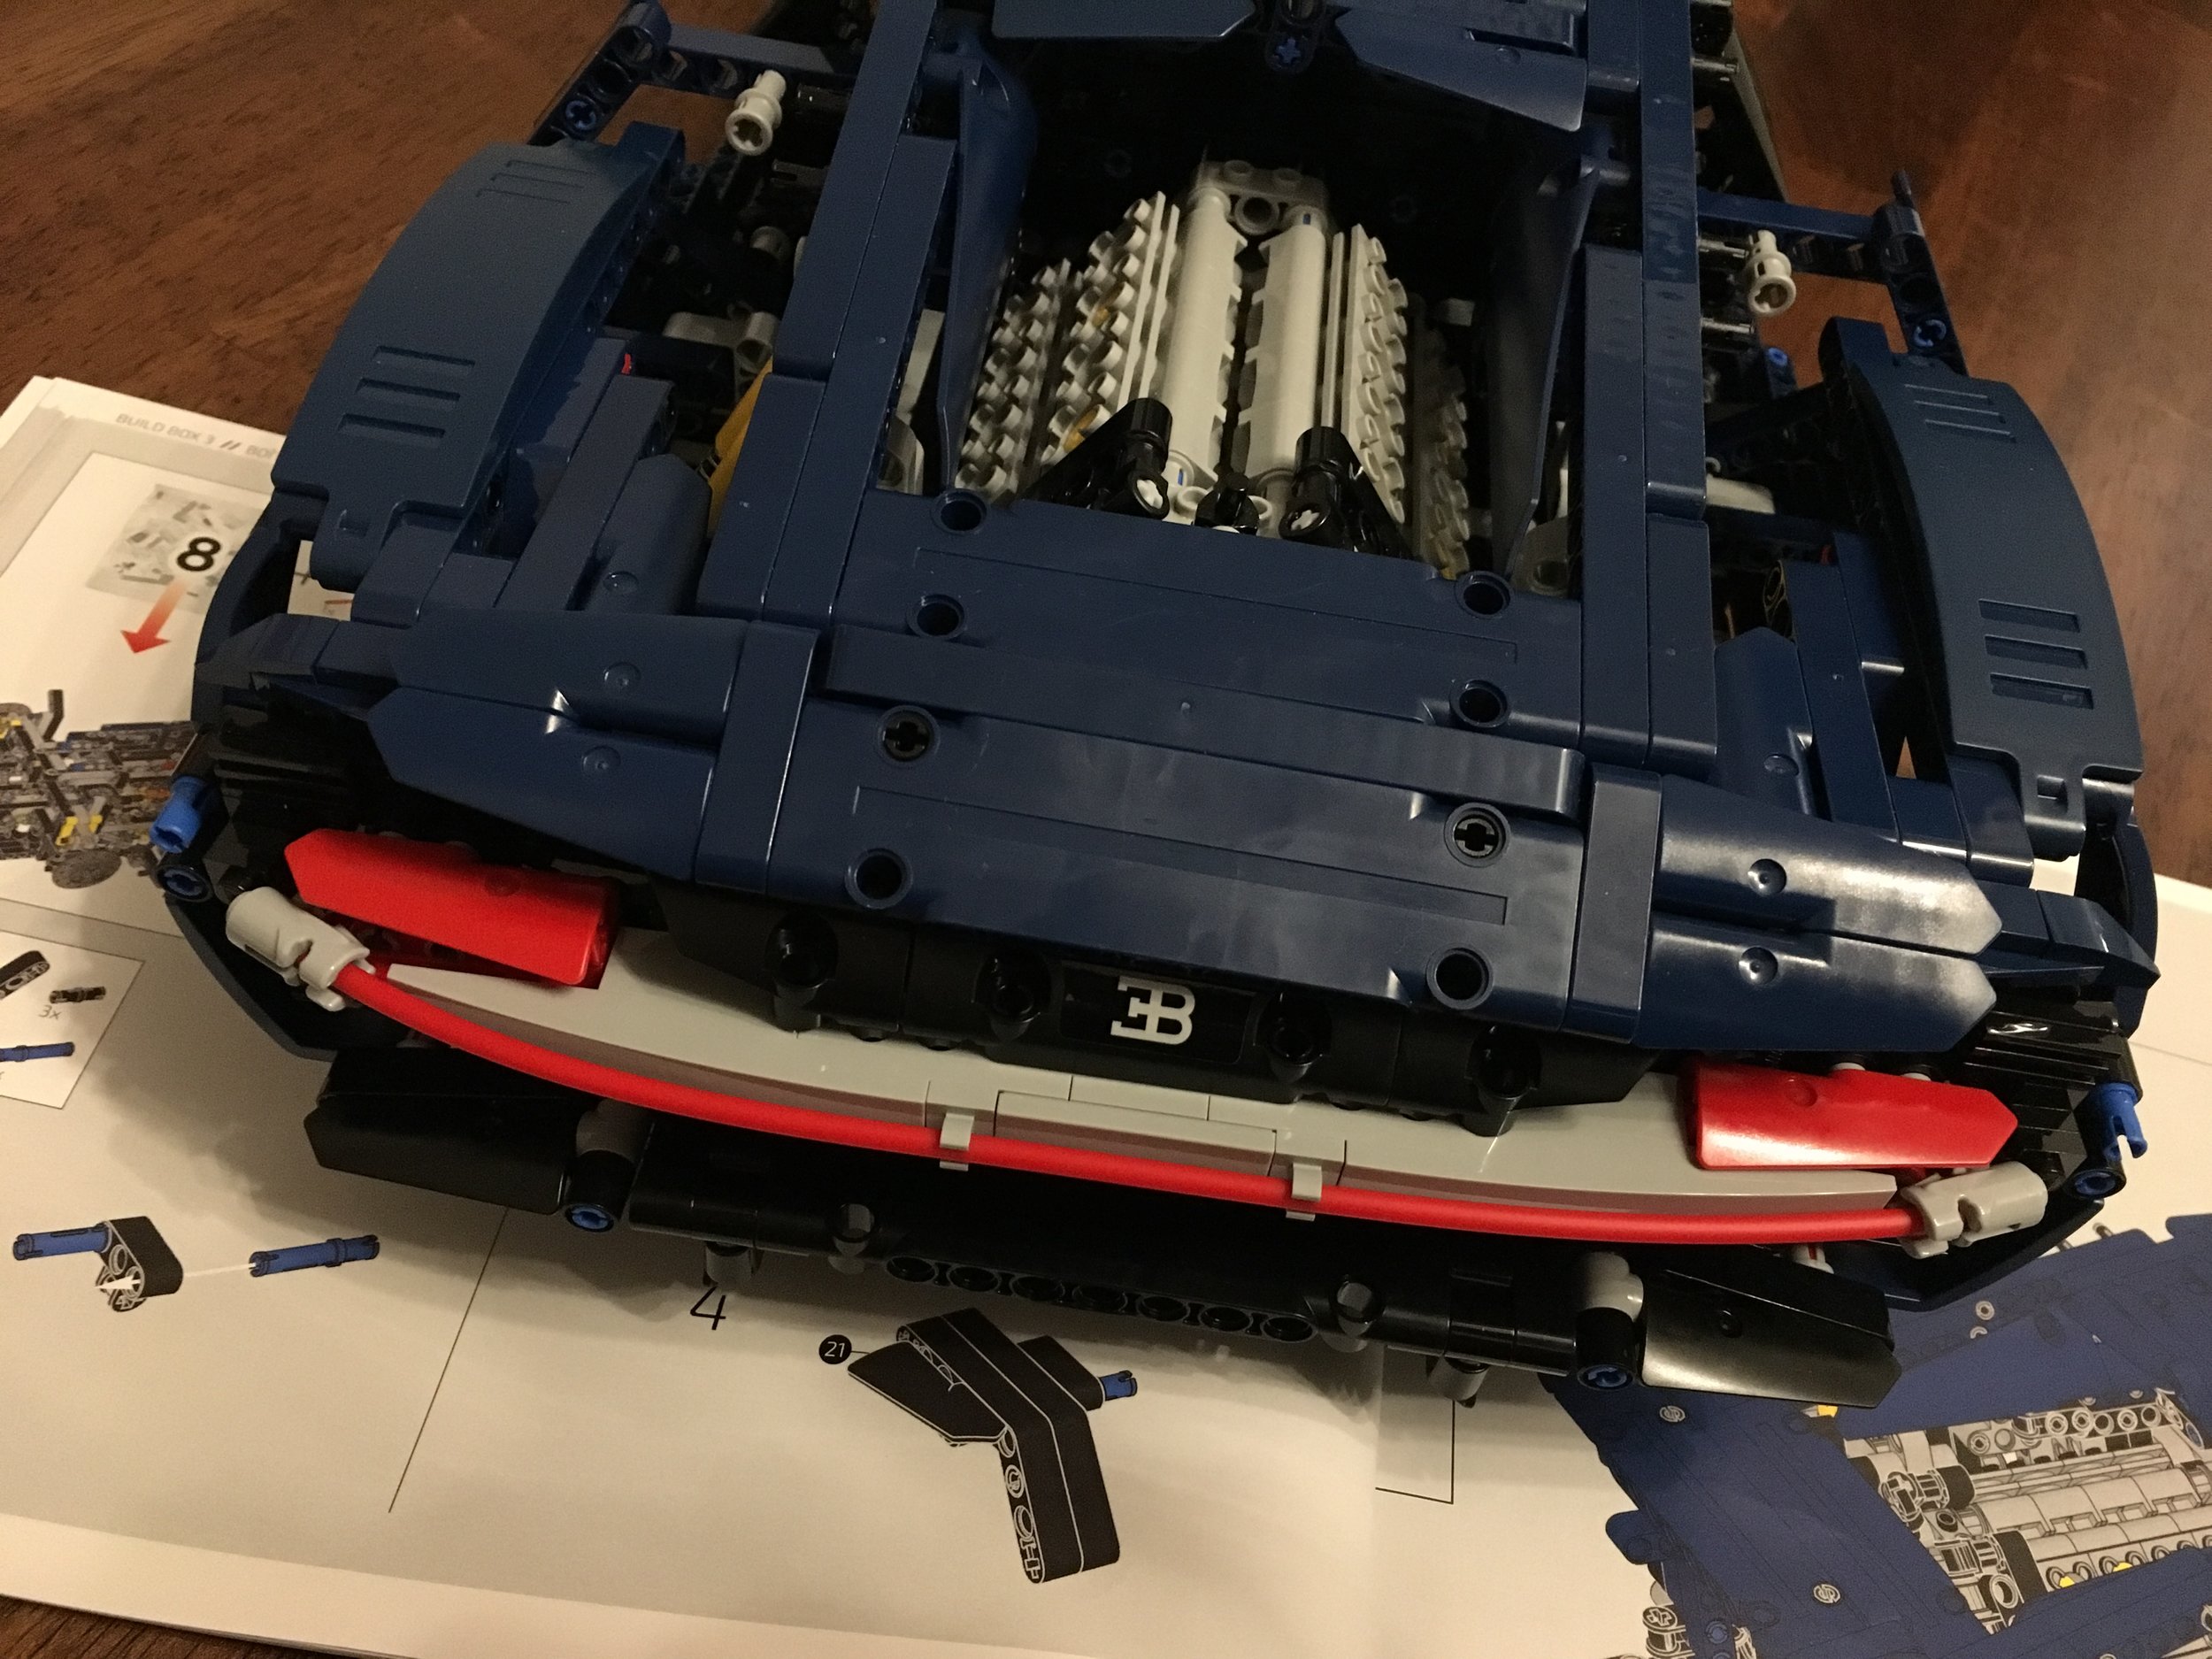
Instruction Book 2 is 322 pages long. It starts off with the set of bags numbered 7 in build box 3. This section of the build is labeled rear body work and deck lid. With Book 1 being the internals, Book 2 focuses on the externals. The bags numbered 7 include the construction of the rear spoiler and then a lot of the body for the back to include the portion around the engine and part of the top of the passenger compartment. Number 8 completes a lot of the detail in the rear to include the cool looking brake lights. There are also a number of stickers that go here. I am not a fan of stickers, but I realize LEGO has to do a price balance between printed pieces and sticker sheets. The cost of the sticker sheet probably helped save a few dollars on an already expensive set. I’m not the best at sticker placement, but it looks okay.

42083_bag7.jpg
42083_bag8.jpg

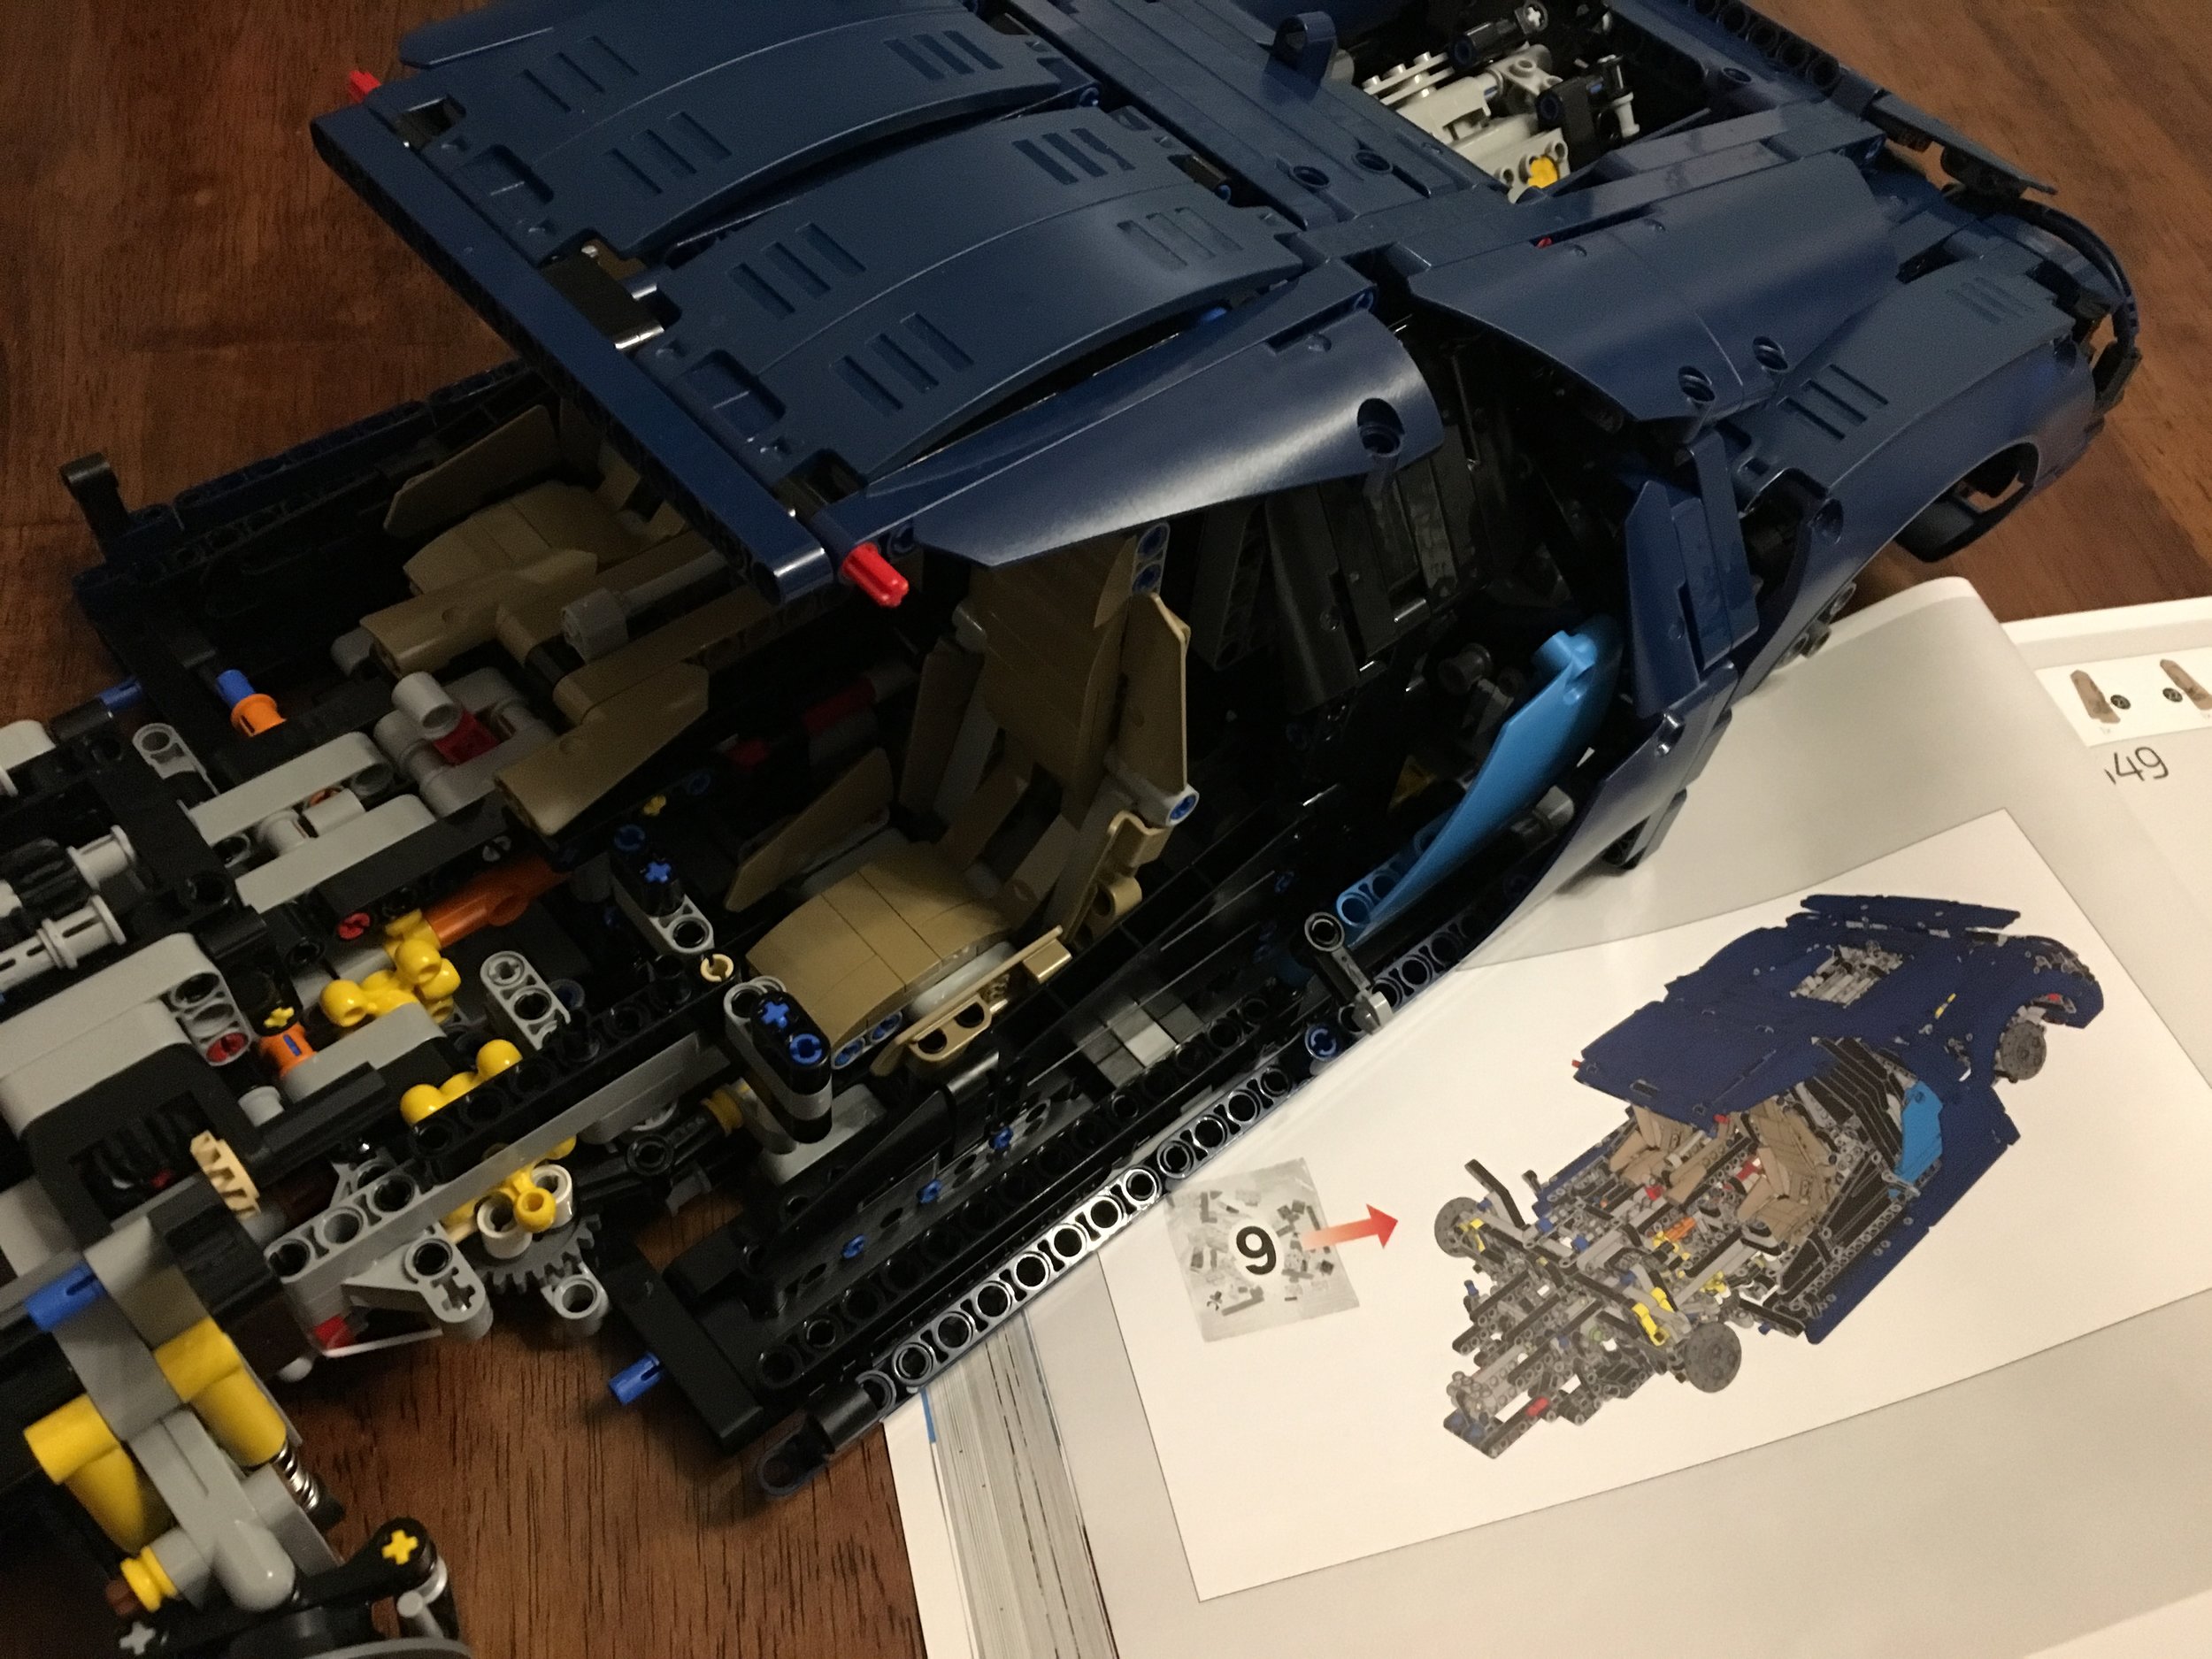
Bags 9 and 10 are labeled the seats and interior on page 108 and start off box four. The seats are Technic built with some System pieces for added detail. As the build went on, I realized that there were more and more System pieces used. I’m not a good builder/designer to begin with, but I’m impressed at the ability to combine the 2 types of pieces into one set and to have it go seamlessly like they did. Bag 9 is the seats and some more of the outer paneling. Bag 10 is the dashboard, steering wheel, glove compartment, and a bunch more stickers.

42083_bag9.jpg
42083_bag10.jpg

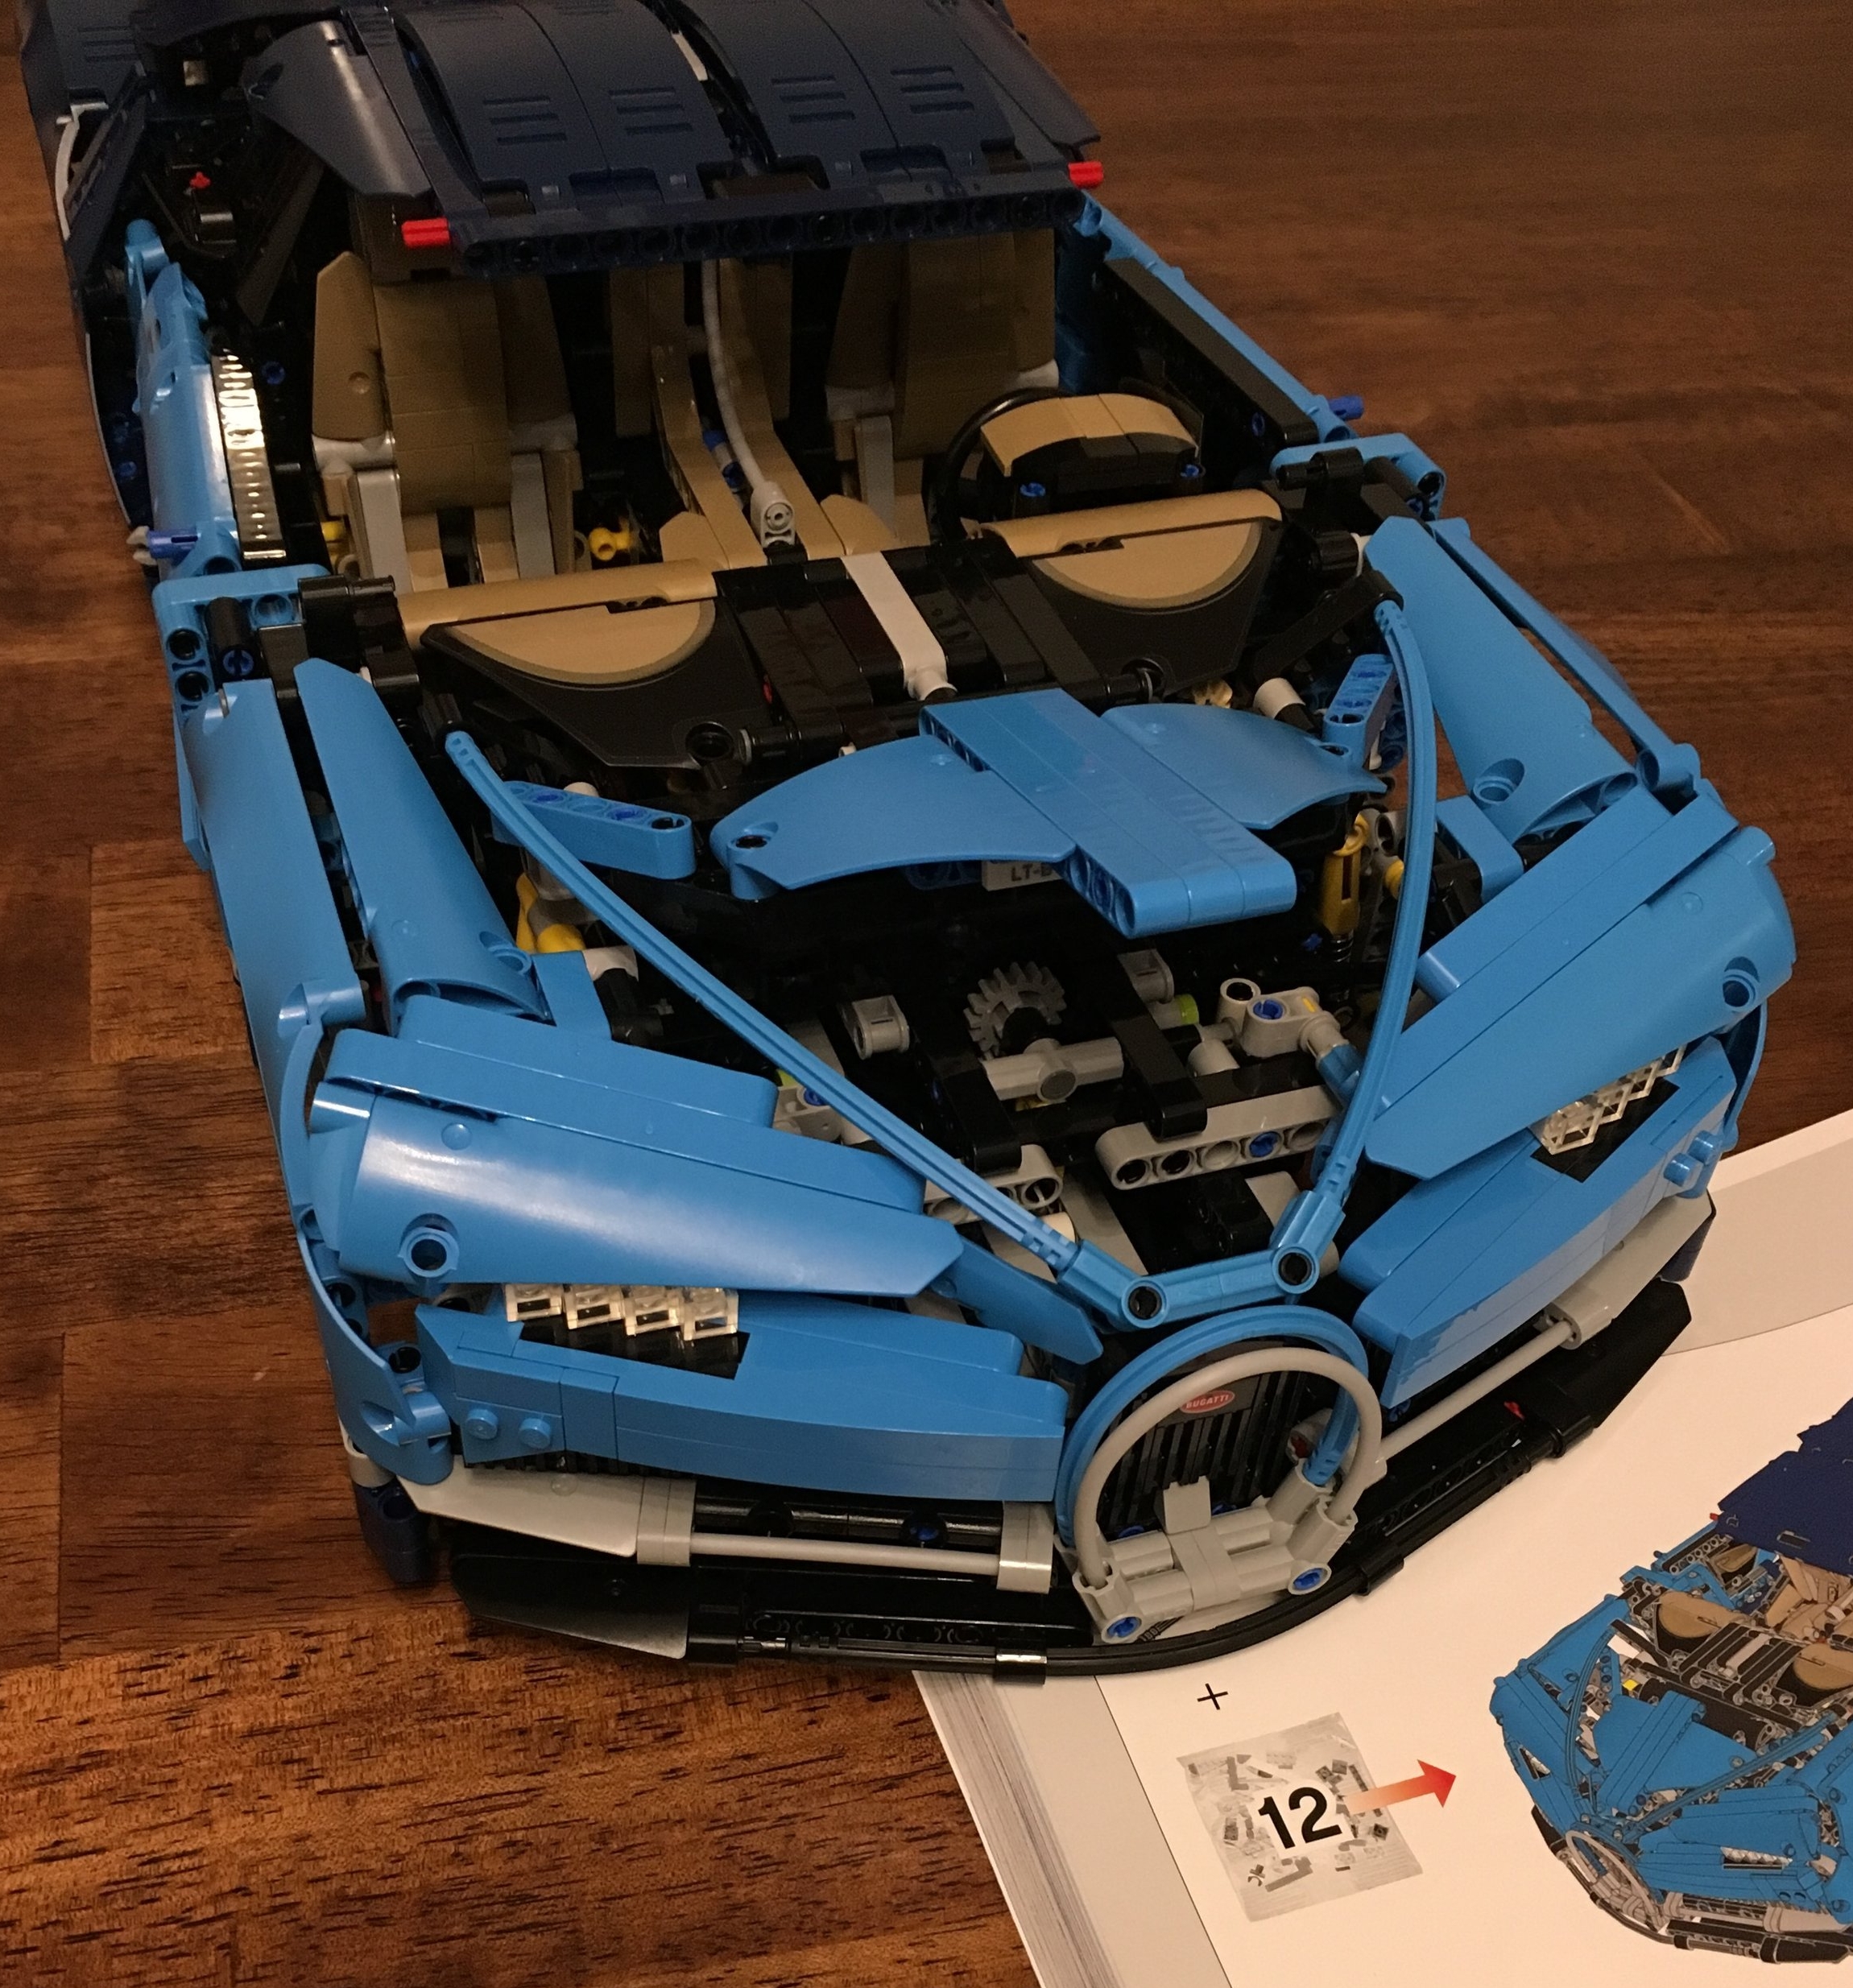
Bags 11 and 12 start on page 200. This section is labeled front body, lights, and horseshoe grill. Bag 11 is mainly the doors, but there are a few details to build up the front of the car. Bag 12 is the details on the front to include the front hood (and storage area), the bumper, the grill design, and the lights. There are a lot of System pieces used in the front to include the bumper and lights. The detailing is pretty impressive between the Technic and System pieces. It still has the Technic look without windows and with the various spots for pin attachments, but it still captures the sleek look of the actual car.

42083_bag11.jpg
42083_bag12.jpg

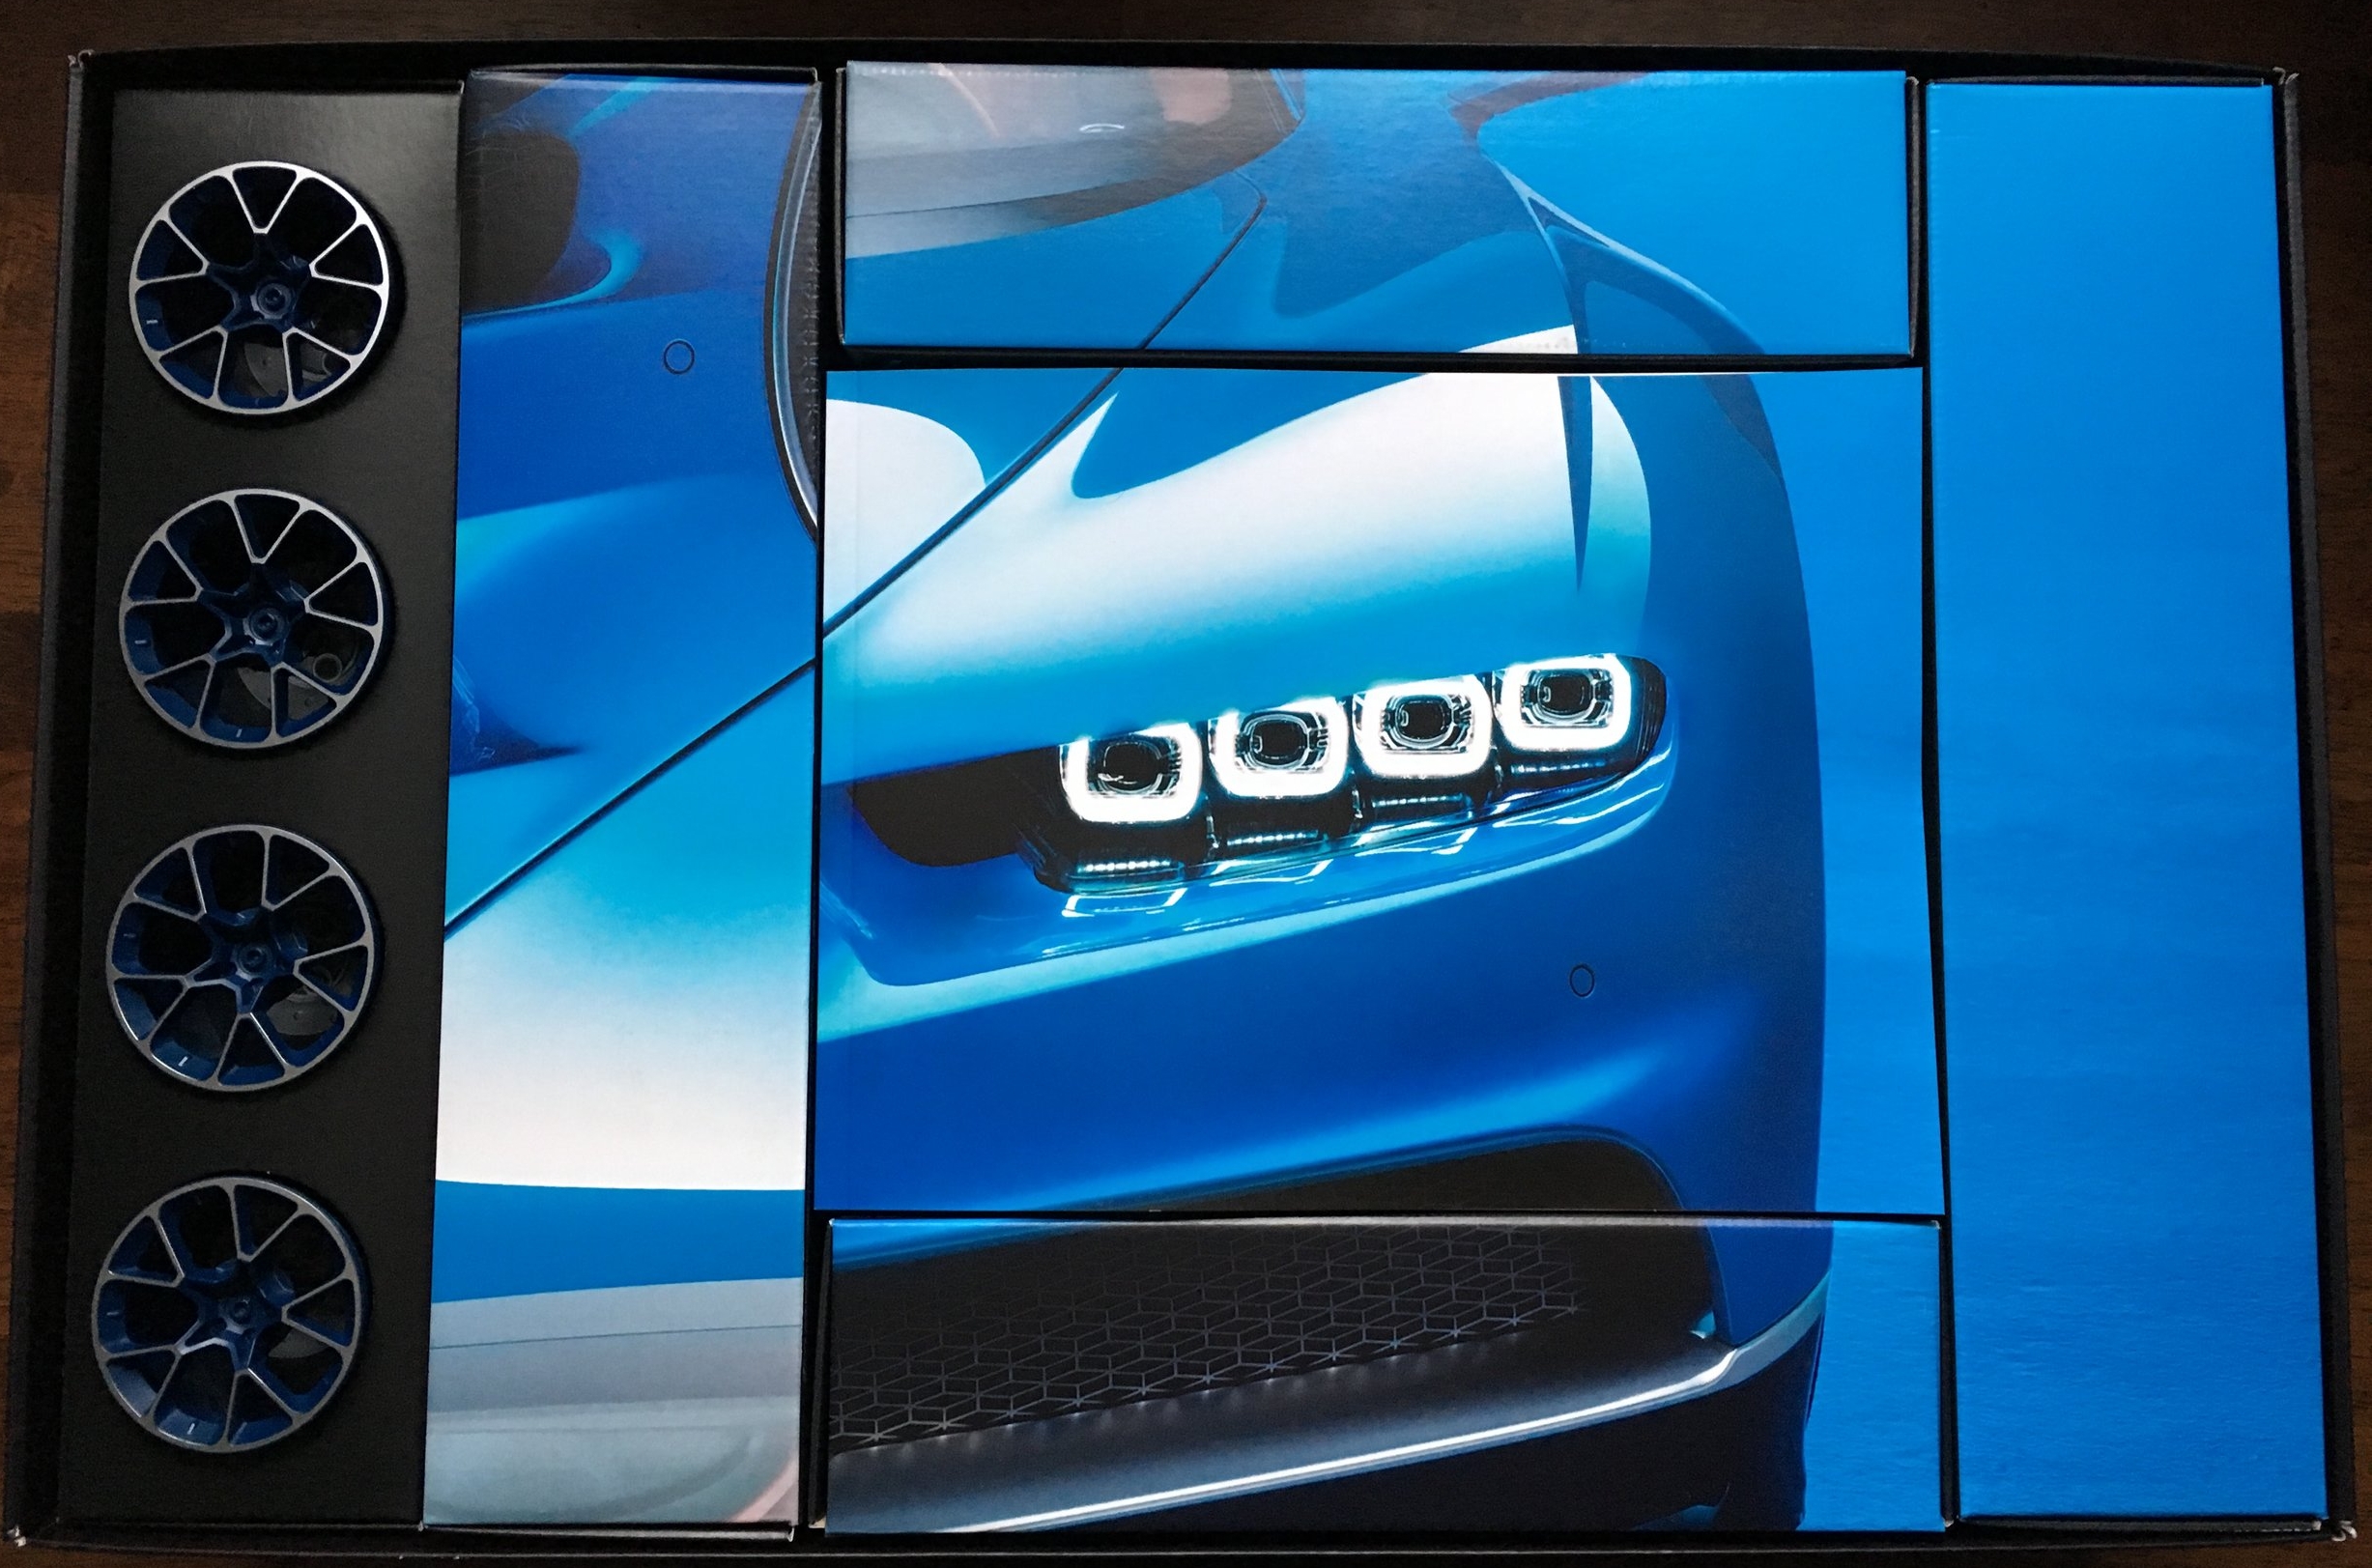
Bag 13 finishes everything up with the final details, the key to raise and lower the spoiler, and much like the Porsche (#42056-1) a handbag to stick in the trunk. It completes a few details to include a lot of the long, thin tubes that help create some of the contours on the car. The instructions for bag 13 also include the wheels and rims. The rims have a 1x1 round tile with the Bugatti logo on them and thankfully that was not a sticker. You even get an extra one (not sure what I’ll do with it).

The end of the instructions give you a link to go to and put in the code on the 1x4 tile that identifies your car. Similar to #42056-1, they have some free content. I have yet to go and see what it is, but #42056-1 had some cool graphics, a certificate of ownership, and some high resolution photos of the vehicle as well. If I ever have my own brick cave someday, maybe I’ll have to print a few of these up.

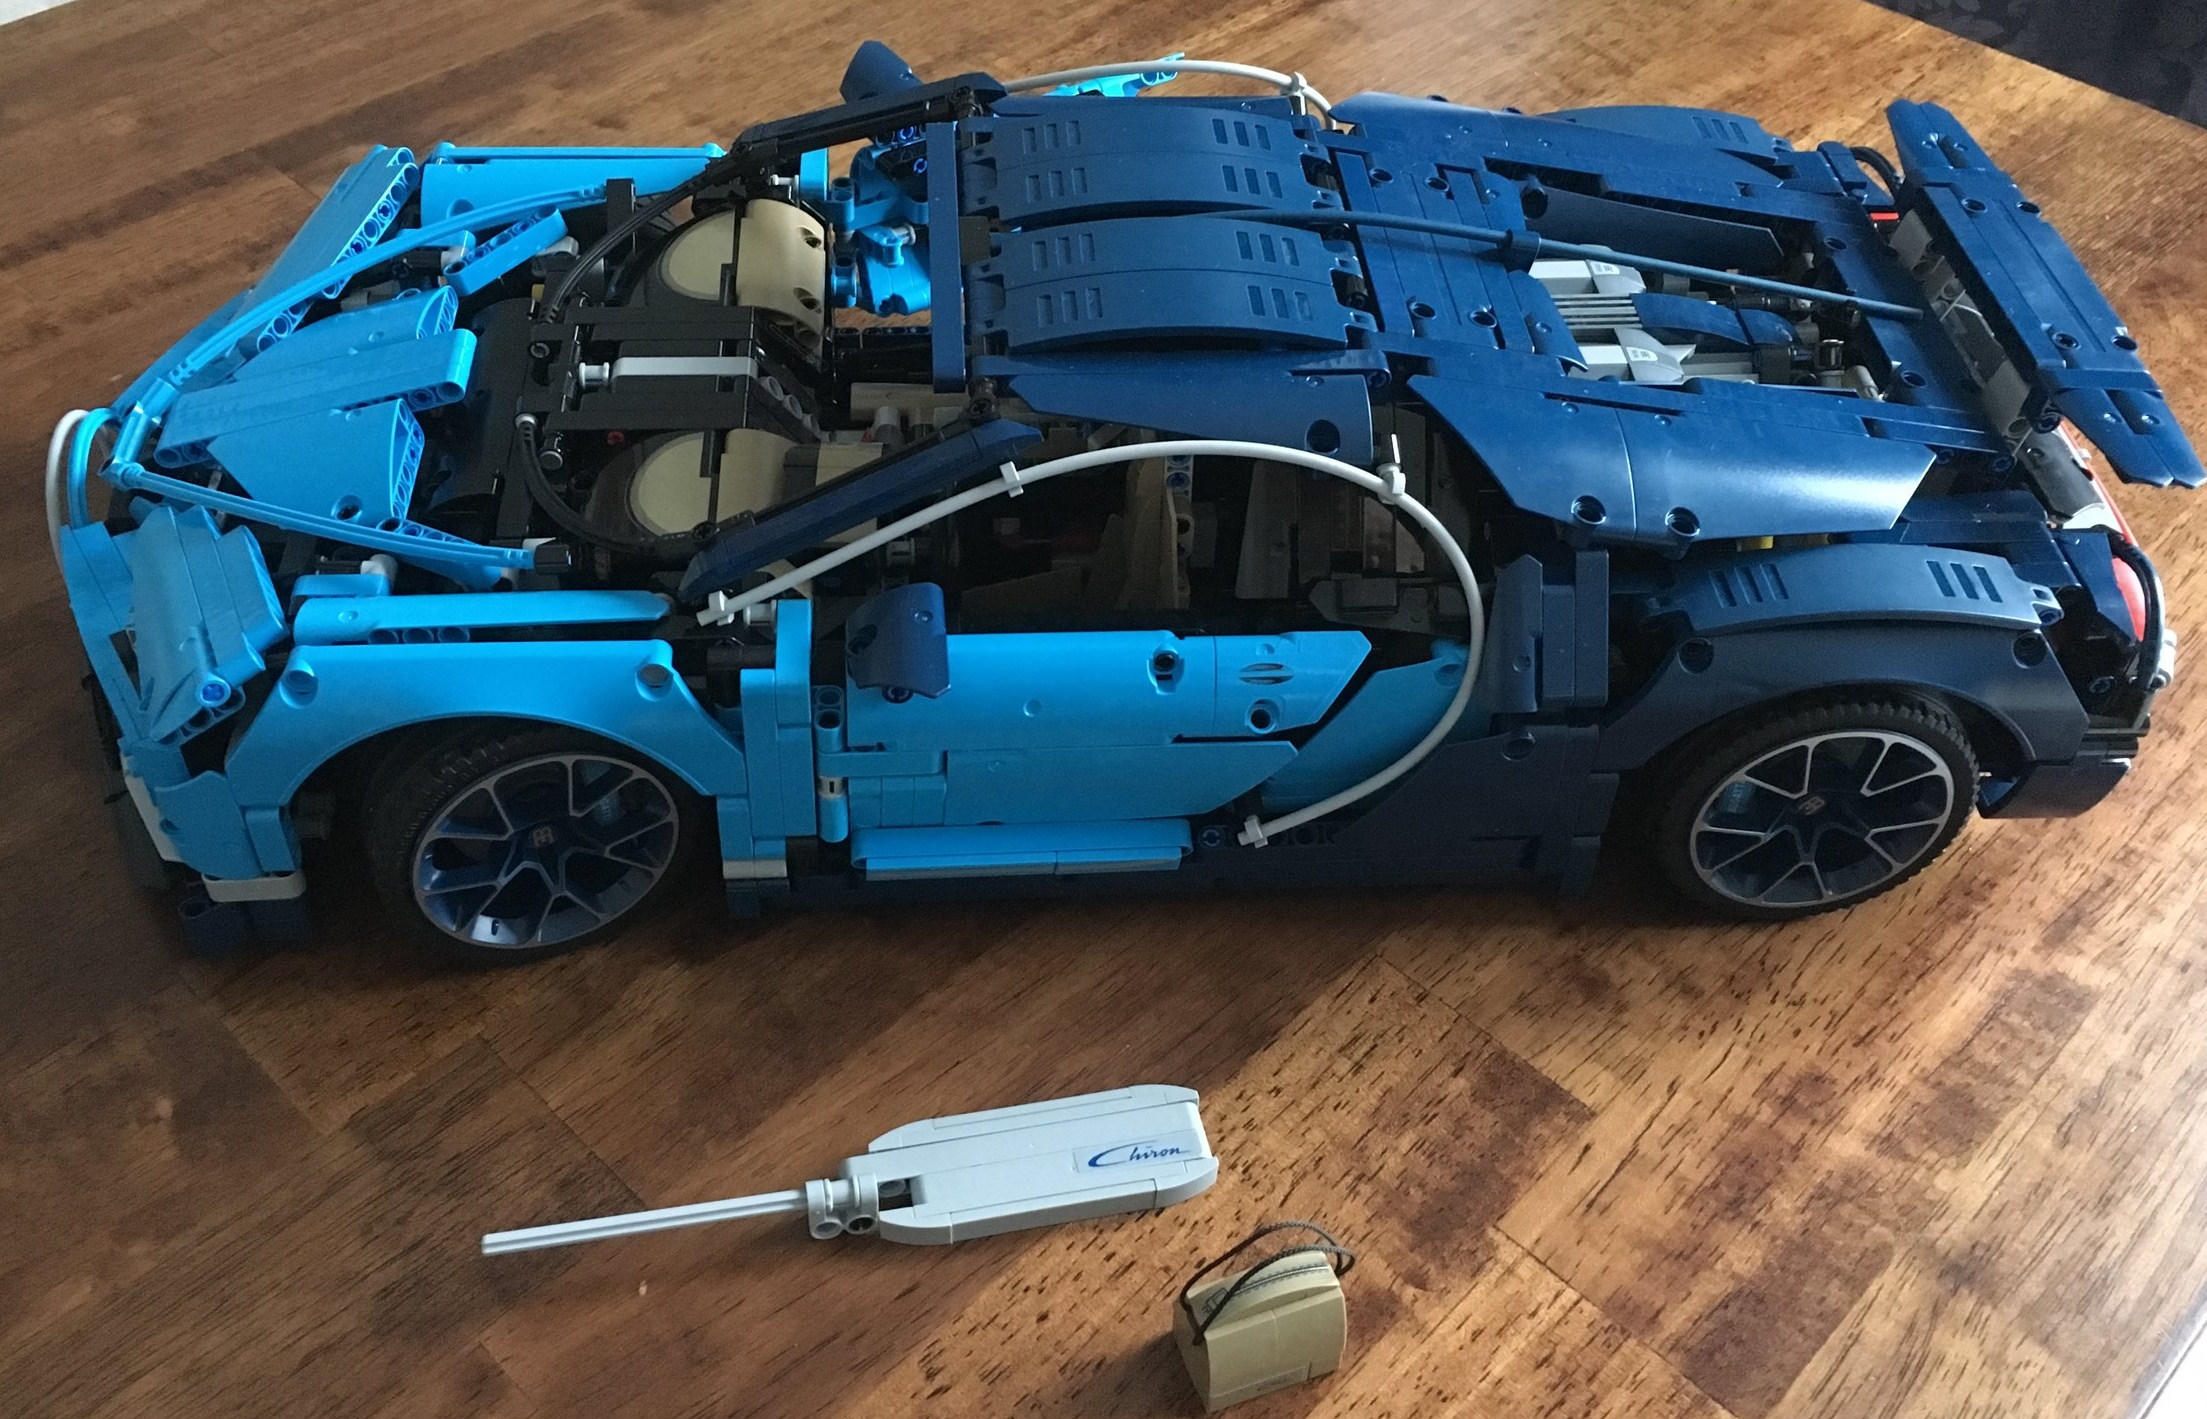
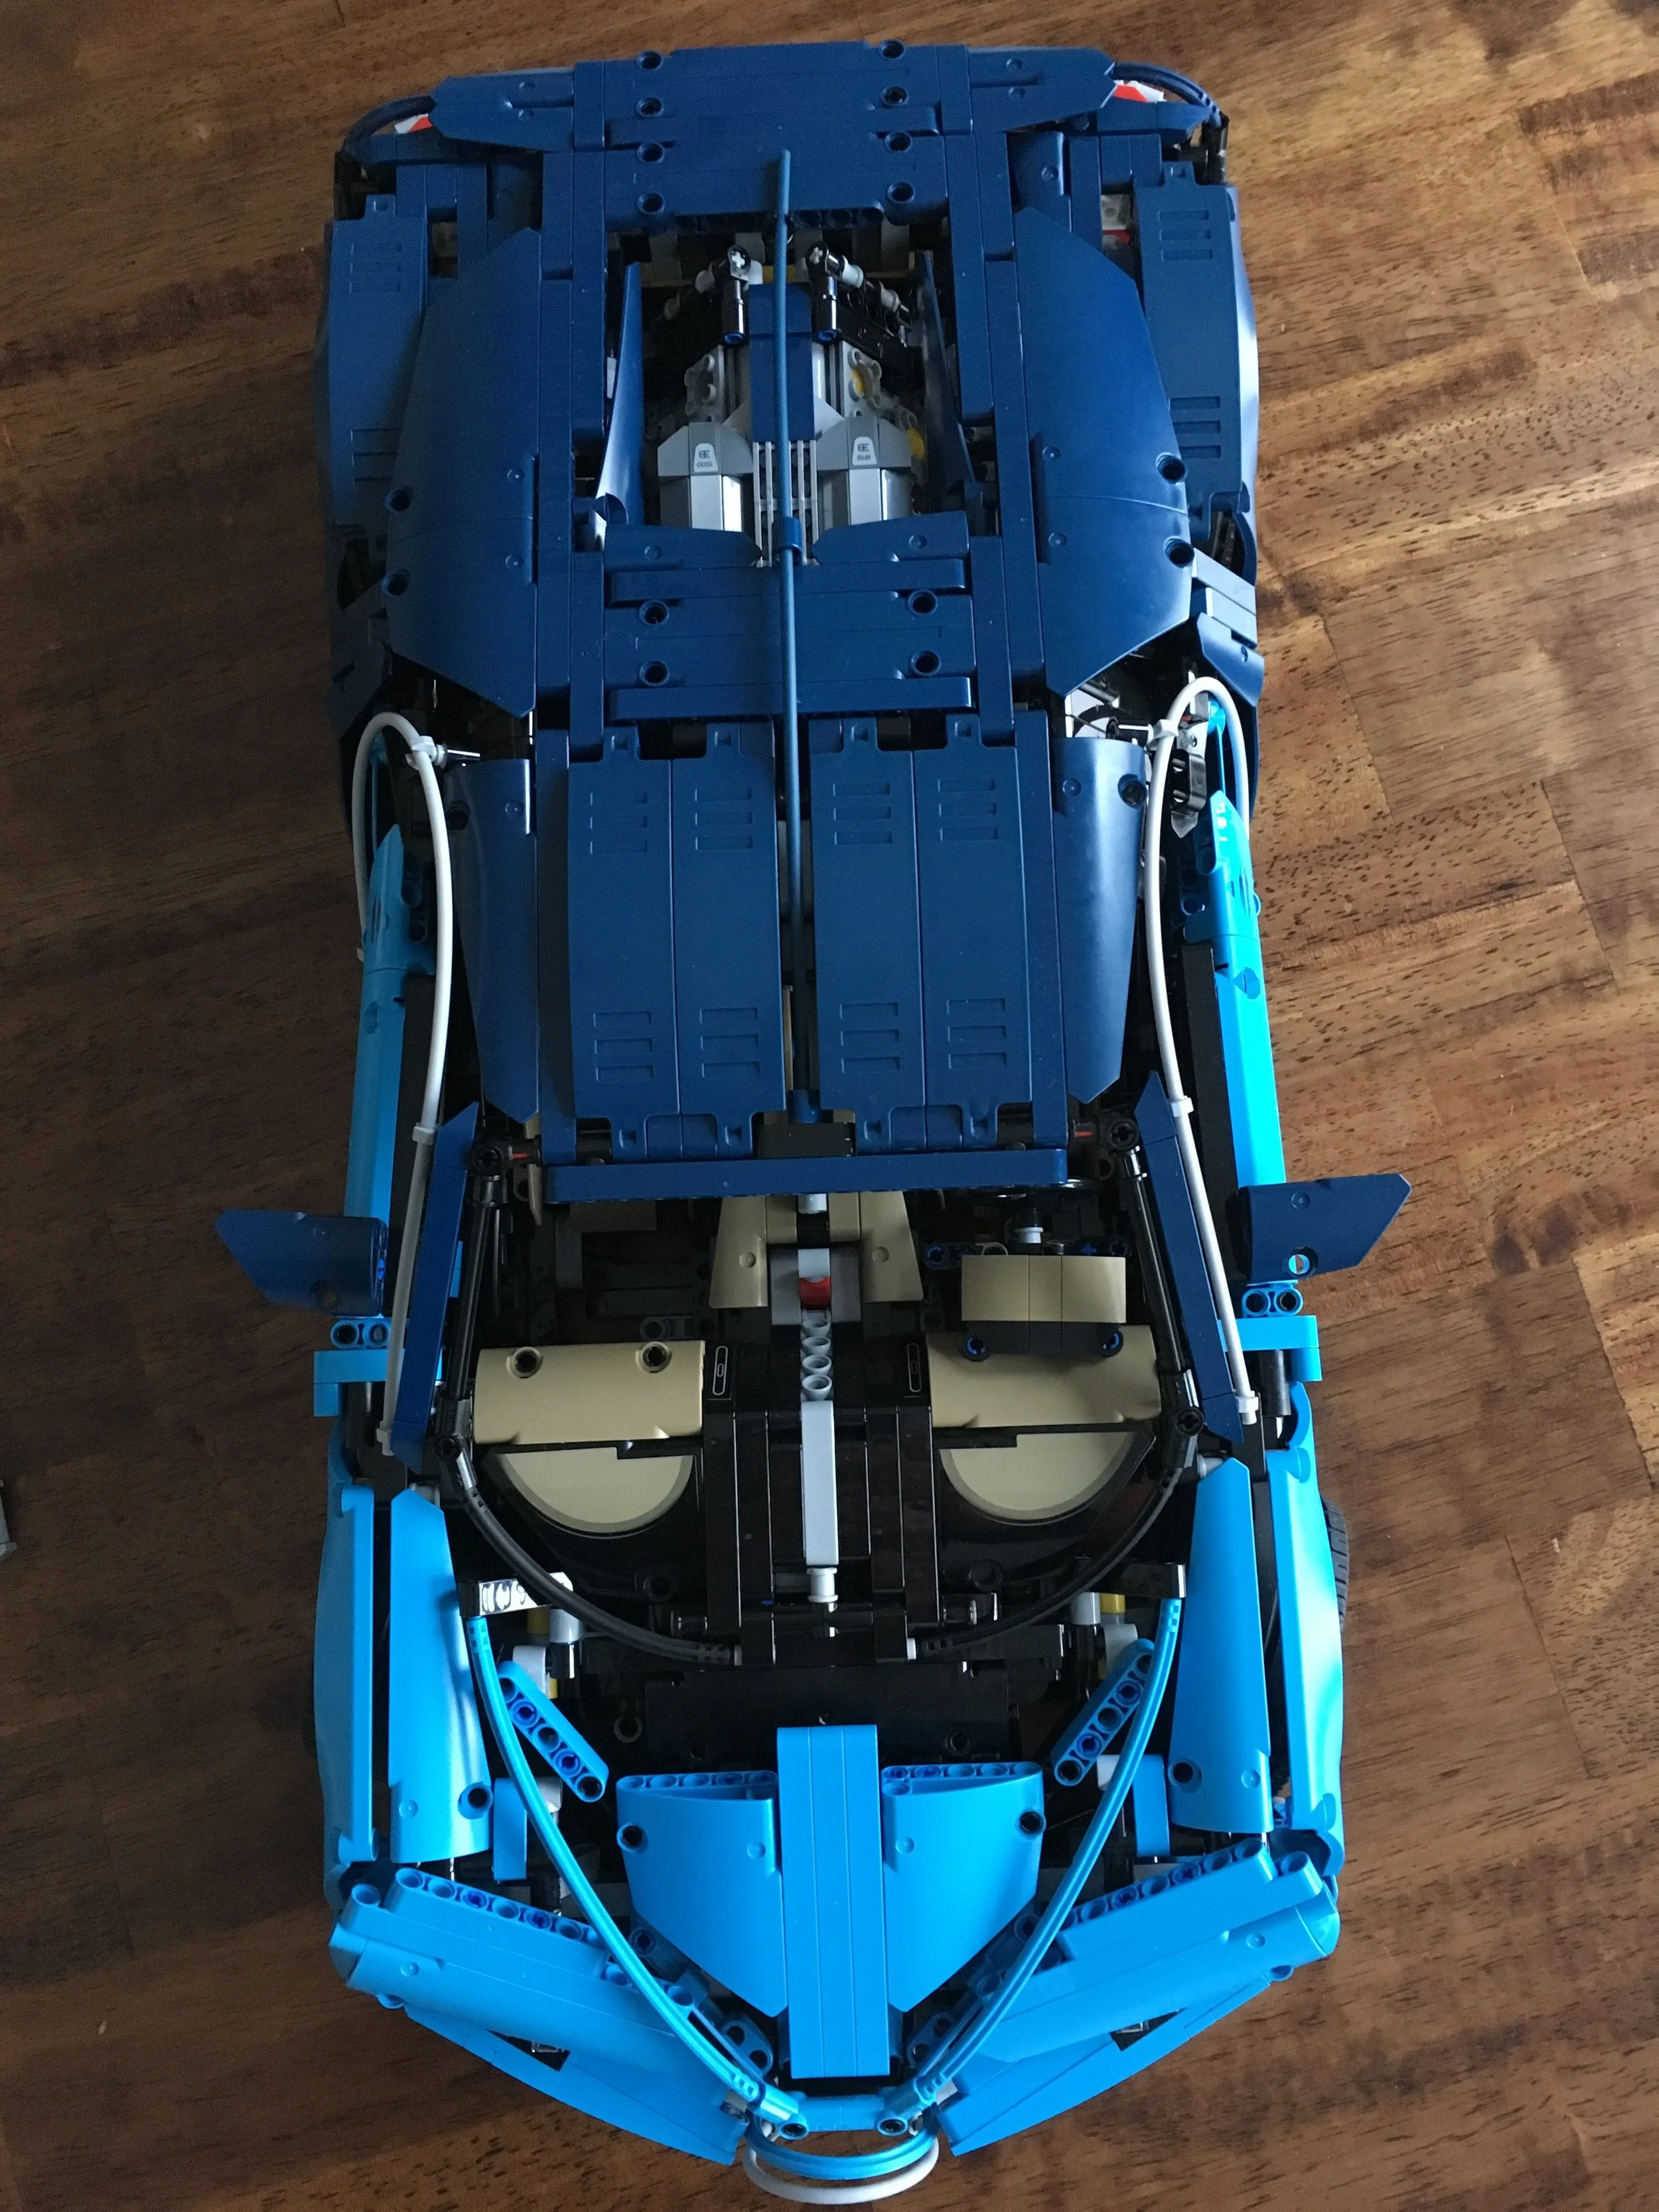
Here’s a top view of the car and then a view of the front with the hood open and the bag sitting next to it. The bag is made of all System pieces versus the Technic style bag of #42056-1.

42083_top.jpg
42083_hood.jpg

Here is a good look at the front to include the horseshoe grill and the lights. Also a view inside the car by the driver’s seat. With my smartphone and poor lighting, you can’t see all the details, but you can see the main details: steering wheel, dashboard with various dials, paddle shifters, and shifter.

42083_front.jpg
42083_inside.jpg

Finally, here’s the back. After seeing the real car, I think the designers did a great job getting it accurate. The first picture is with the spoiler down and the second is with it up and the key still in. The key goes into a small hole behind the driver’s side rear tire. I have yet to be able to do it without peering in to try and find it. The design is impressive as it locks in the up position as well.

42083_back1.jpg
42083_back2.jpg

So the final verdict… I had a blast building it. The design is sleek and very sturdy. It’s very impressive. Unfortunately it is very expensive! I used a gift certificate, but even with that it was still high. I hit a double VIP point day so that helped some, but yikes. LEGO keeps testing the boundaries on price and it’ll be interesting to see where they finally break their fan base. While it’s a great set and I hope LEGO continues this series, I would like to see the price go back to under $300 similar to #42056-1.

What are your thoughts on this one? Too expensive? Priced right for the build?

Happy building!

42083_final.jpg

The Bugatti Chiron in the Wild...

In case you didn’t see my last post, I’m in the process of building the LEGO Technic #42083-1 Bugatti Chiron. With that being said, I was walking down the street last week and a car caught my eye. It looked very familiar to a Bugatti Chiron, but I figured it couldn’t be. Most people don’t just park their $2.5M+ car right there on the street. I had to go over and take a look.

Chiron1.jpg

Okay, maybe I should be a little more specific. If you’ve read the blog, you know that my non-Lego job has taken me to Germany so I had to shut down sales. Living in Europe, my family has done some traveling and recently we took a couple days to go to the Alsace region of France. While there, we stopped in Strasbourg for the Christmas Market (if you’re an American and you celebrate Christmas and you have never been to a true European Christmas Market, they are pretty cool). Strasbourg happens to be near Molsheim, France (about 20 minutes away) and Molsheim is where the Bugatti factory is located.

Back to the car… no it wasn’t just sitting there. It was in a glass enclosed case and there was a security guard outside as well. None the less, it was still the real deal. I never thought I would see a Bugatti Chiron up close and personal or at least as close as the glass would let me. I talked to our host at the B&B we stayed at and he said Bugatti factory tours are only available for car buyers and friends of workers. Good luck getting to see inside the factory.

Back to the car… Next to the car was a sign.

Chiron_sign.jpg

The sign is in French on the left, German in the middle, and English on the right. In case you can’t read the picture I posted, it reads:

“We are proud of our company roots in Molsheim, about 25 km away from Strasbourg,
where our headquarters are still today.

In 1909 Ettore Bugatti founded our company here in Alsace, and to this day Bugatti
represents the pinnacle of the automotive world.

Like the Strasbourg Christmas market we combine tradition with a clear vision.

All qualities and know-how of our company accumulated in 110 years of our existence are
contained in each and every one of the only 500 BUGATTI CHIRON going to be built..”

The sign then gives some of the stats on the vehicle.

Engine:
-8 Litre 16-Cylinder-engine
-4 turbochargers with Bugatti 2-stage turbocharging

Power:
1,500 HP (6,700 U/min)

Torque:
1,600 Nm (2,000 - 6,000 U/min)

Acceleration:
0 - 100km/h 2.4 sec (that’s roughly 0 to 60 mph)
0 - 400 km/h 32.6 sec (that’s roughly 0 to ~250 mph)

Vmax:
420 hm/h (electronically limited) (or around 260 mph)

Enough blabbing, here are a few more pics of the car. The front was white and the back was a navy blue or darker blue type color. The blue color looks similar to the blue of the LEGO version.

Chron_2.jpg
Chiron4.jpg
Chiron6.jpg
Chiron3.jpg
Chiron5.jpg

So I wouldn’t be interested in this vehicle if it weren’t for the LEGO version. I’m not a gear head, but I’m a huge fan now that I have a LEGO version and was super excited to actually see one of these.

But that’s not all…

If you purchased the set you saw this picture in the instruction manual.

42083_instructions.jpg

It’s a picture of the actual car and the LEGO version with an offset in front of the Château St. Jean in Molsheim, France.

On our drive home from the Strasbourg area, I was conversing with my Non-LEGO Spouse (NLS) and talking about Bugatti and how the plant was nearby somewhere. Using the power of the internet she looked it up and told me it was about 2 minutes away. So we came upon a traffic circle, I went straight instead of turning and…

Chateau_St_Jean.jpg

Tah-dah! Okay, we had to take a few passes to get the picture just so, but thankfully it was a Sunday and there wasn’t a lot of traffic. So there’s the full building. Just no cars in front.

Here’s a sign near the Château.

Bugatti_sign1.jpg

We figured the factory had to be close by and sure enough it was. We hit a traffic circle and took a different exit and saw the factory. It’s not very big although if you’re only building 500 of a vehicle and you probably take your time building it, you don’t need a big facility. We didn’t take pictures of the signs in French telling us it was private property and to not trespass. We just took our pictures and turned around. My NLS questioned why the workers didn’t have better cars. My guess is the employee discount doesn’t take much off the $2.5M price tag.

Bugatti_sign2.jpg
Bugatti_factory2.jpg

Hope you enjoyed some additional info on the Bugatti Chiron. I don’t think I’ve seen a set review or LEGO blog yet that showed pictures of the actual car or the factory. I’ll claim to be the first to include pictures of both in a LEGO review.

Happy building!

Set Review - #42083-1 - Bugatti Chiron - TECHNIC - PART 1

My guess is most people who are into LEGO and reading this blog are not able to throw down $2.5 million for a Bugatti Chiron, but thankfully LEGO came to our rescue and built a much cheaper version. Following the 2016 release of the Porsche 911 GT3 RS on the LEGO Technic line, LEGO released the Bugatti Chiron on 2 June 2018. Retail price in the US is $349.99 or $0.097 per piece. Opportunities for sales were limited on the Porsche. It just retired and I saw it on Amazon.com for 20% off for less than a day. Using VIP points to get a discount is one of the best ways to pay less for this set at this point. While it’s not $2.5M, $350 is kind of hefty for the LEGO world.

This set came with a lot of fanfare from LEGO. The lead up to its release included a number of teaser videos and trailers along with a countdown clock. After it was finally released, the videos didn’t stop. Here are a few you might want to check out if you didn’t get to see them:

LEGO builds a full scale Bugatti Chiron

LEGO shows off the build and its functions

Kicking off the review, the Bugatti Chiron is shipped in its own box inside of a box when you order it from Shop @ Home. While this method is probably more costly, I like that when you spend a bit of money, they take the time to make sure your set arrives in good condition. From the label on the box, my version was manufactured in October 2018 in Mexico. I ordered it during the double VIP points weekend in October 2018 so not bad timing for LEGO’s supply chain.

42083_shipping.jpg
42083_image_tag.jpg

The set box itself is very flashy with a front view of the car on the top of the box and a back few of the car on the bottom with a few detailed pictures on the bottom as well.

42083_boxfront.jpg
42083_boxback.jpg

Similar to the Porsche 911 GT3 RS (#42056-1), When you open the box up, there are parts boxes. Unlike the Porsche set, this one has the boxes and instruction booklet creating a picture of the car. Props to the designers on this one. There are 6 parts boxes, 2 instruction booklets, and a sticker sheet. Each box is numbered. The instruction books show what box of parts you are on based on what page you are on. It does not list what parts bag set you are on though so if you’re like me and you build in spurts, you have to search for where you left off. Book 1 is 305 pages long. It includes some snazzy pictures of the LEGO design and of the actual car model. It also mentions that there is a podcast you can listen to while building the set. I did not do that so if anyone else did, let me know what you thought of it.

42083_box_inside.jpg
42083_contents1.jpg

Book 1, box 1 starts off with page 21 that says you will be building the engine and gearbox first. pages 22 and 23 show where you’ll be when finished with that section and there is a picture of what I presume is an engine and gearbox in the background. I won’t go too much into the details of the build other than to say when you’re used to building the LEGO System pieces and the last Technic build you did was over 2 years ago, it is a bit of a challenge (for me). I’ve definitely had to take my time as I’m not used to looking at instructions with the various Technic pieces.

Below are pictures of where you are at the end of each build. So all of the bags numbered 1, then numbered 2, and so on.

42083_bag1.jpg
42083_bag2.jpg

Here are bag sets 3 and 4. Number 3 finishes off the engine in the back of the car. It’s a very impressive design job too! They fit a lot in a small space. Number 4 starts on the front of the car to include the steering column.

42083_bag3.jpg
42083_bag4.jpg

On page 138 is labeled “The Marriage Process.” The book mentions that this is the way that the actual Chiron is built in that the front and back are assembled and then they join the two together. This section starts with set of bags number 4, the marriage process actually happens in number 6. Bags labeled #5 finish up the front of the car and some of the frame. I included my build and the picture on pages 140 and 141 of the set designer (Aurélien Rouffiange) merging the 2 sections of the build. Hopefully I built mine correctly.

42083_bag5.jpg
42083_bag6.jpg

I spent 5 posts on the Porsche (#42056-1) and I thought it was a bit much. My goal for this one is to give a quick overview instead of making you go through 5 pages of how great the build was.

With book one being complete, I figured it was a good time to post where I’m at. So far, I’m very impressed by the Bugatti Chiron. LEGO raised the bar with the Porsche 911 GT3 RS and they did it again with the Chiron. The box design and layout are impressive, the details inside the instruction book about the car and the set are cool, having the option to listen to a podcast about the project is an added bonus, and in general the build is very impressive in terms of functionality and matching what the actual car is like. While I had a gift card and purchased during a double VIP point period, at this point I say that it was a good purchase. It has definitely been worth my time and the funds I spent.

Stay turned for part 2